Duodeal user guide
Welcome! This guide explains everything you can do with Duodeal: create deals, build beautiful sales proposals, share them with your clients, track their interest in real time and get them signed online.
Duodeal in one sentence: instead of sending a static PDF quote, you send your client an interactive web page. You then see when they open it and how long they spend on it; they can choose their options, comment and sign directly online.
How to read this guide: every feature is presented the same way — what it does, how to use it, and what you need to know. You can read the guide from start to finish or jump straight to the section you need. The screenshots were taken in the app on 21 October 2026, on a demo account: the companies and people shown are fictional.
1. Getting to know the interface
The main screen
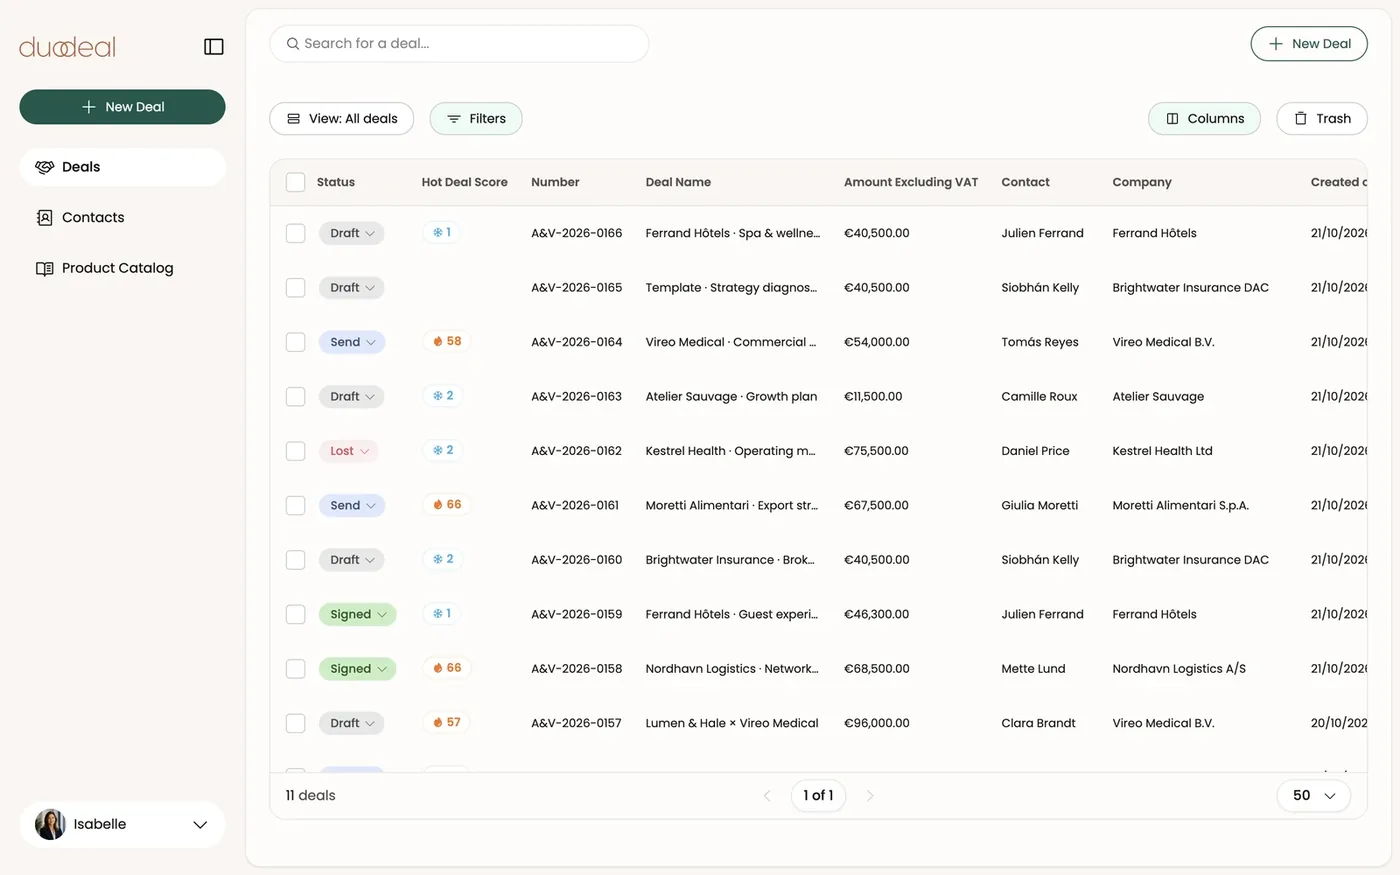
What it does Every screen in Duodeal is laid out the same way, so you never feel lost:
- on the left, the sidebar: the main menu and, at the very bottom, your profile;
- at the top, the search field and the primary action button;
- in the center, the content of the current screen, shown in a large card on a cream background.
The sidebar (main menu)
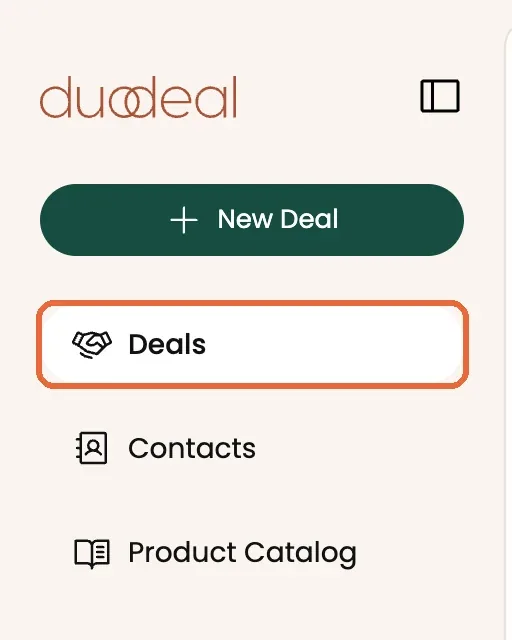
What it does This is your starting point for moving between the app's main sections:
- Deals: the list of all your deals;
- Contacts: your contacts and their companies;
- Product Catalog: your catalog of products and services.
The section you're in is highlighted.
How to use it
- Click a menu entry to switch sections.
- The New Deal button, right below the logo, creates a new deal at any time (see section 2).
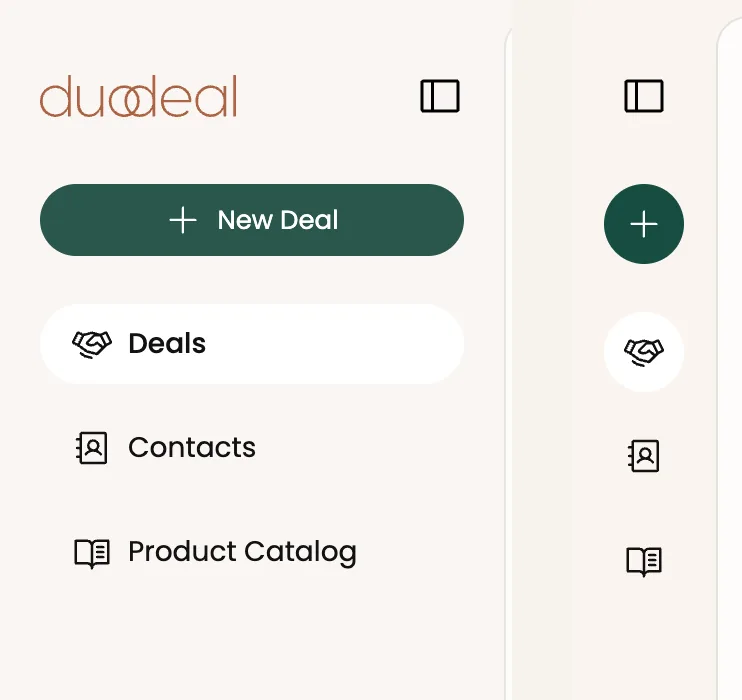
- The icon next to the logo collapses the sidebar into a simple rail of icons, to free up space. Click it again to expand it.
Good to know
- Your choice (collapsed or expanded) is remembered.
- When the sidebar is collapsed, the "New Deal" button becomes a simple "+".
- Menu entries depend on your permissions: if your role doesn't give you access to a section, it doesn't appear.
Your profile and the user menu
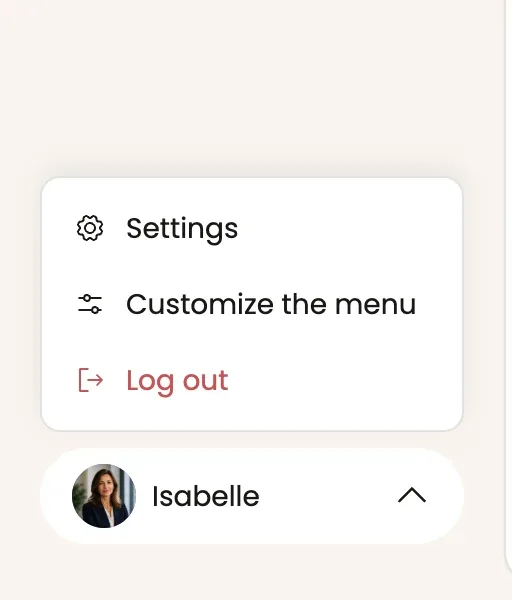
What it does At the bottom of the sidebar, the row with your photo and first name opens the user menu, upwards:
- Settings: the settings (see section 10);
- Customize the menu: customize your main menu (see below);
- Log out.
Customizing the main menu
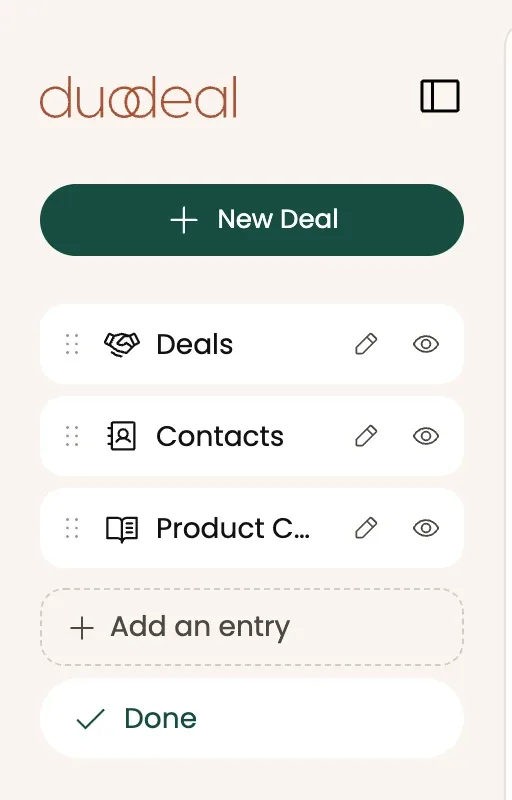
What it does Adapt the menu to the way you work: rename or hide tabs, reorder them, and add your own shortcuts (a web link or one of your saved views).
How to use it
- User menu → Customize the menu. The menu switches to edit mode.
- On each entry: the pencil renames it, the eye hides it, and the ⠿ handle lets you drag it to change the order.
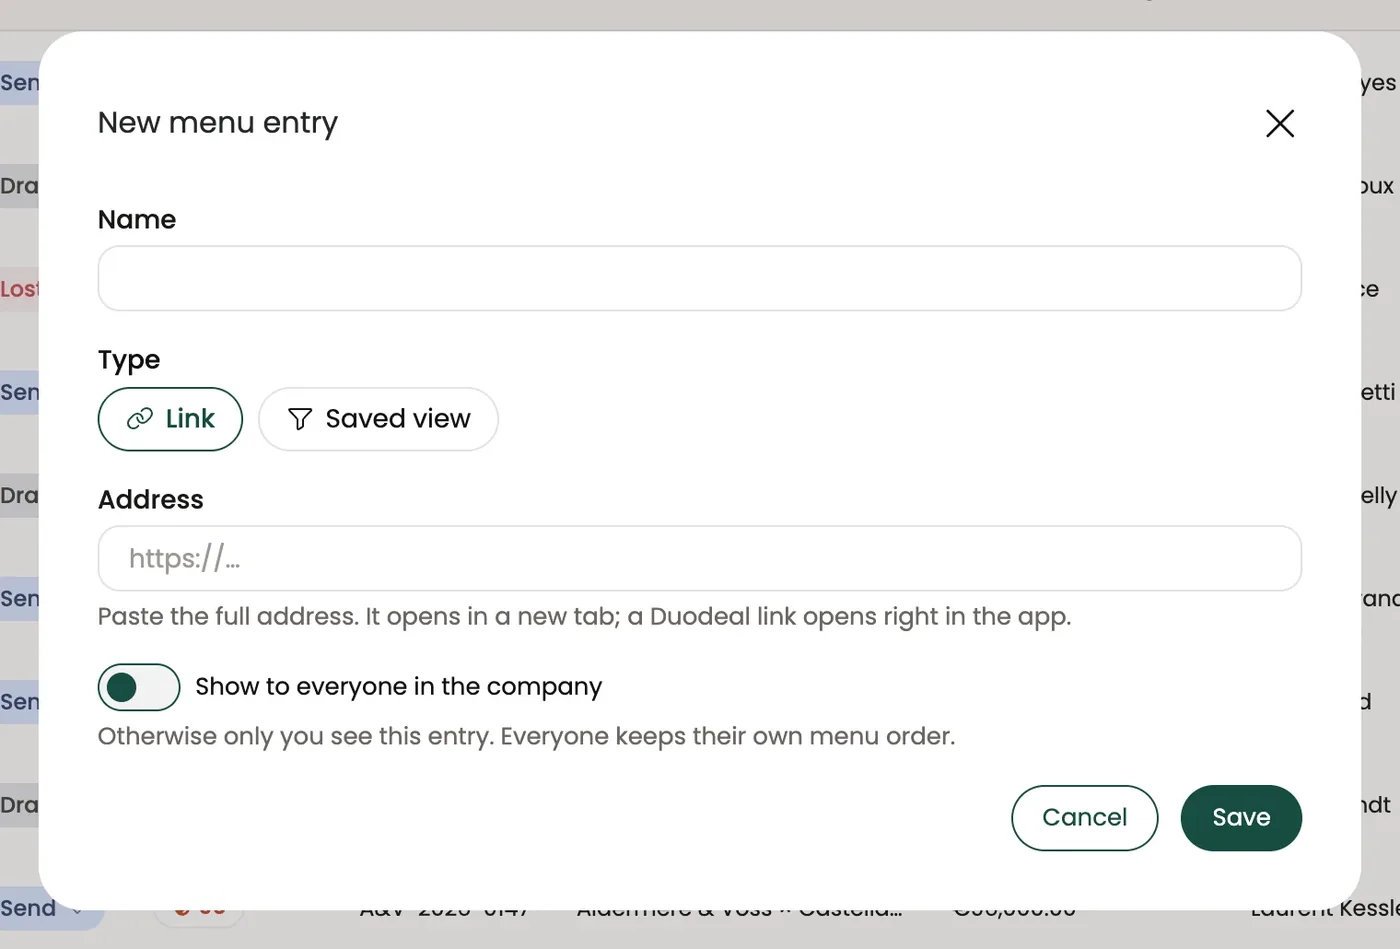
- Add an entry adds an entry: give it a name, choose its type — Link (a web address) or Saved view (one of your saved deal list views) — and decide whether everyone in the company sees it (Show to everyone in the company) or only you.
- Click Done when you're finished.
Good to know
- The order, names and hidden tabs are specific to each user.
- A link to an external page opens in a new tab; a Duodeal link opens right in the app.
- A "saved view" entry opens the deal list directly on that view.
- If Duodeal has enabled connected apps for your company, they appear in the menu automatically, with their icon. You can move them, but not edit or delete them.
Search
What it does The search field at the top left quickly finds an item on the current screen: a deal on the Deals page, a contact on the Contacts page, a product on the Products page.

How to use it Type at least 3 characters: the list filters automatically.
Good to know Search only covers the page you're on — it isn't a global search.
The primary action button
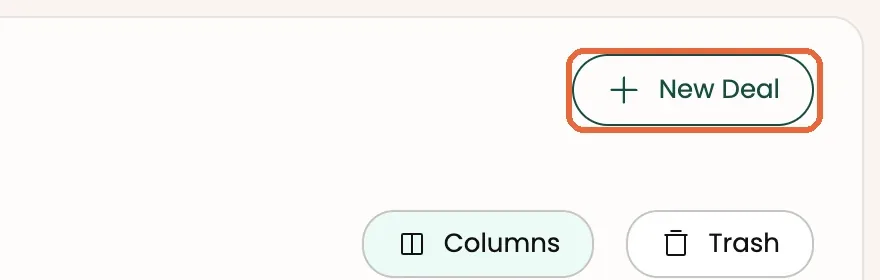
What it does At the top right, a button always offers the most useful creation action for the current screen: "New Deal" on deals, "Add Contact" on contacts, "Add Company" on companies, "Add Product" on products.
2. Creating a deal
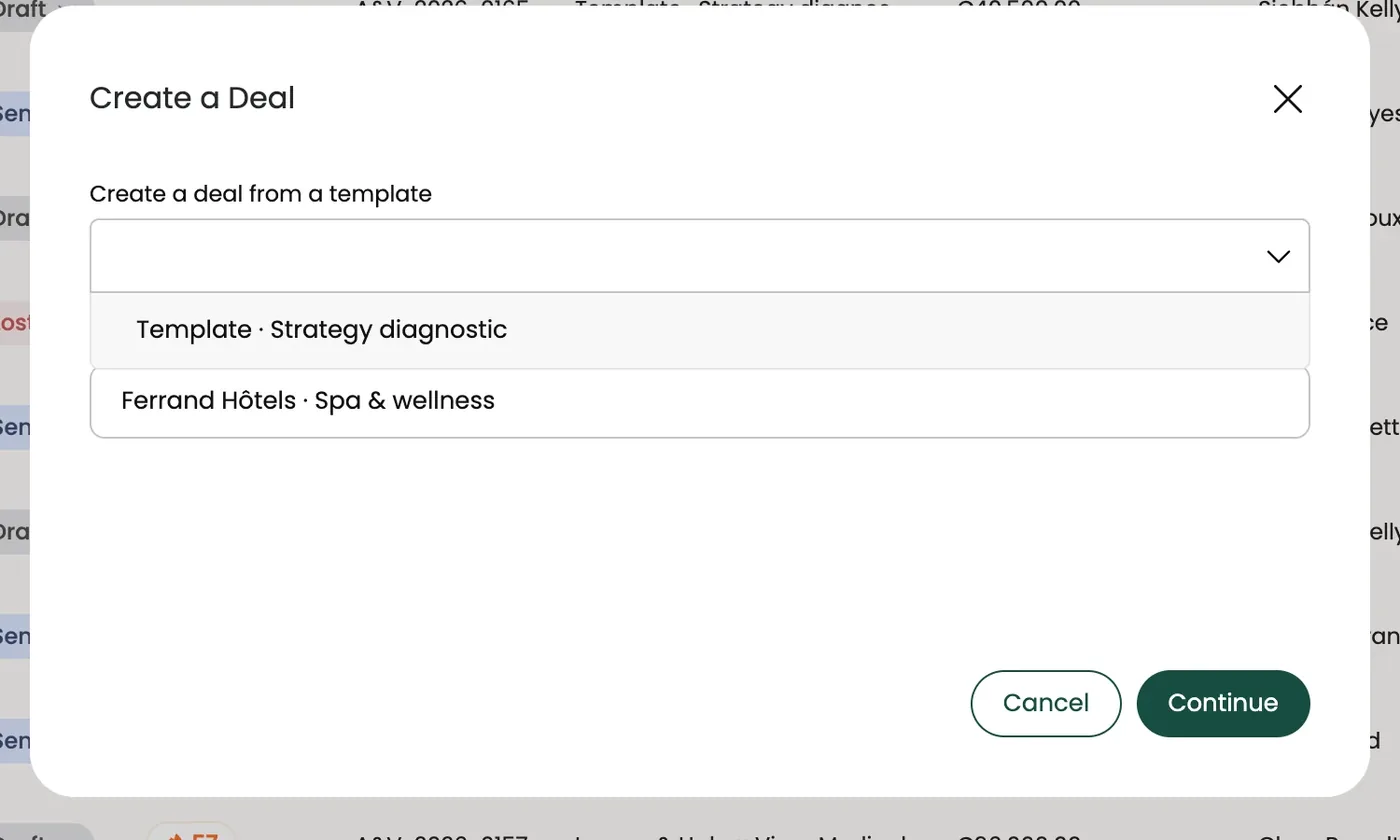
The "Create a Deal" window
What it does This is where everything starts: a deal represents a sales opportunity with a client. It will contain one or more proposals (quotes) that you then build.
How to use it
- Click New Deal (in the sidebar, or at the top right of the Deals page).
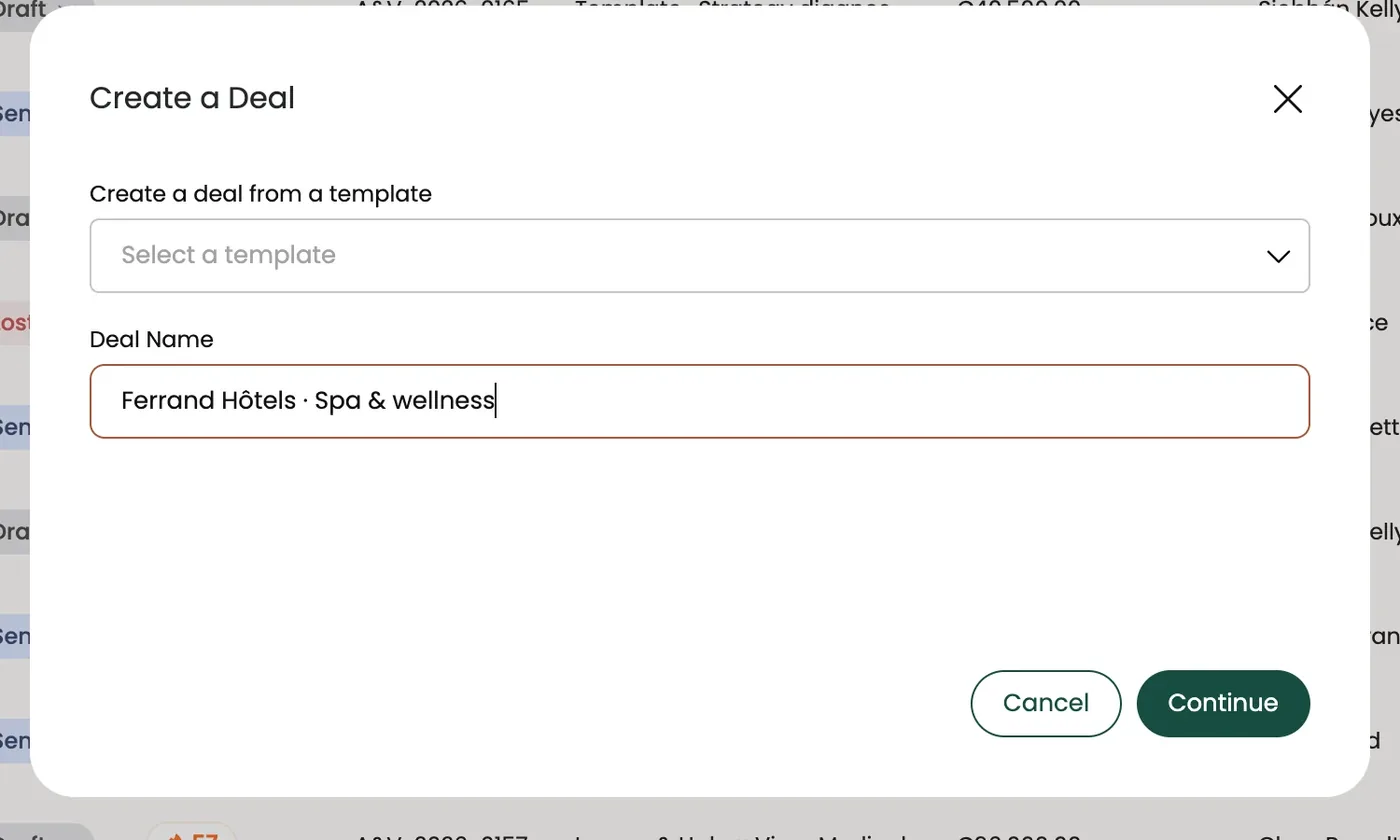
- A window opens with two fields:
- Create a deal from a template: choose a template if you want to start from a prepared deal (optional);
- Deal Name: the name of your deal (for example "Ferrand Hôtels · Spa & wellness").
- Click Continue: the deal is created and the editor opens straight away.
Good to know
- Cancel closes the window without creating anything.
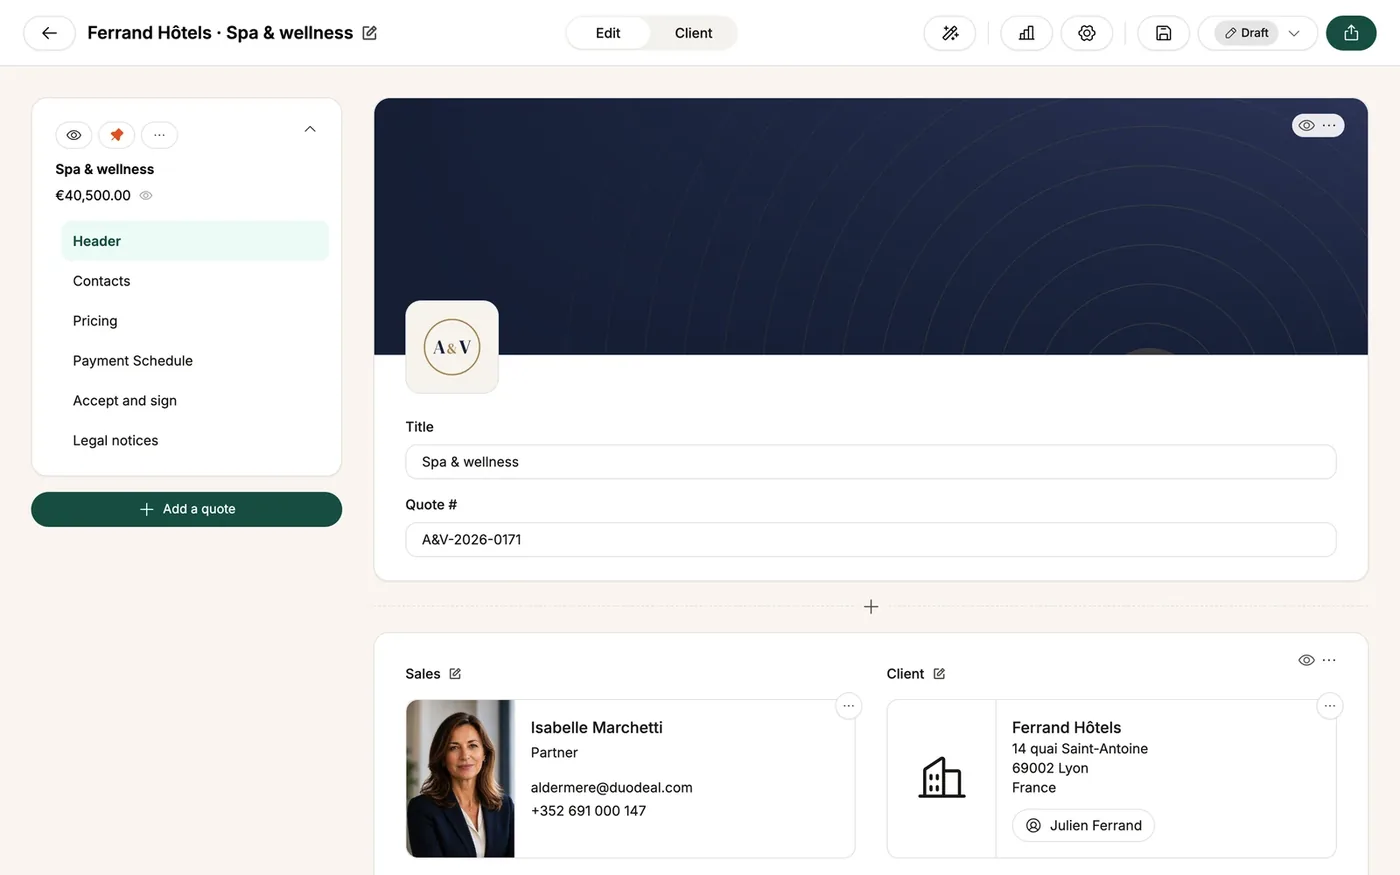
- A deal created without a template starts with three blocks already in place: the header, the contacts and the pricing table.
- A deal created from a template copies all of the template's content and opens in the editor, just like a blank deal.
- Only active templates (not in the trash) appear in the list. To create a template, turn on Save as template in a deal's settings (see section 4).
3. Managing your deals (the list)
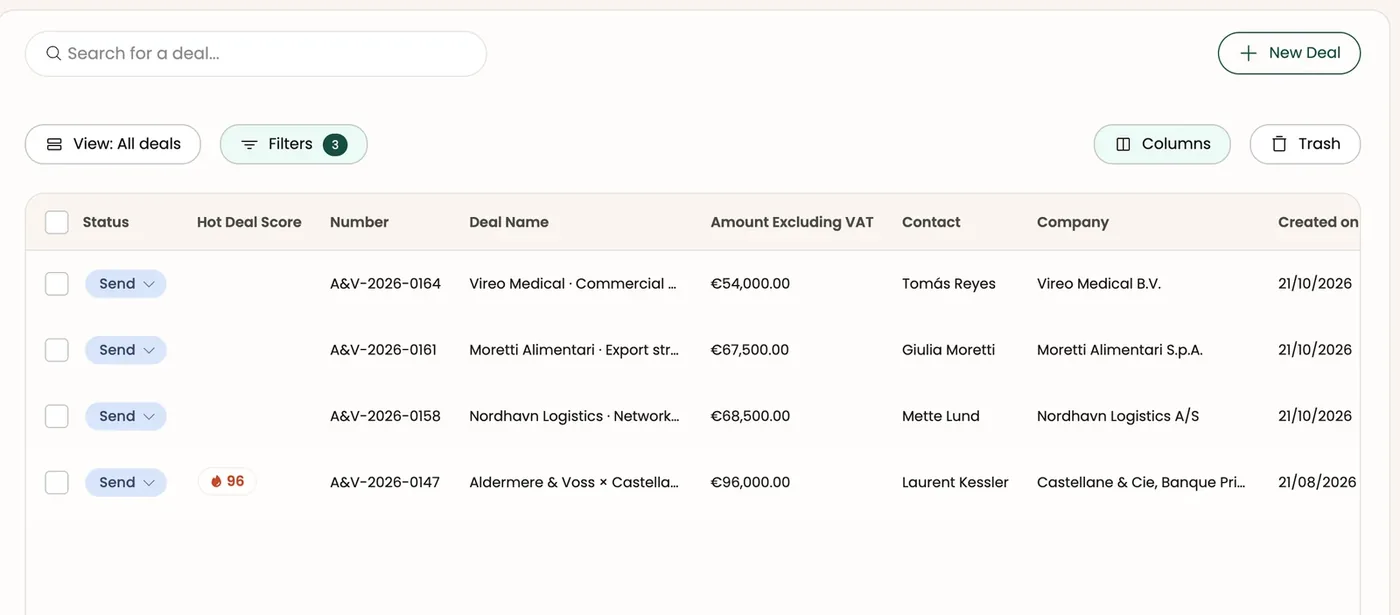
The deal list
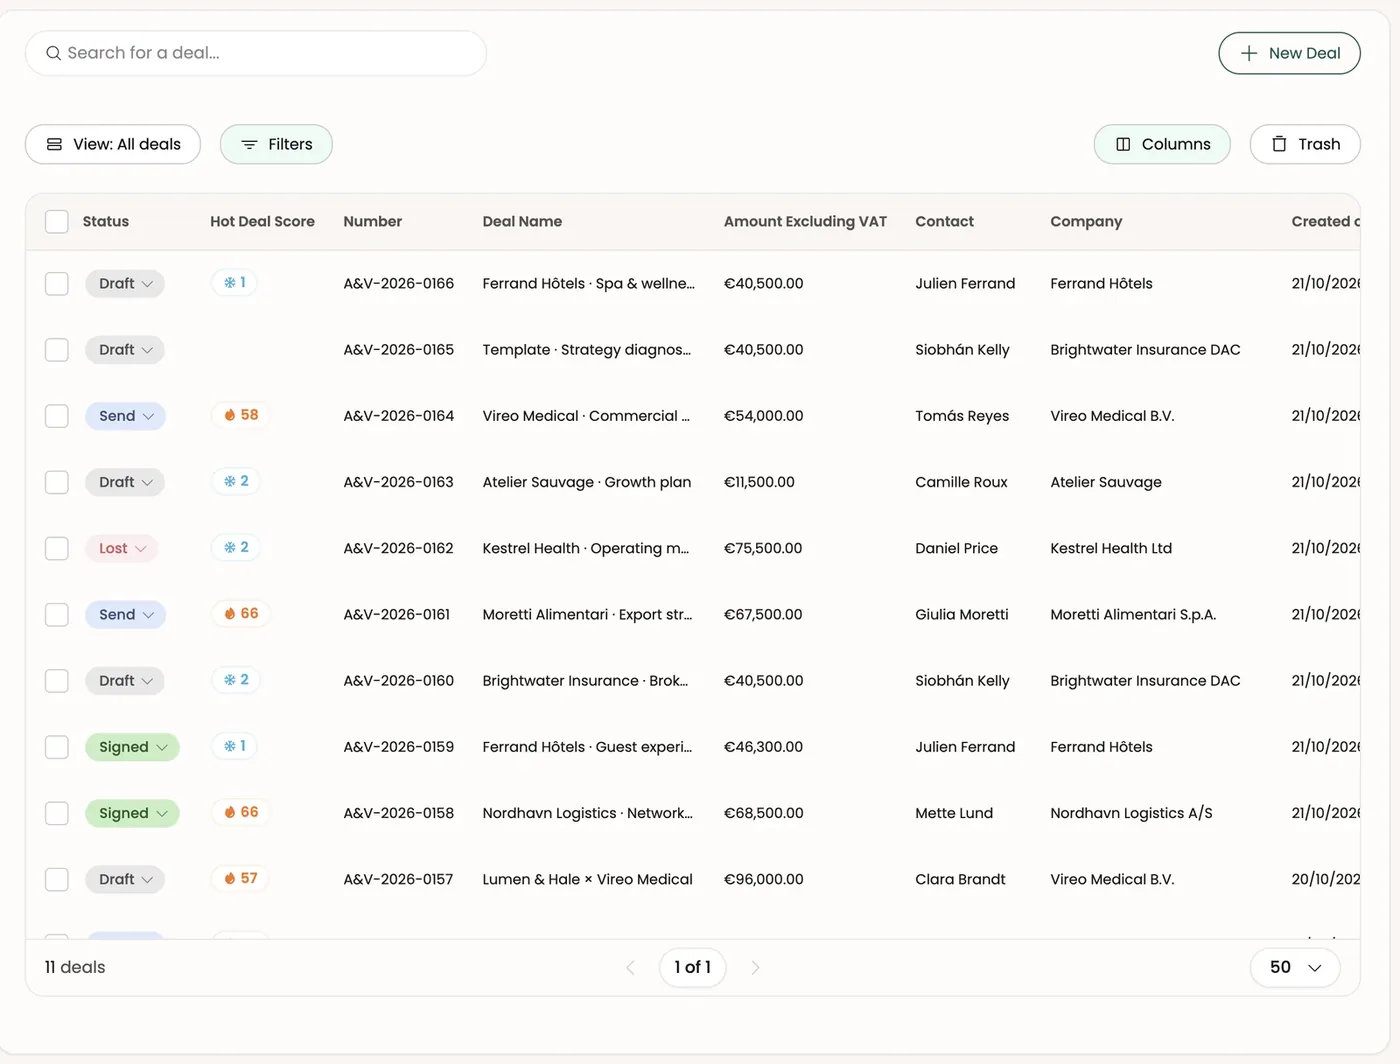
What it does The Deals page is your sales dashboard: all your deals are listed with their status, Hot Deal Score, amount, client and owner.
How to use it
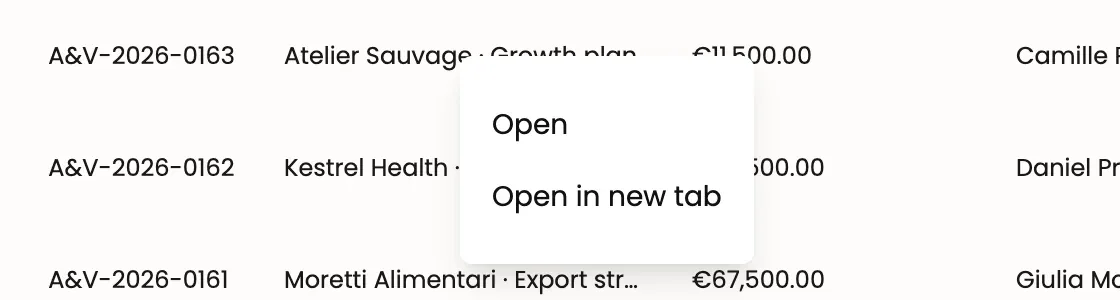
- Open a deal: click its row. A right-click offers Open and Open in a new tab.
- Search: type at least 3 characters in the search field at the top.
- Sort: click a column header (a second click reverses the order).
Good to know
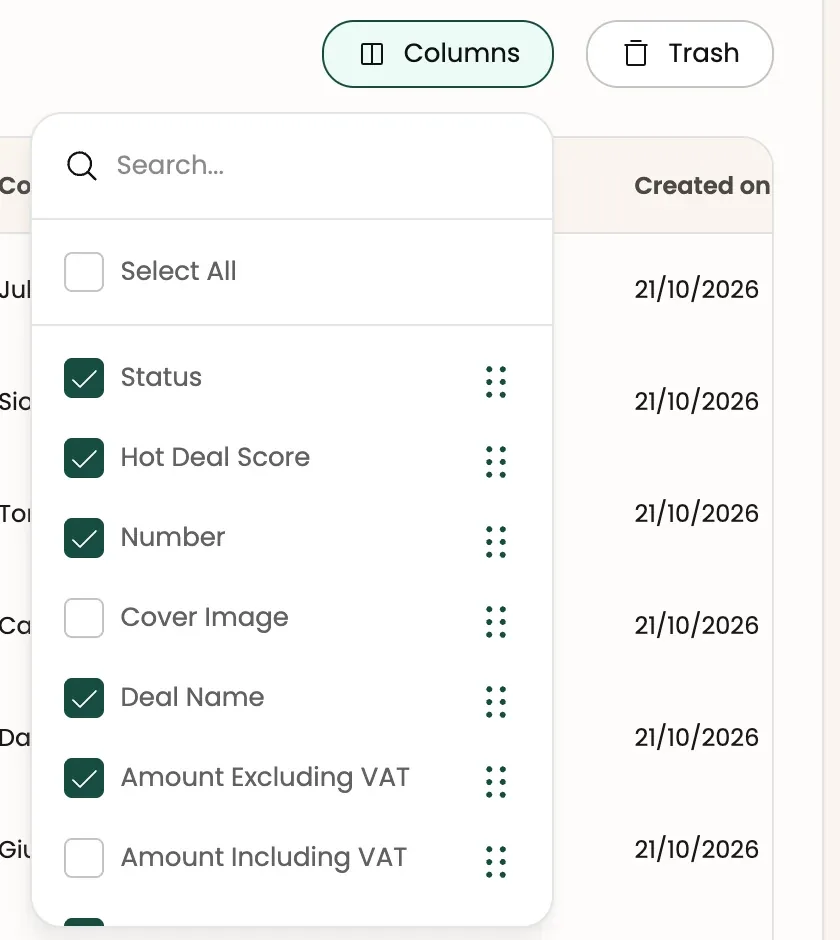
- Default columns: Status, Hot Deal Score, Number, Deal Name, Amount Excluding VAT, Contact, Company, Created on, Owner. Other columns (amount incl. VAT, cover image, custom fields…) can be added from Columns.
- The Back button of a deal takes you back to the view you came from (saved view, filters, sort, page); clicking "Deals" in the menu always opens the default view.
Pagination
What it does At the bottom of the table: the number of deals, the current page ("1 of N") and the number of rows per page (15, 30, 50 or 100).

Good to know The number of rows you choose is remembered in your browser, for each list (deals, contacts, companies, products).
Changing the status from the list
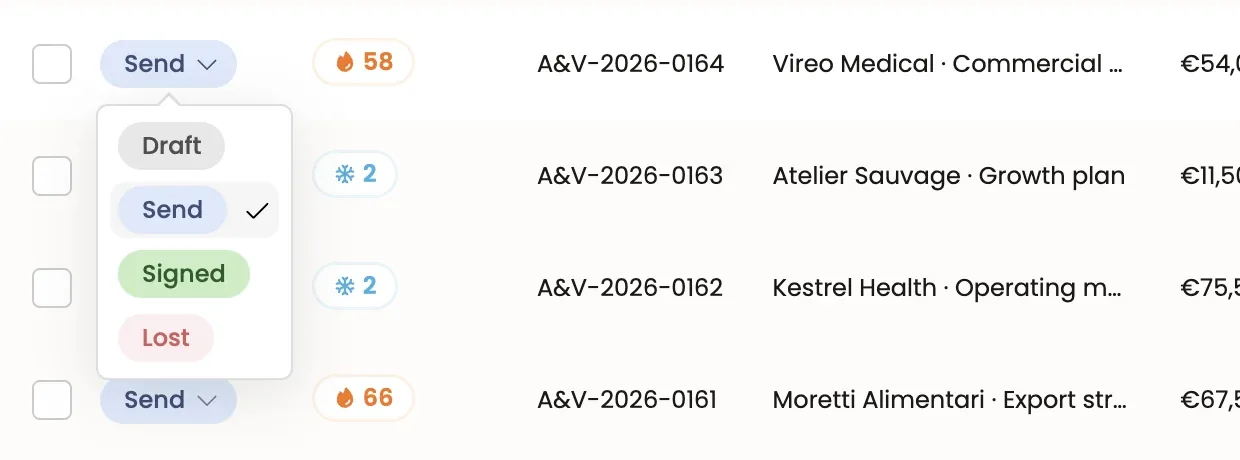
What it does Update a quote's status without opening it — for example from Draft to Send after sending the link from your own mailbox.
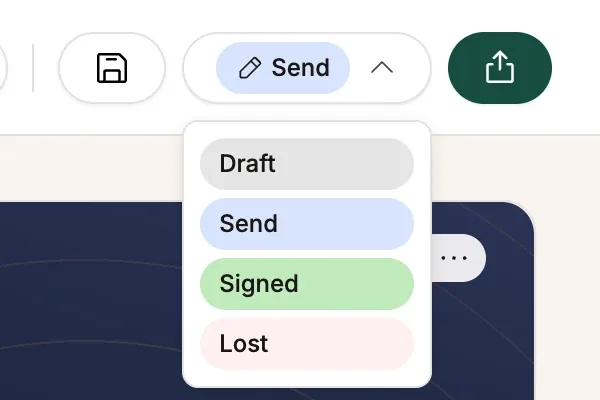
How to use it Click the status pill: a menu lists your company's statuses (by default Draft, Send, Signed, Lost). The current status is checked.
Good to know
- A signed quote can't go back to Draft or Send.
- Without permission to edit deals, the pill is read-only.
- Statuses are configured in Settings → Quotation statuses (see section 10).
The Hot Deal Score
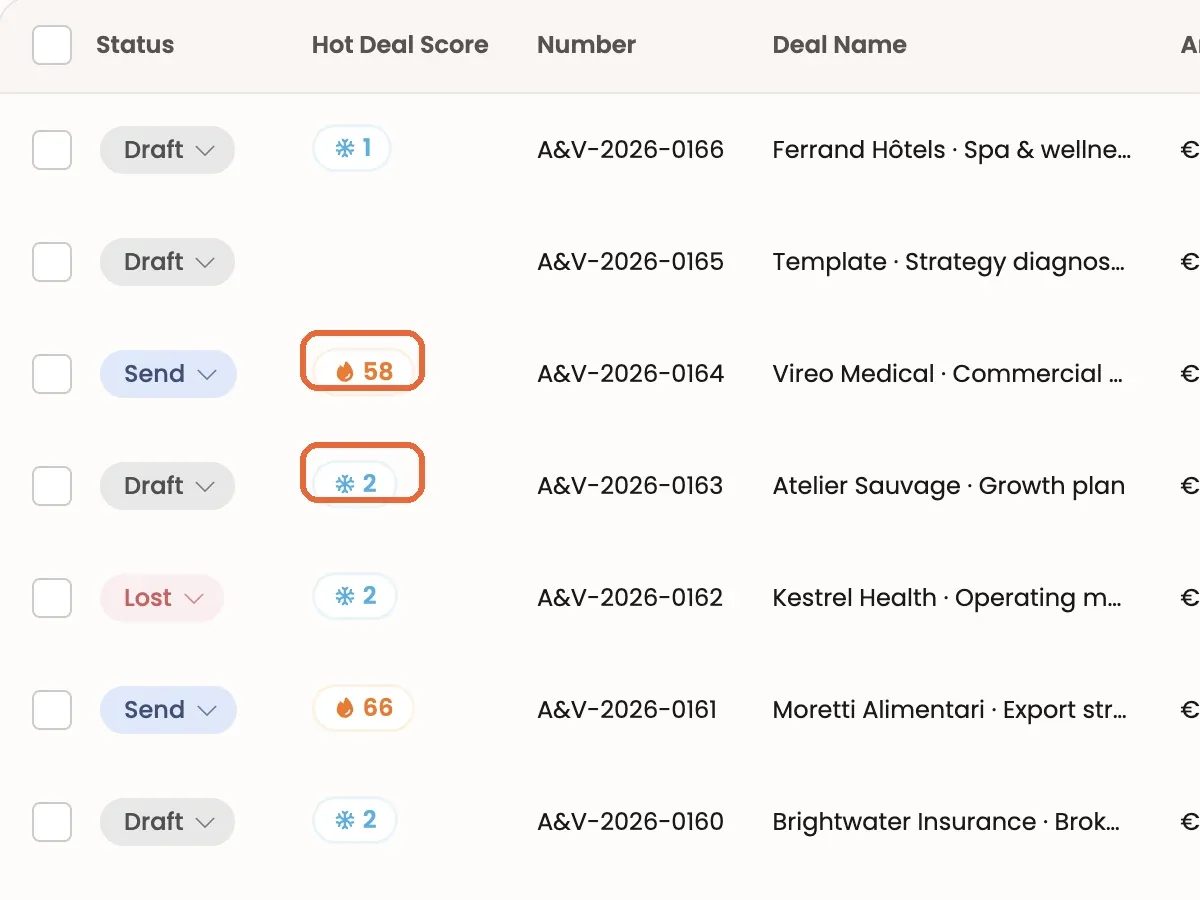
What it does The Hot Deal Score measures, from 0 to 100, your prospect's interest based on how they behave on the page you sent them (visits, time spent…). It's your compass for prioritizing follow-ups.
How to read it — three levels:
- Hot (70 to 100): red flame — the prospect is highly engaged;
- Medium (36 to 69): orange flame — they read your proposal carefully;
- Cold (0 to 35): blue snowflake — they barely looked at it.
No pill: the prospect hasn't opened the page yet.
Good to know Your own visits, and those of your logged-in colleagues, aren't counted.
Filtering the list
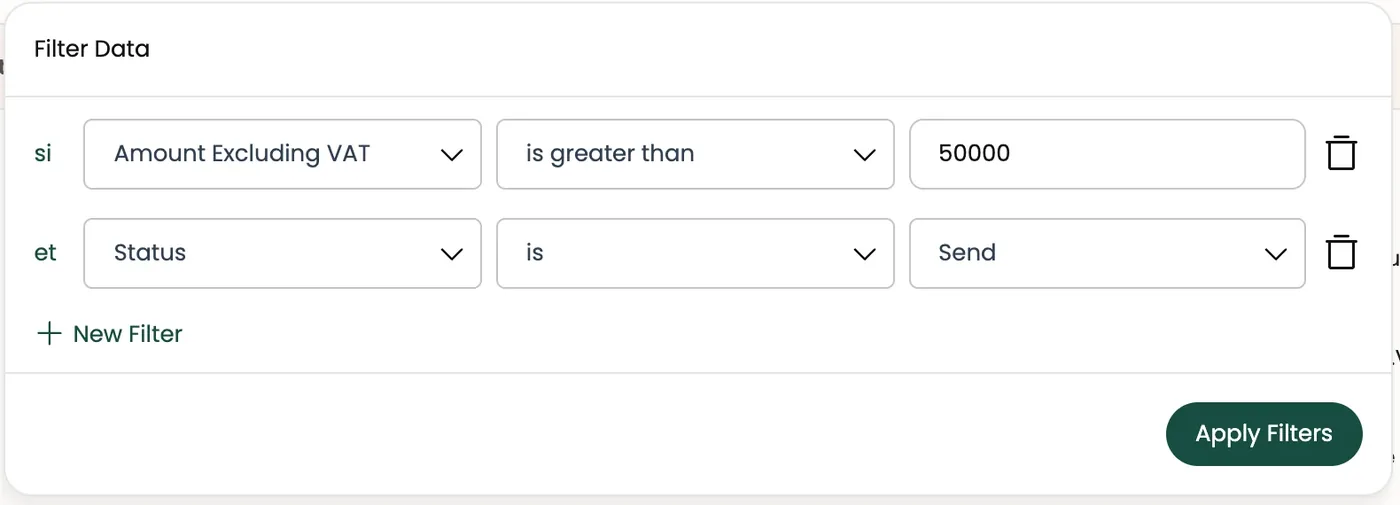
What it does Show only certain deals: by status, owner, amount, date, company, or your custom fields. For example: "all sent deals above €50,000".
How to use it
- Click Filters.
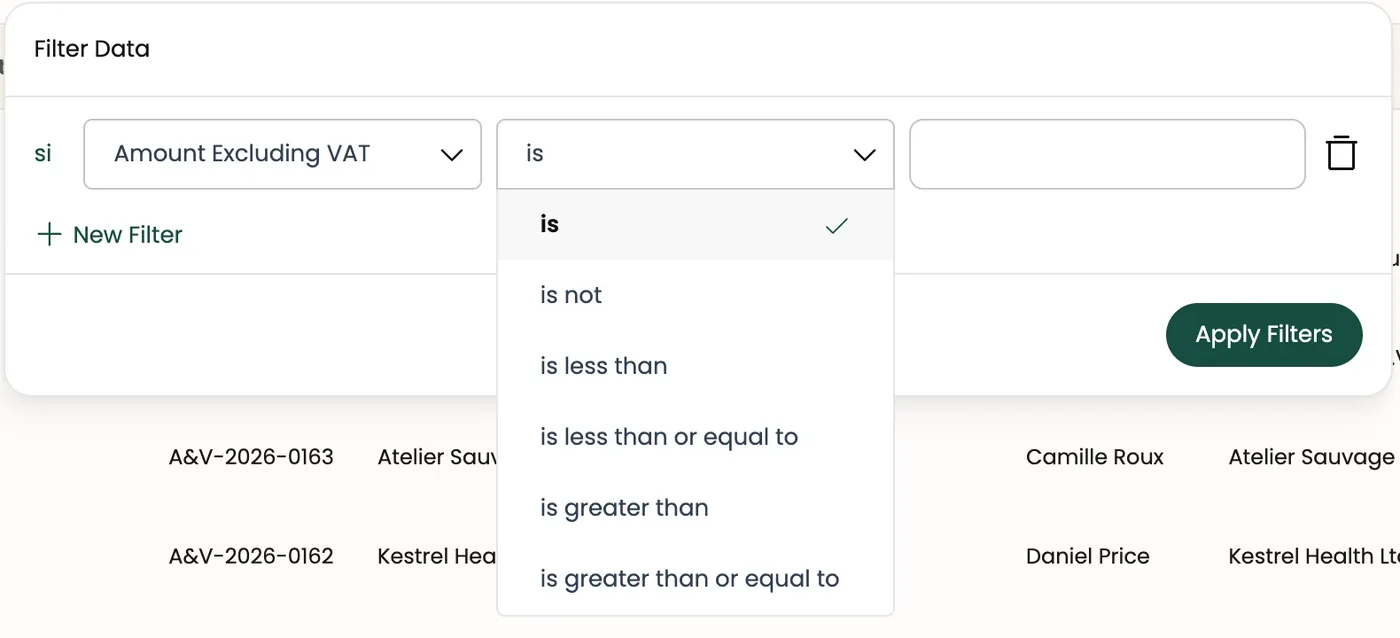
- Add a condition: the column, the operator ("equals", "contains", "greater than", "between"…) and the value.
- Add more conditions with + New Filter.
- Click Apply Filters. The number of active filters shows on the button.
Good to know
- When you combine several conditions, a deal must meet all of them ("and" logic).
- Operators adapt to the column type: a date offers "between", text offers "contains", and so on.
- The Status filter works on quotation statuses, the ones shown in the Status column.
Saved views
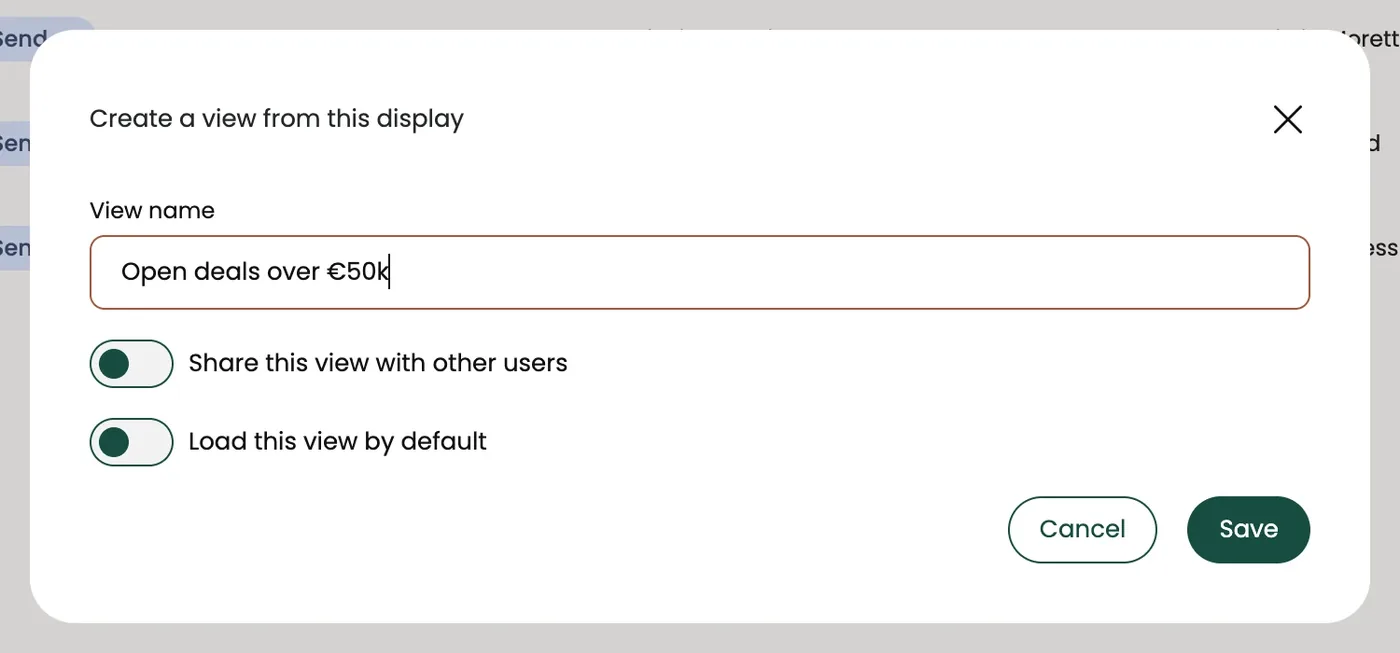
What it does A view saves a combination of filters, sort and columns you use often, so you can get it back in one click. For example: "Open deals over €50k".
How to use it
- Set up the list the way you want (filters, columns, sort).
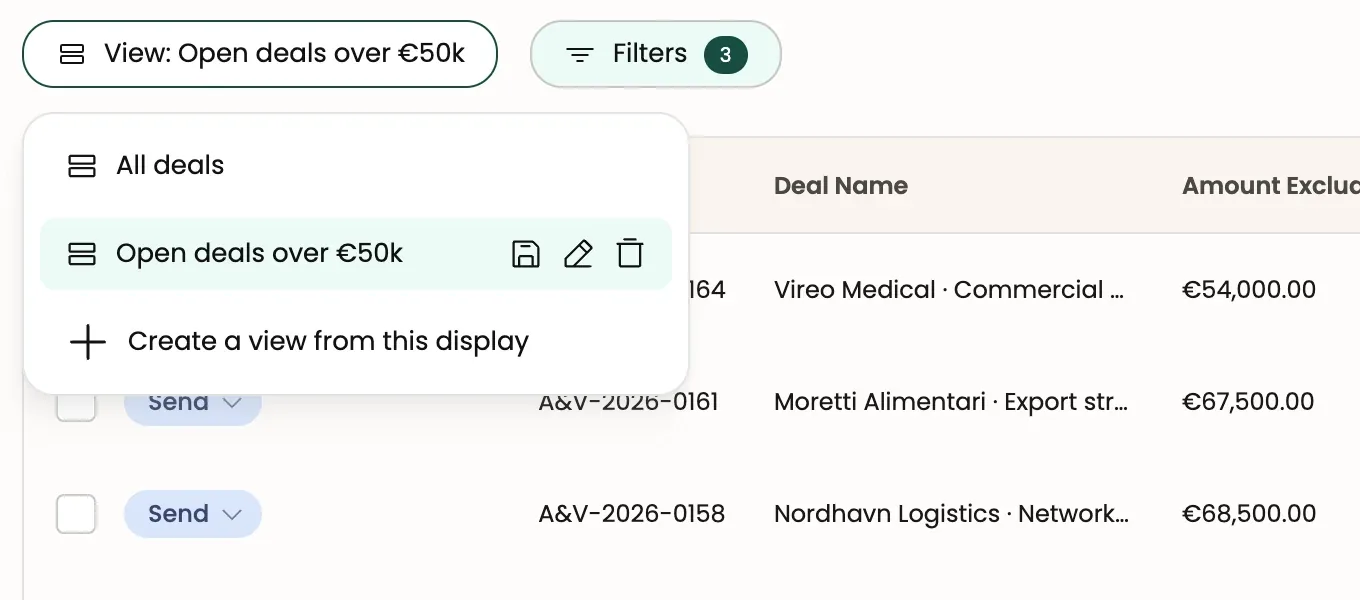
- Click View, then Create a view from this display, and give it a name.
- To come back to it later, click View and pick your view. All deals restores the standard display.
Good to know
- On the active view, three icons let you save it again (after changes), rename it or delete it.
- A view can be set as the default: it's the one shown when the page opens.
- A view can also become an entry in your main menu (see "Customizing the main menu").
Choosing and ordering columns
What it does Show exactly the information that matters to you, in the order you want.
How to use it Click Columns: check or uncheck columns and drag them by the ⠿ handle to reorder them. The search field and Select All help when the list is long.
Calendar view
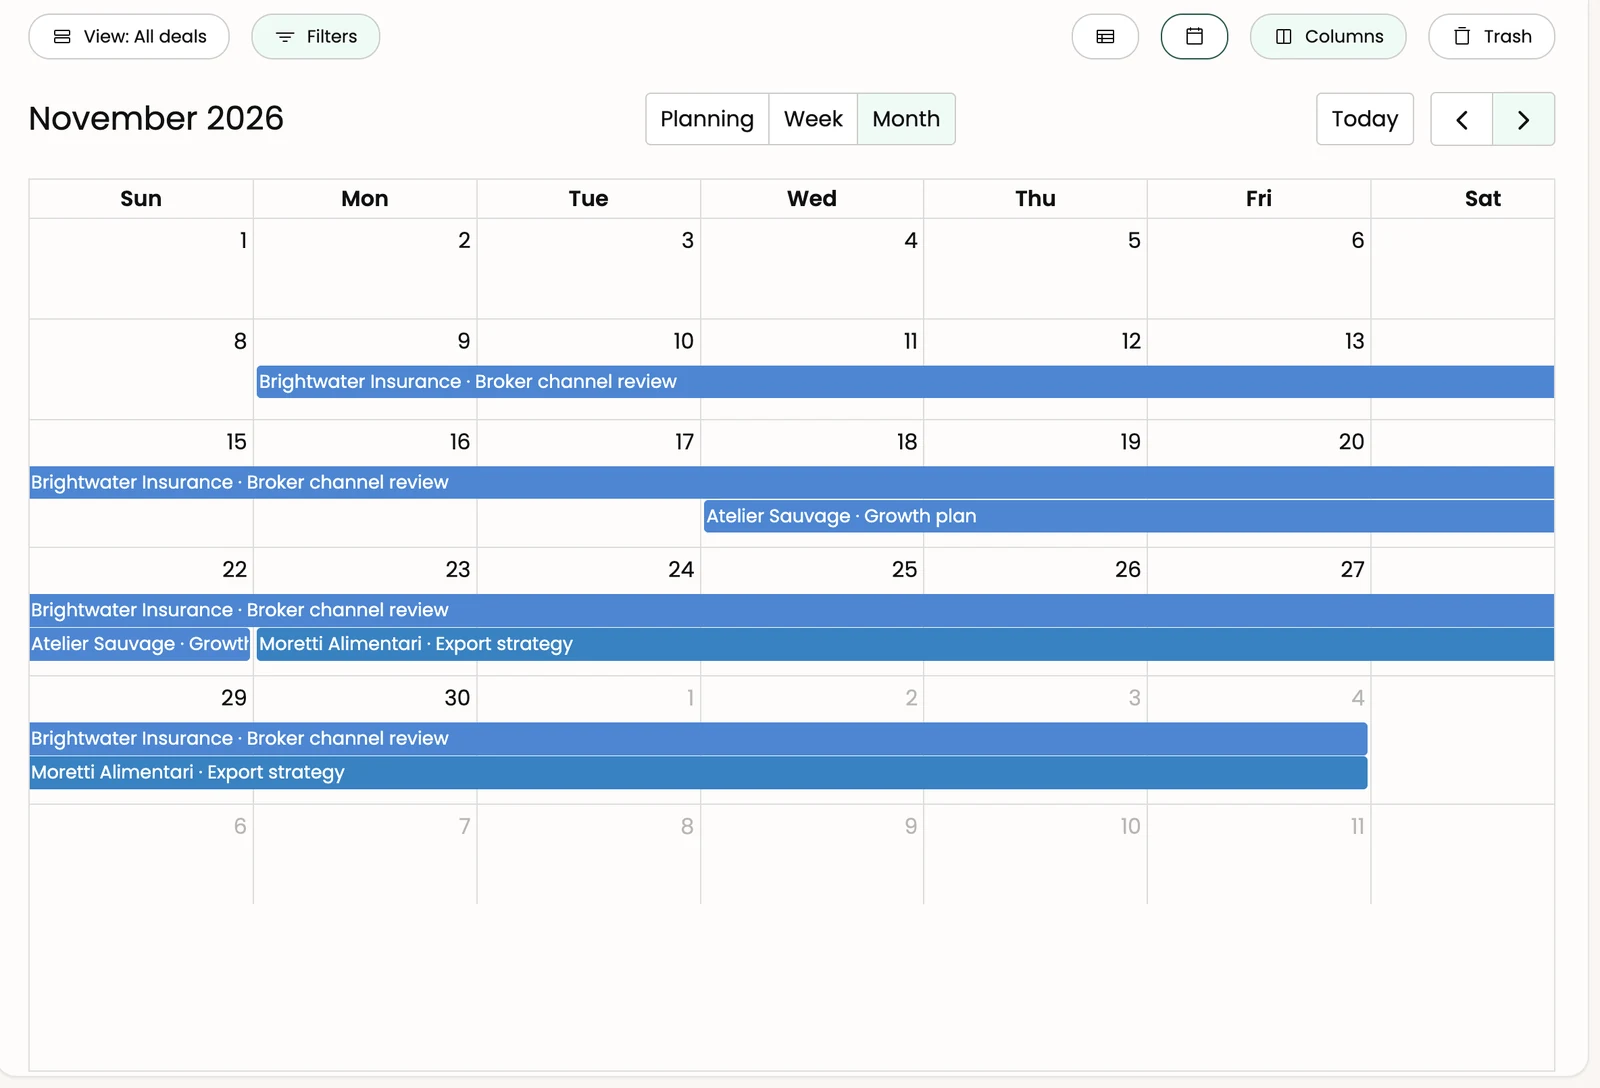
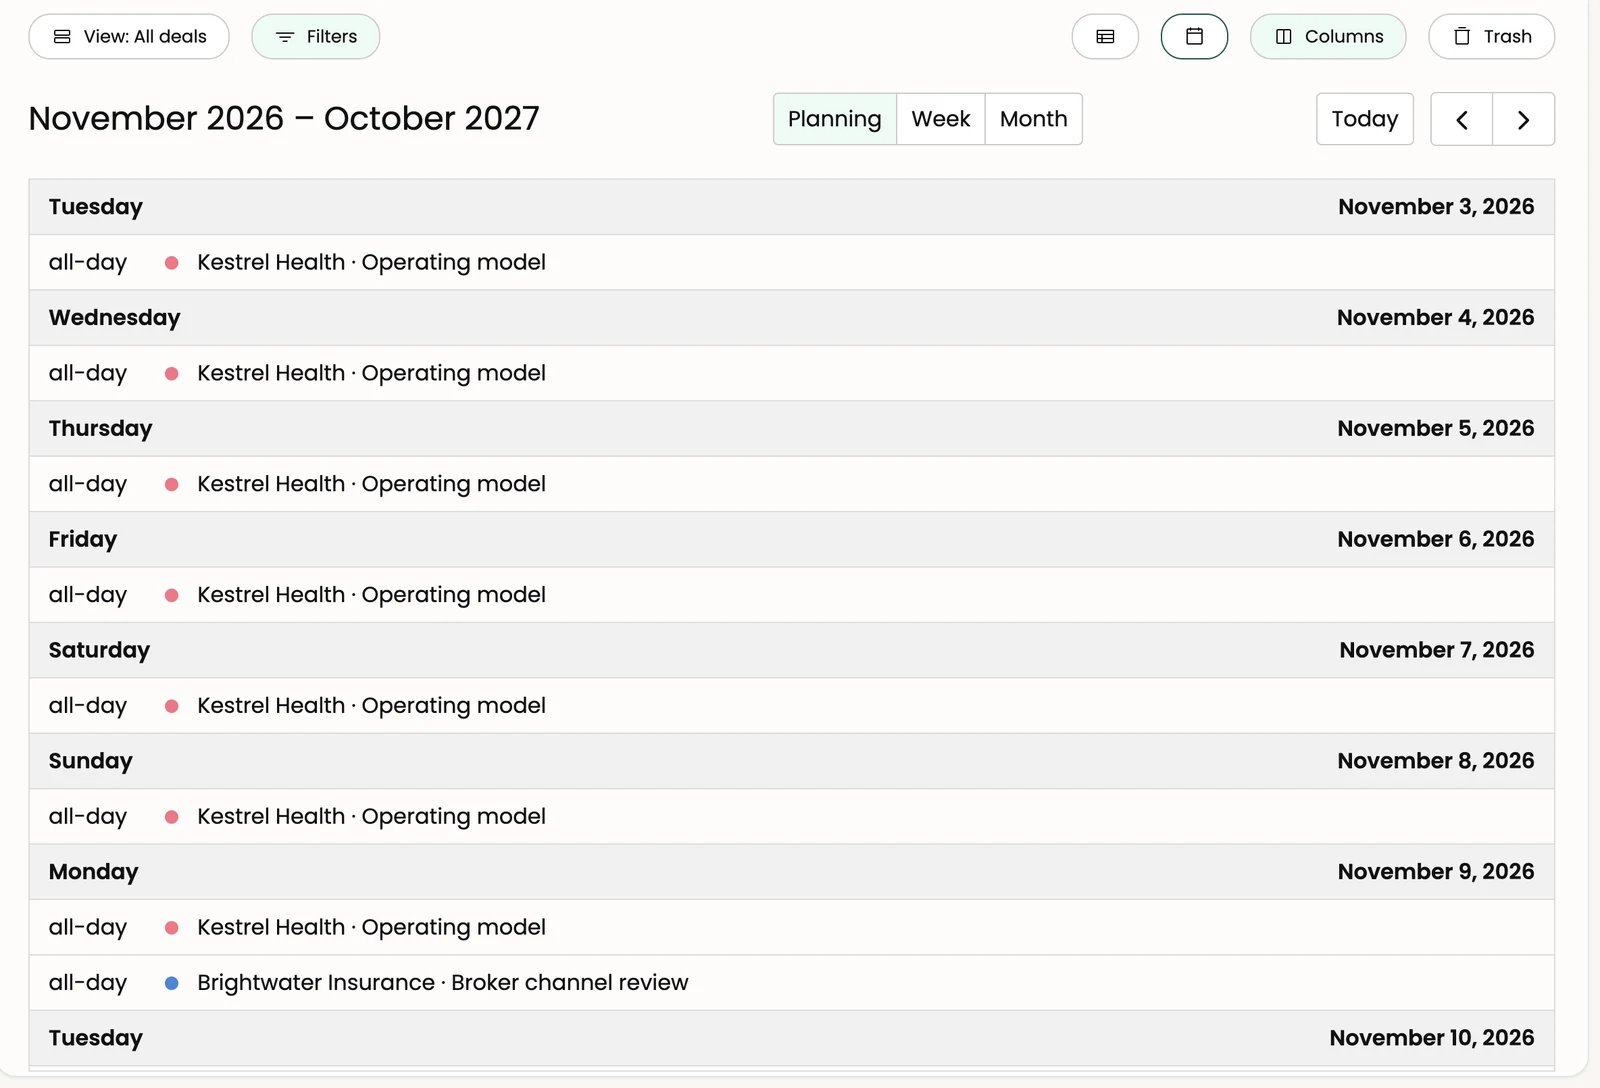
What it does See your deals on a calendar instead of a list — handy when your deals have a start and end date (event, assignment, service).
How to use it
- The two buttons to the left of Columns switch between the list and the calendar.
- Three displays: Planning (chronological list), Week and Month; the arrows change the period.
- Each deal is colored by its status; click it to open it.

Good to know
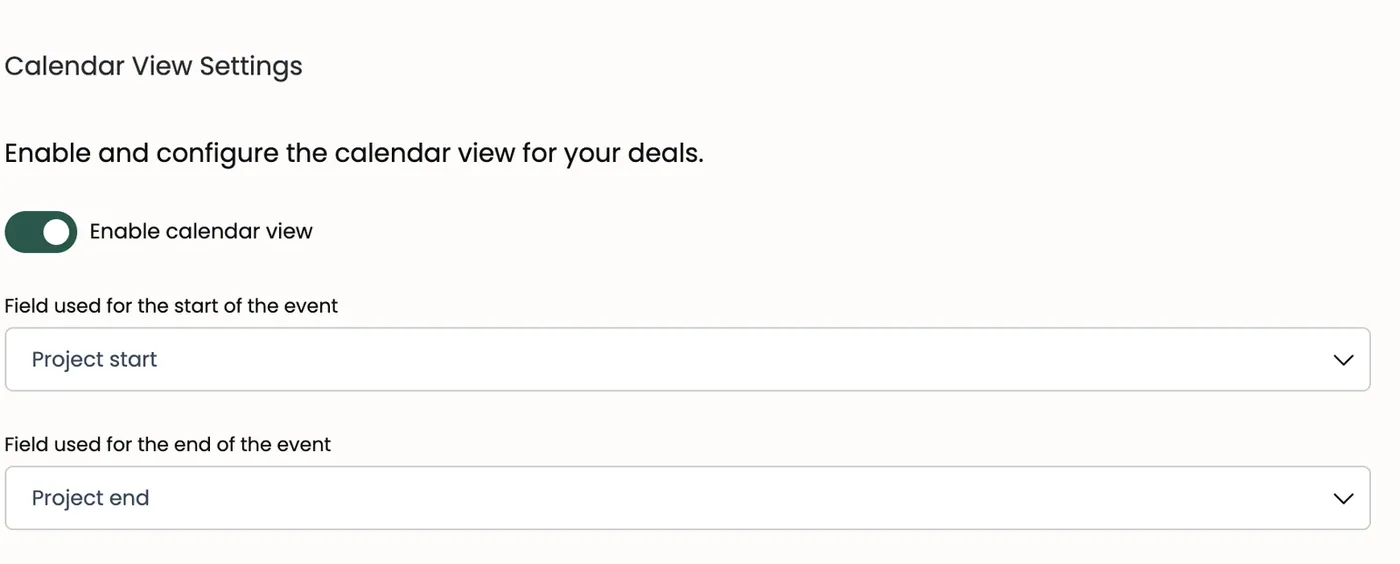
- The calendar only appears once it's enabled in Settings → Deals (see section 10), where you choose the field that marks the start and the one that marks the end of each deal. These are quotation custom fields of type "Date" or "Date and time".
- Fill in both fields (start and end): if the end field is left empty, the calendar shows no deals.
- A date without a time creates an all-day event, last day included.
- Filters active on the list also apply to the calendar.
- For now, the calendar's own labels (days, months, buttons) still appear in French in the English interface; this is a known issue (see "Open questions").
Deal actions: edit, clone, move to trash
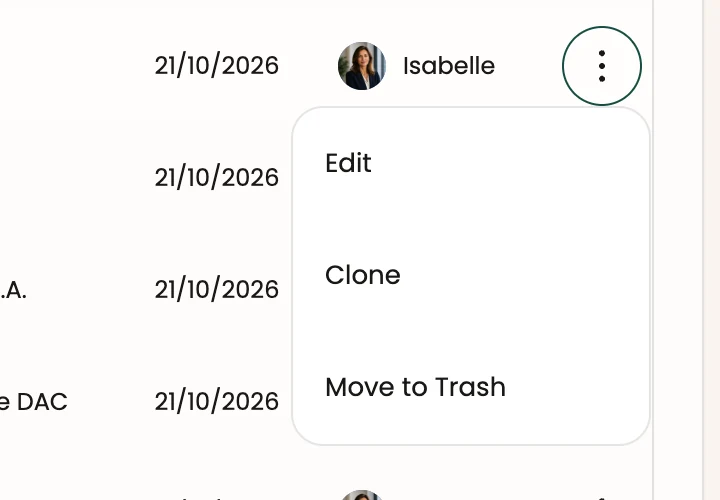
What it does Each row has a ⋮ menu (far right) with the usual actions.
How to use it
- Edit: opens the deal in the editor.
- Clone: creates a copy of the deal.
- Move to Trash: sends the deal to the trash (it isn't permanently deleted).
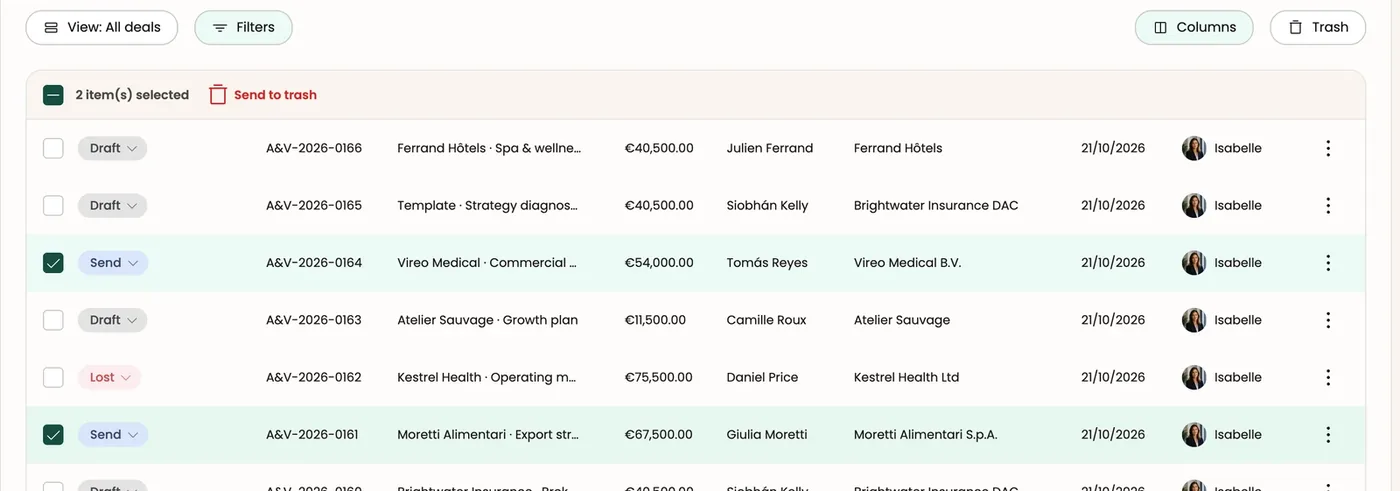
To act on several deals at once, check the boxes on the left of the rows.
The trash
What it does Find deals moved to the trash, restore them or delete them permanently.
How to use it
- Click Trash: the list shows trashed deals, and a banner reminds you of it.
- A deal's ⋮ menu: Restore (put it back in the list) or Delete Permanently (with confirmation).
- Go back returns to the normal list.

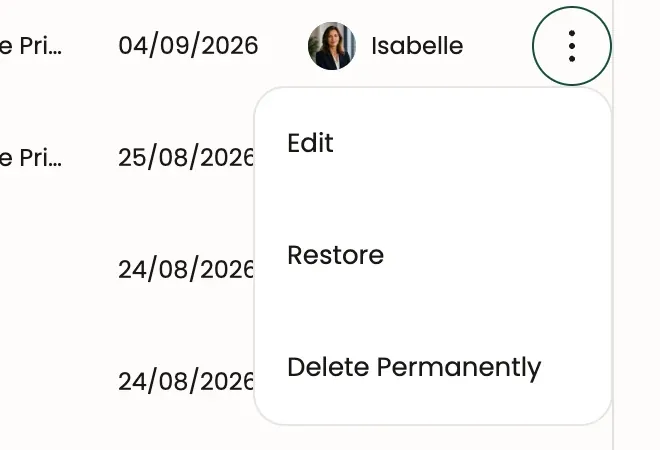
Good to know Permanent deletion can't be undone. As long as a deal is only "in the trash", you can get it back.
4. Building your proposal (the editor)
This is where you spend most of your time: the editor builds the page your client will see, block by block. Each block (pricing table, text, video, FAQ, signature…) can be added, moved and configured freely.
The editor header bar
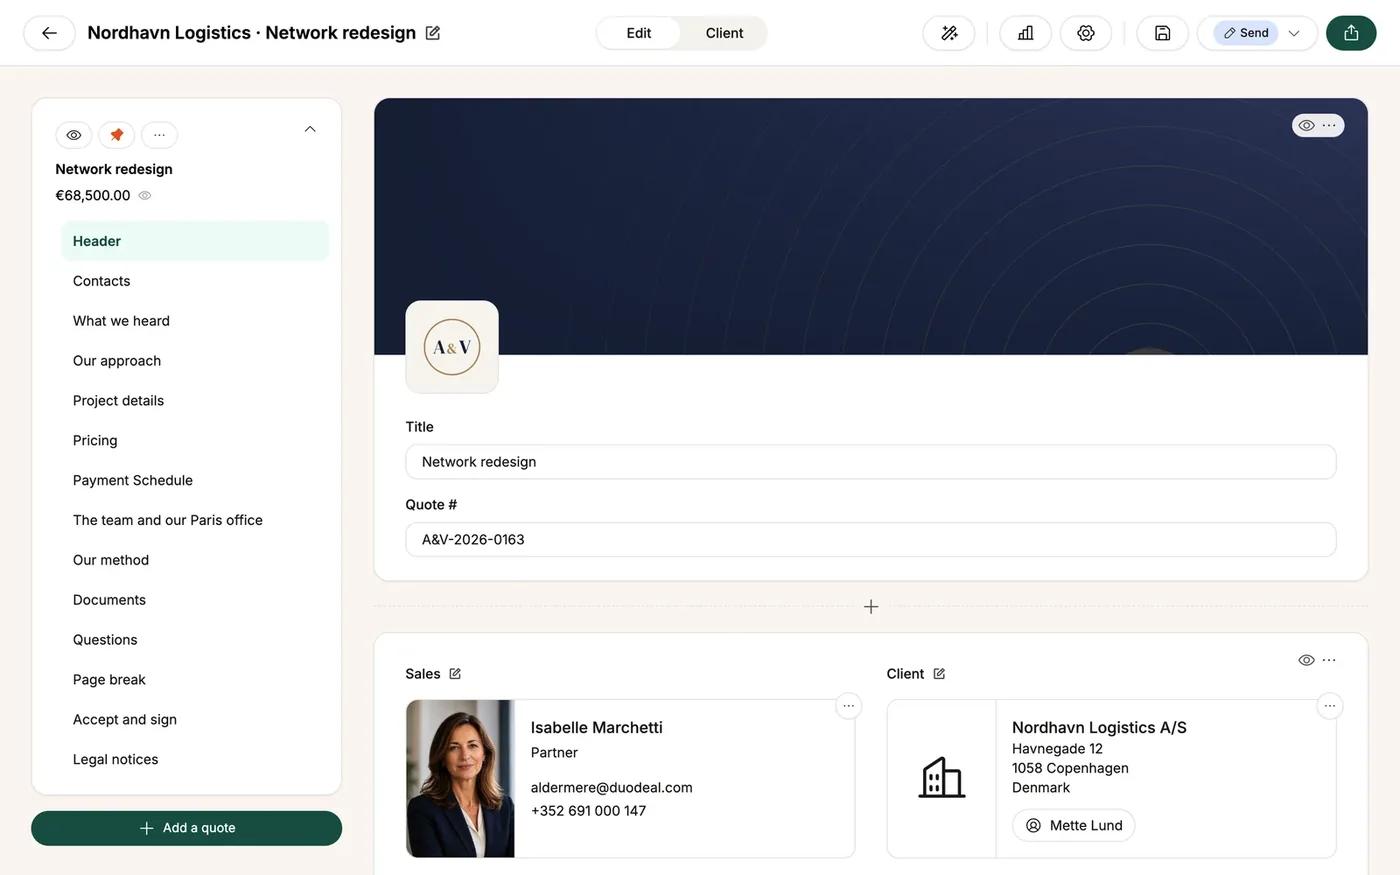
What it does It groups the deal's tools, always visible at the top of the screen, from left to right:
- ←: back to the deal list (in the view you came from);
- Deal title and its pencil: rename the deal;
- Edit / Client: switch between editing and the preview your client will see;
- Magic wand: the AI assistant (see below);
- Chart: viewing statistics (see section 7);
- Gear: deal settings;
- Floppy disk: save immediately;
- Status pill (Draft, Send, Signed, Lost…): click to change the quote's status; it's saved straight away;
- Green button: share the proposal (see section 5).

Client preview
What it does Check what your proposal will look like for the client, without leaving the editor.
How to use it Click Client: the page is shown read-only, with only the visible blocks. Edit takes you back to editing, at the same place on the page.

Good to know
- This is an internal preview: signing is disabled. To test the real rendering, open a share link.
- A signed quote can no longer be edited: the "Edit" side is disabled and a message says so.
Saving (automatic and manual)
Good to know
- Your changes are saved automatically a few seconds after each edit; a "Quotation saved successfully" message confirms it.
- The floppy disk saves immediately. A pricing line still open in its editor is saved along with the rest.
- Cmd+Z (Mac) or Ctrl+Z (Windows) undoes your last changes, Cmd/Ctrl+Shift+Z redoes them.
A deal's proposals (left column)
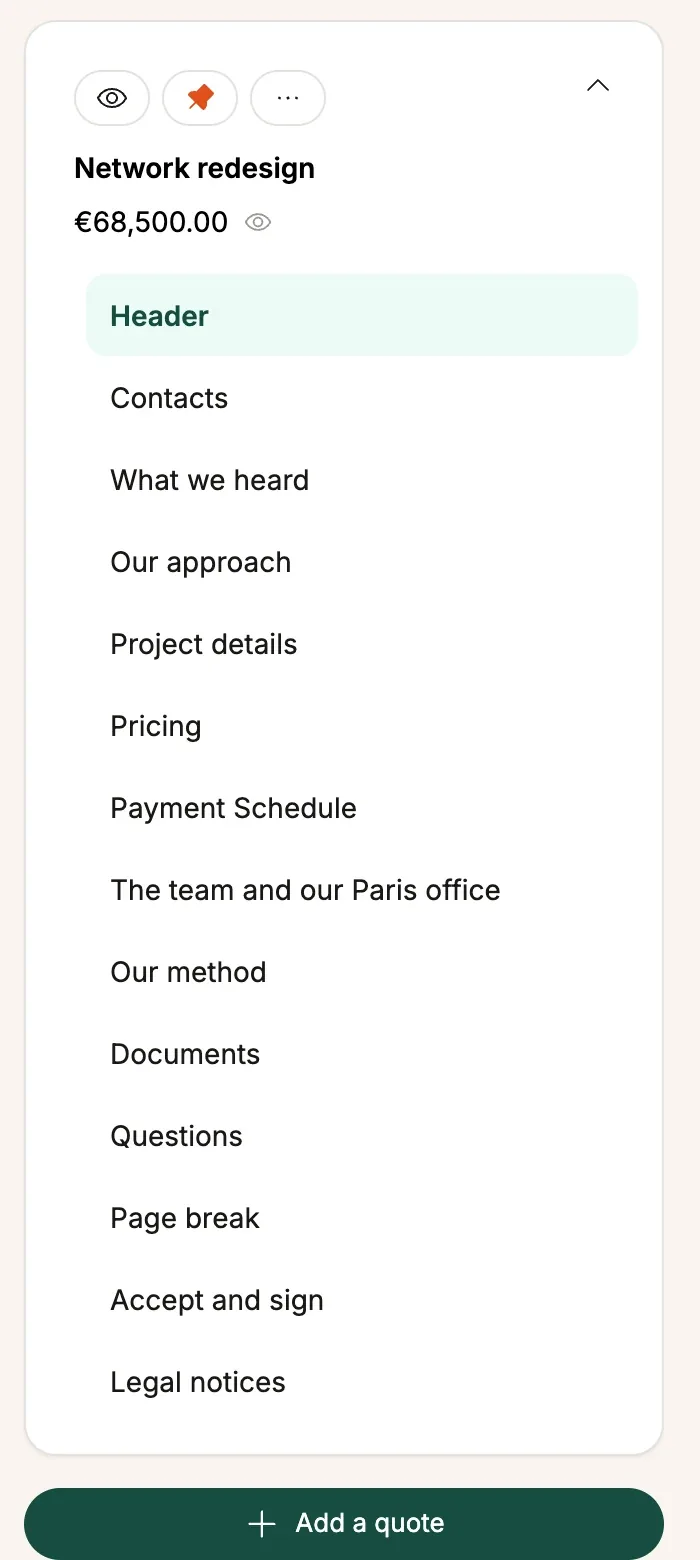
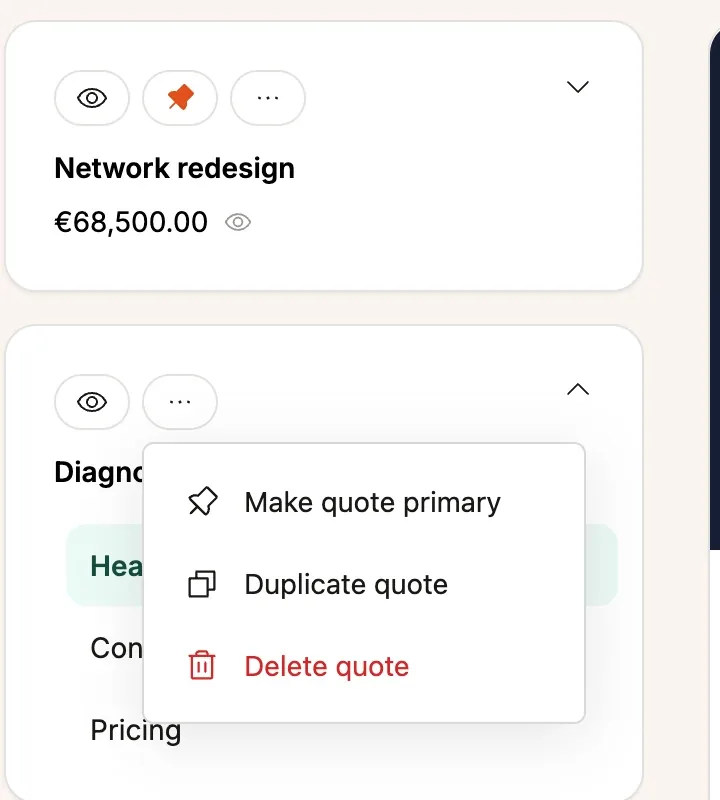
What it does A single deal can contain several proposals (several versions of the offer), for example "Network redesign" and "Diagnostic only". The left column lists them as cards.
How to use it
- + Add a quote (at the bottom of the column): add a proposal.
- On each card:
- the eye: show or hide this proposal for the client;
- the orange pin: the deal's primary proposal (the one whose amount counts in the deal list);
- the ⋯ menu: Make quote primary, Duplicate quote, Delete quote;
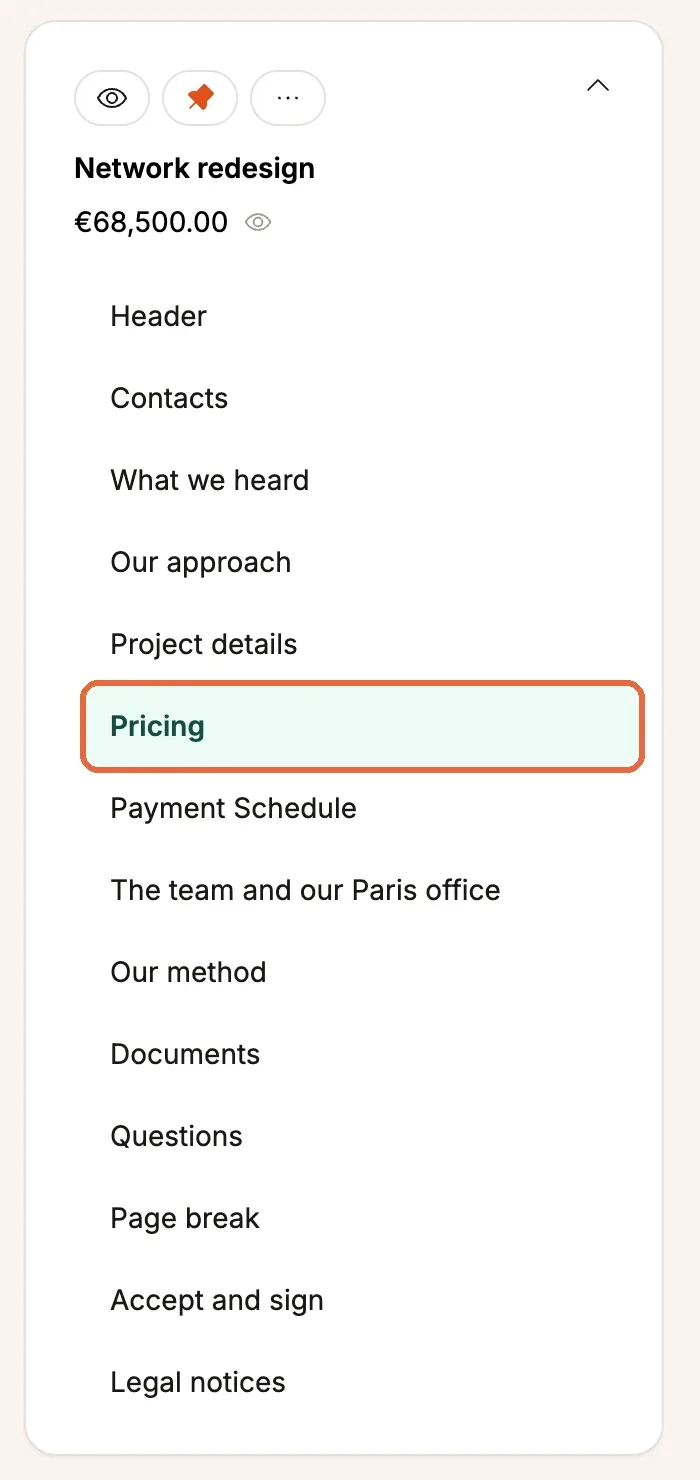
- the chevron: expand the outline of blocks;
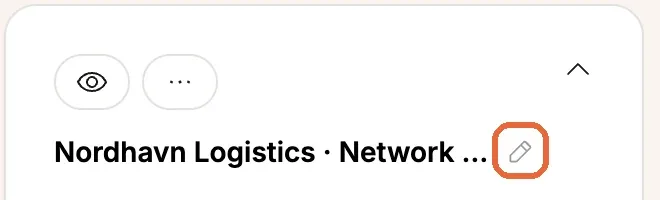
- the title: on hover, a pencil lets you rename it (Enter saves, Esc cancels);
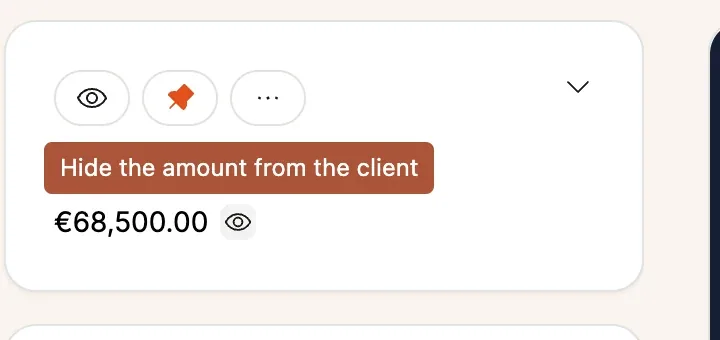
- the amount excl. tax, recalculated live, with a second eye to hide the amount from the client (the proposal stays visible, the amount is shown greyed out).
Good to know
- A signed proposal can't be deleted, nor can the last proposal of a deal.
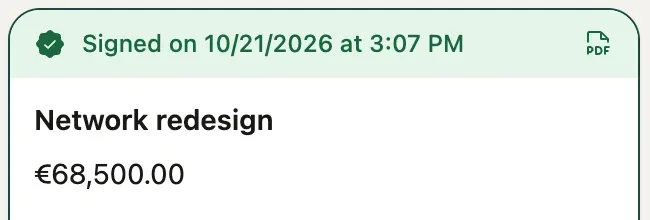
- A signed proposal shows a "Signed on…" banner with the signed PDF to download.
- In the expanded outline, drag blocks to reorganize the page or click a block to jump to it. A block hidden from the client is shown in grey.
- The outline follows your reading: the current block is highlighted in green as you scroll.
Adding a block
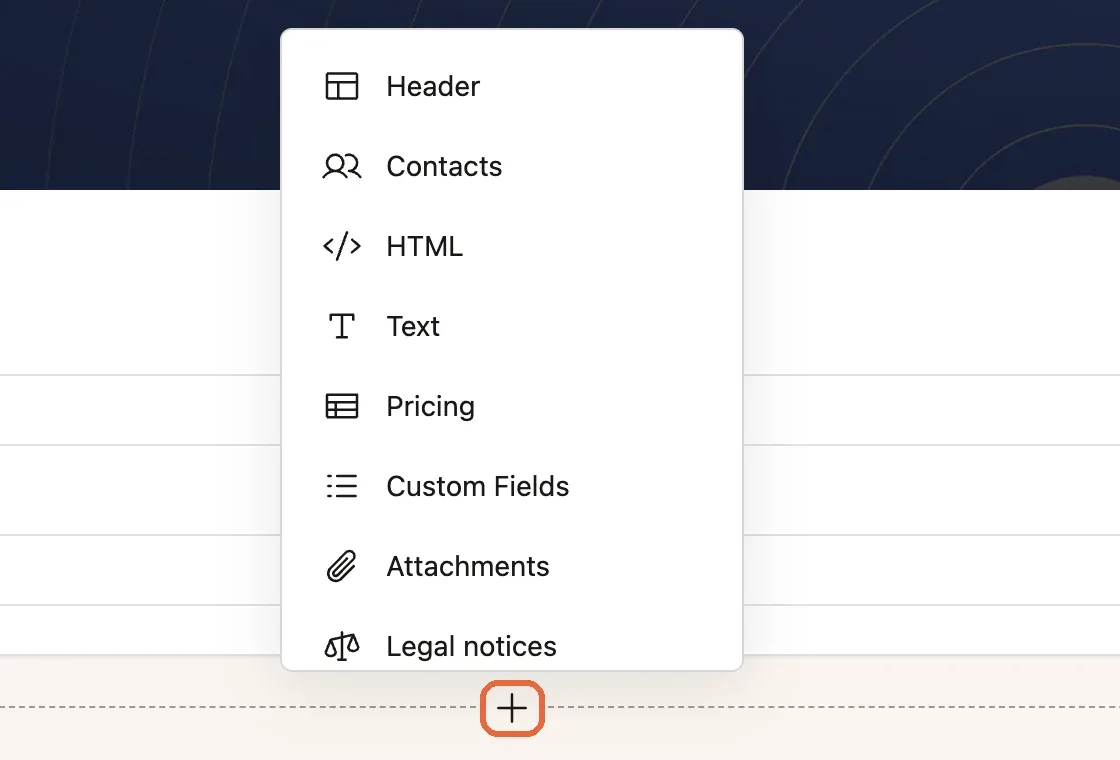
How to use it Hover between two blocks: a dotted line with a + appears. Click it to open the block library, then choose the type to insert.
Working with a block
How to use it
- Title: the pencil renames the block.
- Eye: hide the block from the client (it stays in the editor, semi-transparent).
- Columns / Rows: for blocks that support it, the number of columns or rows.
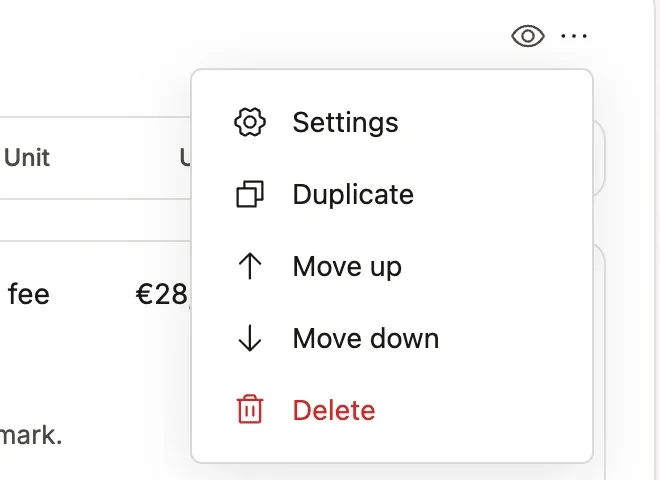
- ⋯ menu: Settings (block settings, including showing or hiding its title), Duplicate, Move up, Move down, Delete.
Good to know The Save button in a block's settings really saves the quote.
The blocks, one by one
The 19 block types:
| Block | What it's for |
|---|---|
| Header | The header: cover image, logo, title and quote number. |
| Contacts | The two contacts: you (the salesperson) and your client. |
| HTML | Custom content (free layout, form…), prepared by your team or the AI assistant. |
| Text | Formatted free text, on 1 to 3 columns. |
| Pricing | The pricing table: products, quantities, options, discounts and totals. |
| Custom Fields | The quote's custom fields (start date, purchase order…). |
| Attachments | Files to download. |
| Legal notices | The legal footer: your company details and terms. |
| Payment Schedule | A payment schedule calculated automatically. |
| PDF File | A PDF readable inside the page. |
| YouTube | One or more YouTube videos. |
| FAQ | Expandable questions and answers. |
| PowerPoint presentation | An embedded PowerPoint presentation. |
| Google Slides | An embedded Google Slides presentation. |
| Canva | An embedded Canva design. |
| Embed | Content from another tool (Loom, Guideflow, Typeform…). |
| Image gallery | A photo gallery with click-to-enlarge. |
| Accept and sign | Online signature, which becomes a stamp once the quote is signed. |
| Page break | A page break, invisible on screen, that acts on the PDF. |
Header
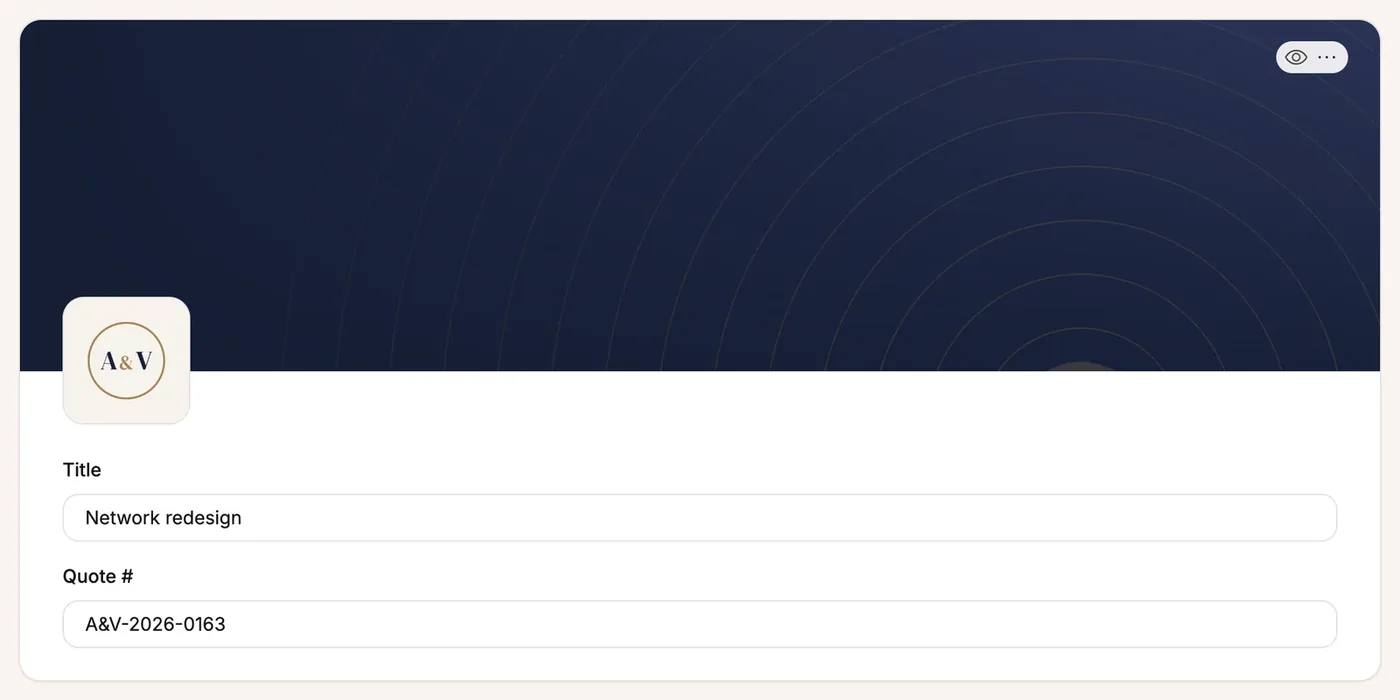
What it does The banner at the top of the proposal: a cover image, your logo, the quote's title and number.
How to set it up
- Cover and logo: by default, your company's (Settings → Company). Click them to pick others from the media library, or remove them.
- Cover height: drag its bottom edge.
- Crop the cover: the crop button first offers the LinkedIn banner format, then free cropping.
- Title and Quote #: the quote's title and number, editable right in the block.
Good to know The title entered here is also the title of the proposal's card, in the left column.
Contacts
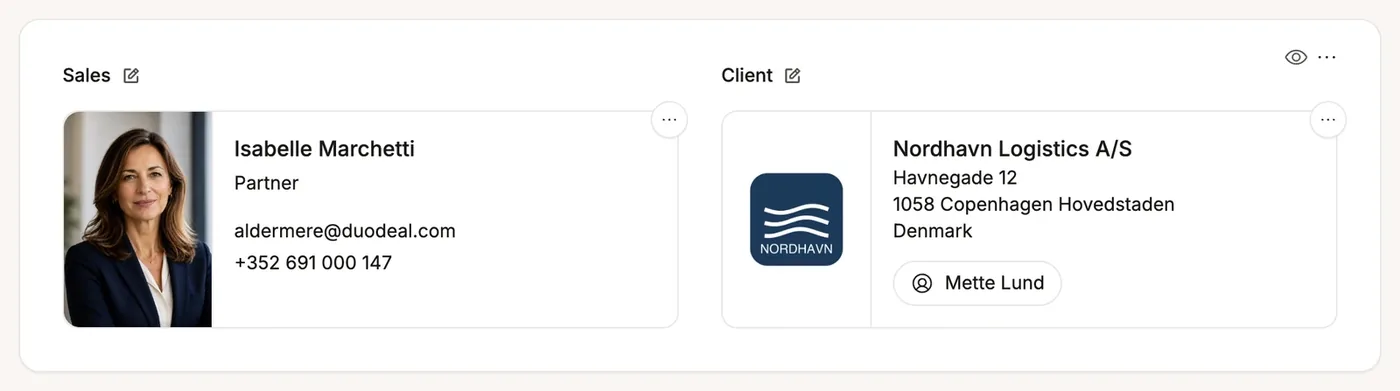
What it does Present the salesperson (Sales) and the client (Client) side by side, with photo, contact details and, for a client company, its logo.
How to use it
- Click the client company name: the Edit Company window opens (logo, name, registration number, VAT number, address, state, postal code, city, country). Your changes show straight away.
- Click the contact pill to edit the person's details.
- The pencil next to Sales and Client renames these labels (for example "Your consultant"). Left empty, the label follows the reader's language.
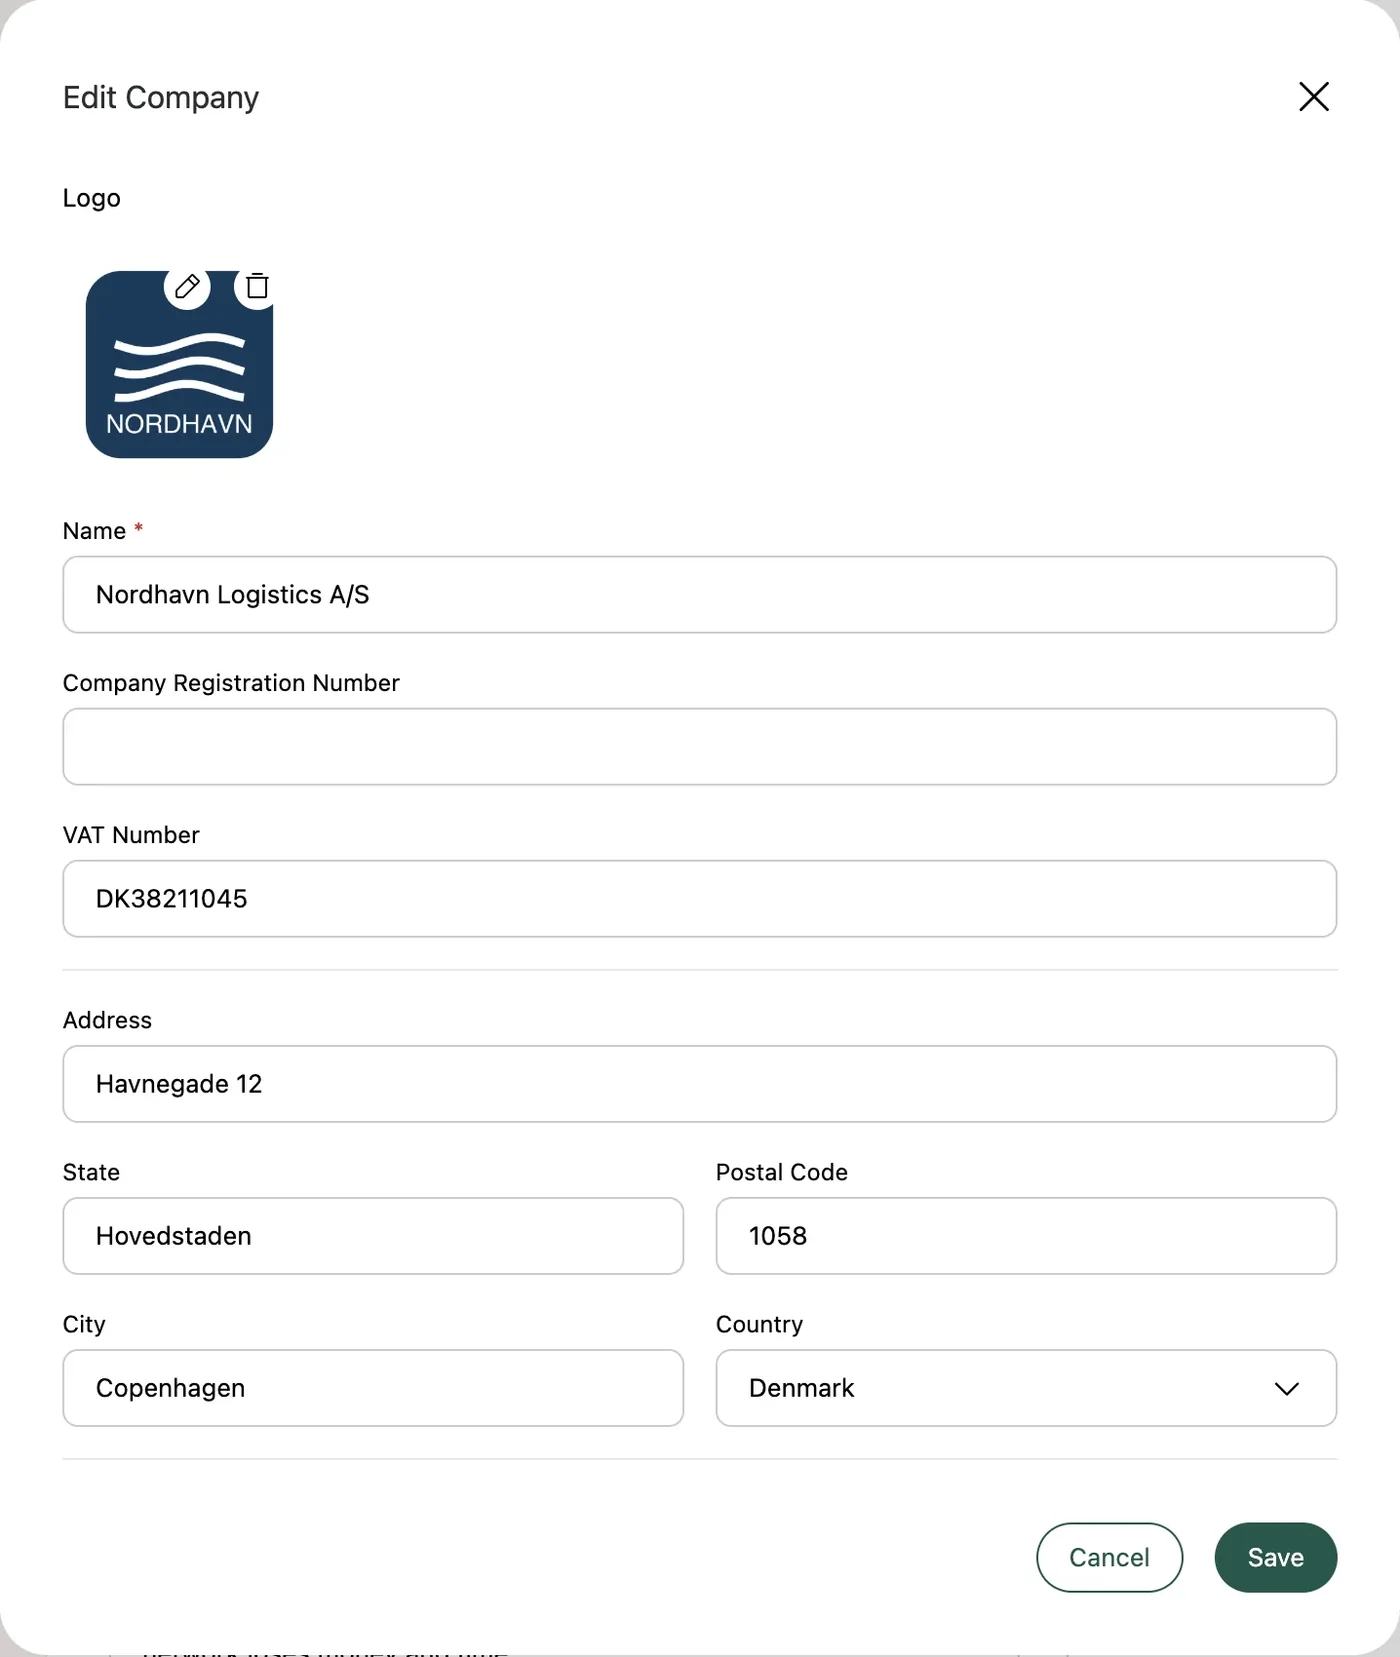
Good to know The client company's logo (PNG or JPEG, 2 MB max) replaces the generic icon, in the editor and on the client side.
Text
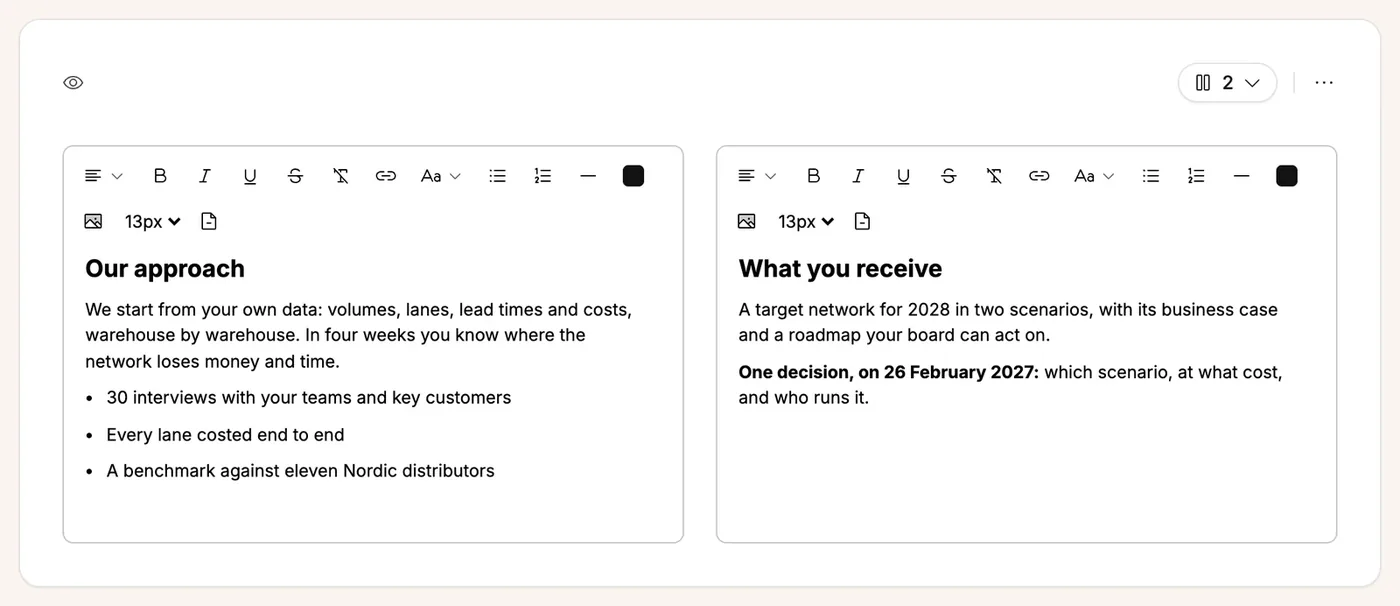
What it does A space for formatted free text: present your approach, your team, the context, the next steps…
How to set it up
- Type directly; the toolbar offers headings, bold, italic, lists, color, size, alignment, links and images.
- The columns selector spreads the text over 1, 2 or 3 columns, each filled independently.
Good to know On mobile, columns stack on top of each other.
Pricing (pricing table)
What it does The heart of the quote: the products and services offered, with quantities, prices, options, discounts and automatically calculated totals.
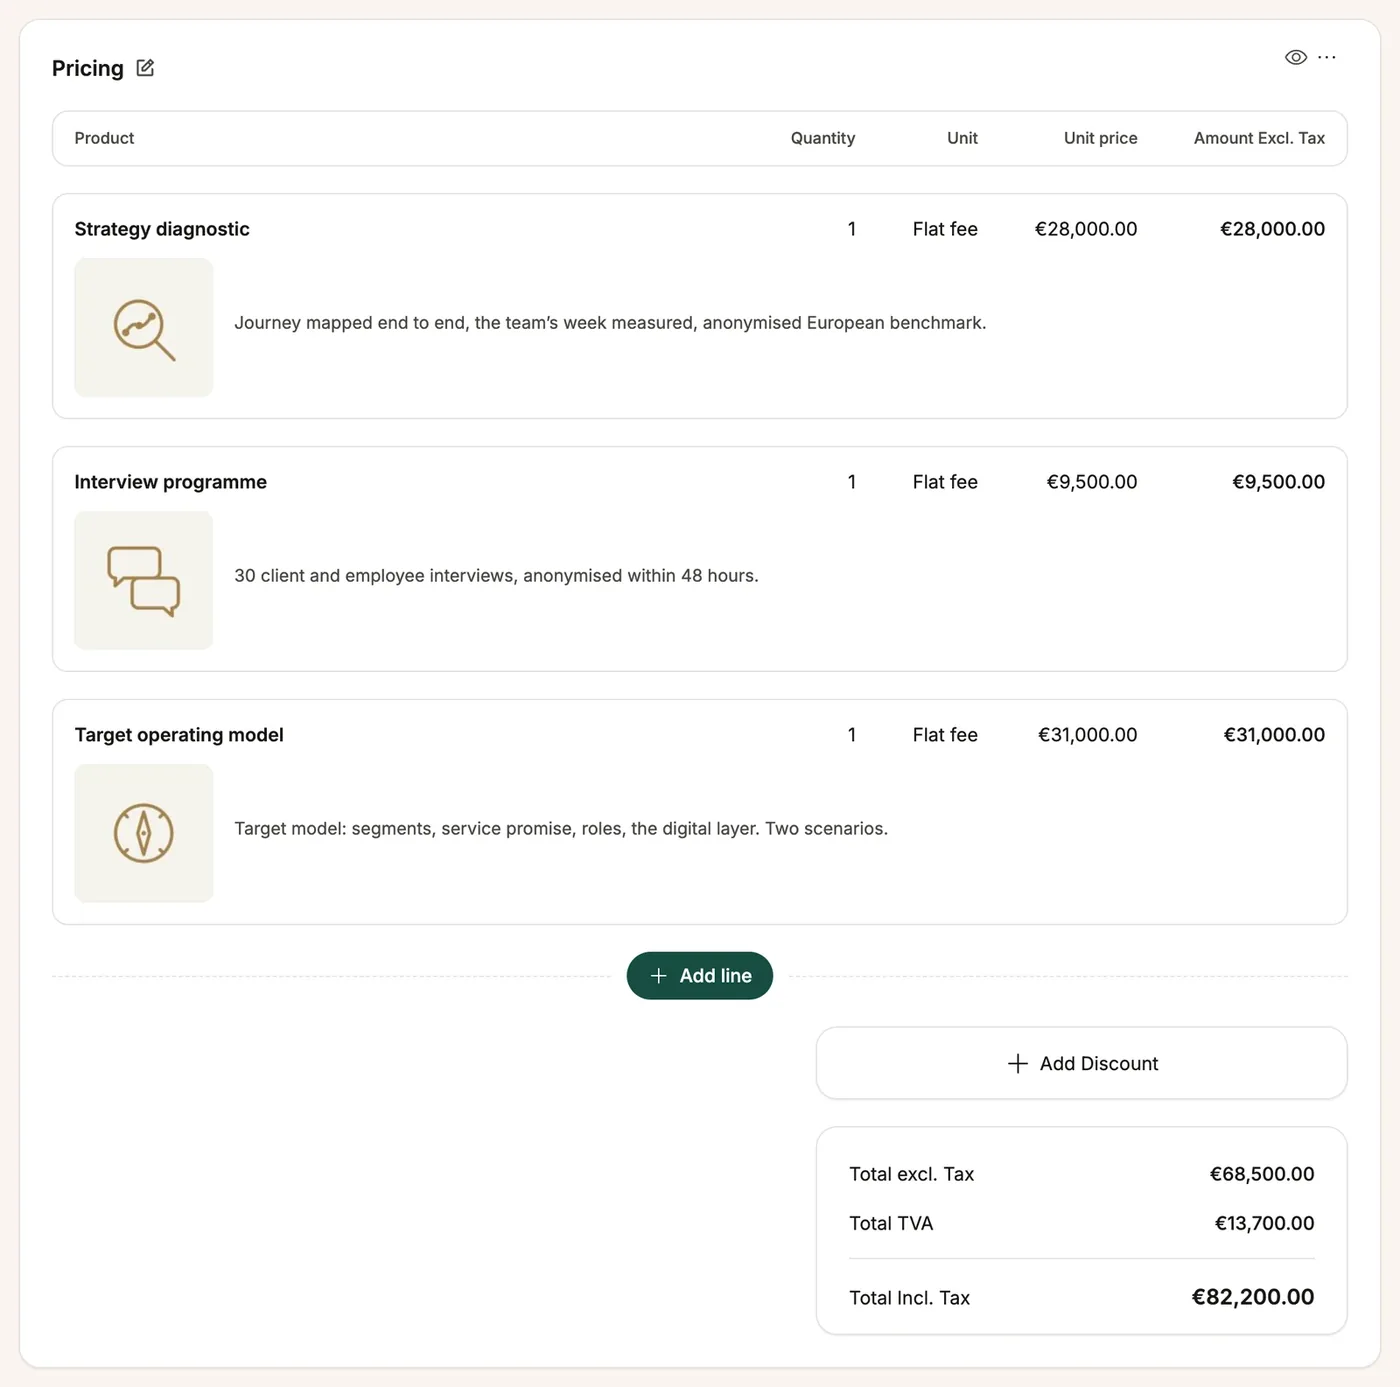
How to use it The Add line button offers three choices:
- Add product: a product line (from the catalog or typed freely);
- Add title: a title line to structure the table (for example "Phase 1 — Diagnostic");
- Subtotal: an intermediate subtotal.
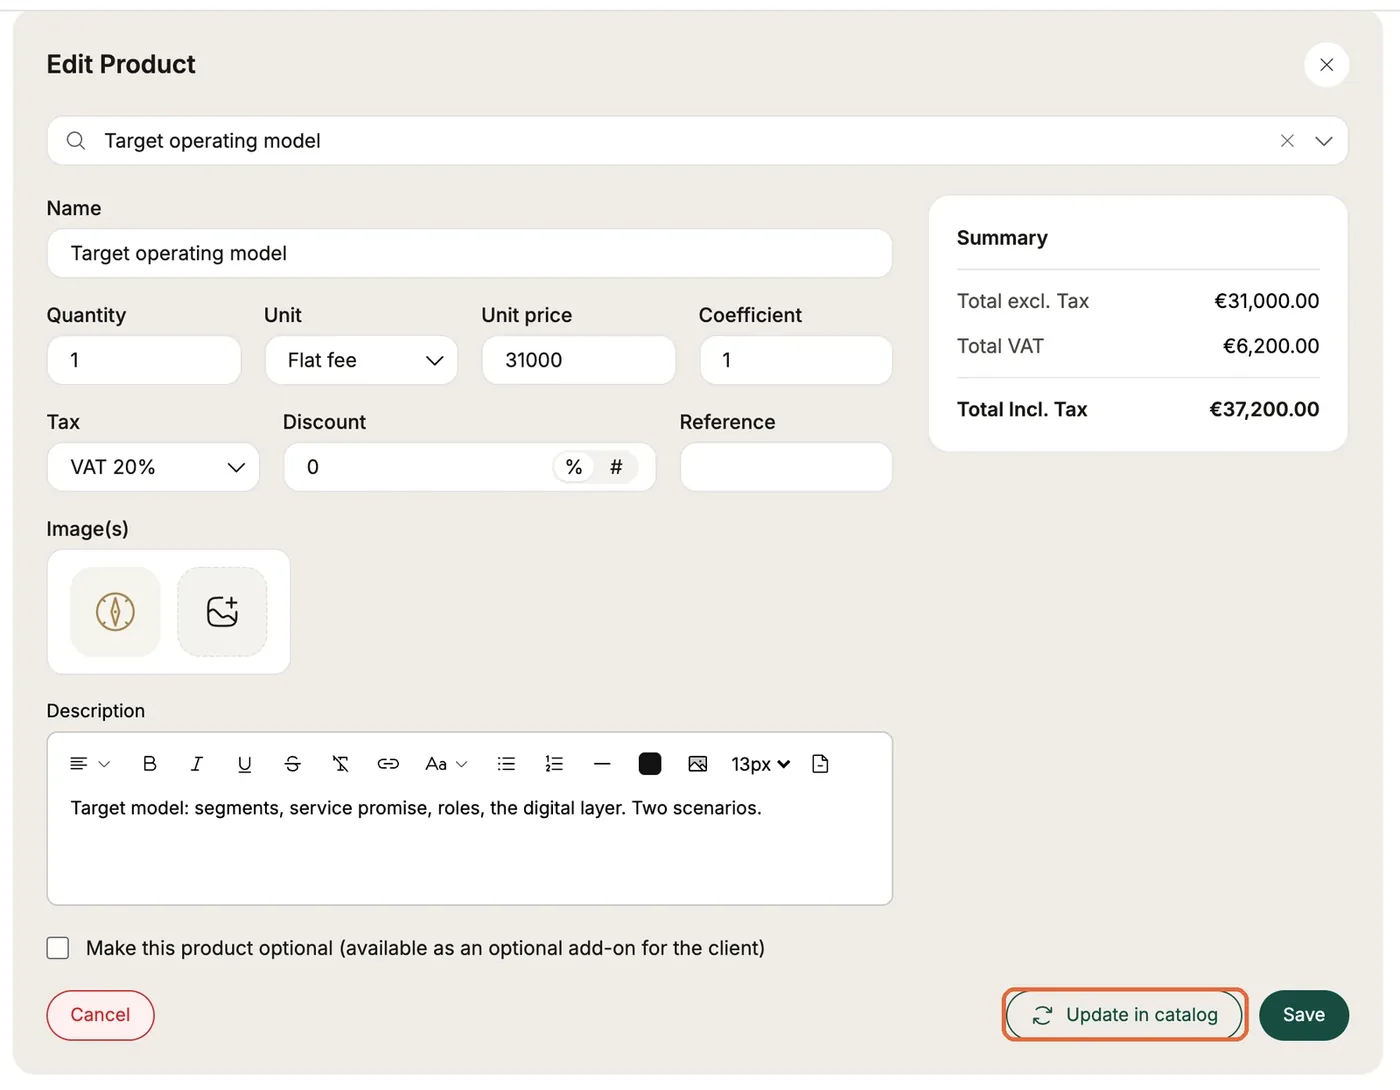
Adding or editing a product
- In the search field, type the name: if the product is in the catalog, select it — name, description, images, unit, price and tax fill in. Otherwise, type everything yourself.
- Fill in Quantity, Unit, Unit price, Coefficient (empty = 1), Tax, Discount (% or amount), Reference, Images, Description.
- Make this product optional makes the line optional (see below).
- The Summary on the right shows the line's amount excl. tax, tax and total live.
- Save saves the line.
Good to know
- Keyboard shortcuts: Esc closes without saving (with a confirmation if there are changes), Enter saves from a single-line field, Cmd + Enter (Ctrl + Enter on PC) saves from anywhere.
- Update in catalog copies your changes (description, images, unit, price for the quote's price category) to the catalog product. For a line typed by hand, the button becomes Add to catalog.
- A line's photos are saved as soon as you add them.
- The price taken from the catalog depends on the deal's price category (see deal settings).
A line's menu
When you hover a line, a handle lets you drag it and the ⋯ button (or a right-click) opens its menu: Edit, Duplicate, Insert before / after, Move up / Move down, Move to top / Move to bottom (within its section), Mark as option, Hide, Delete.
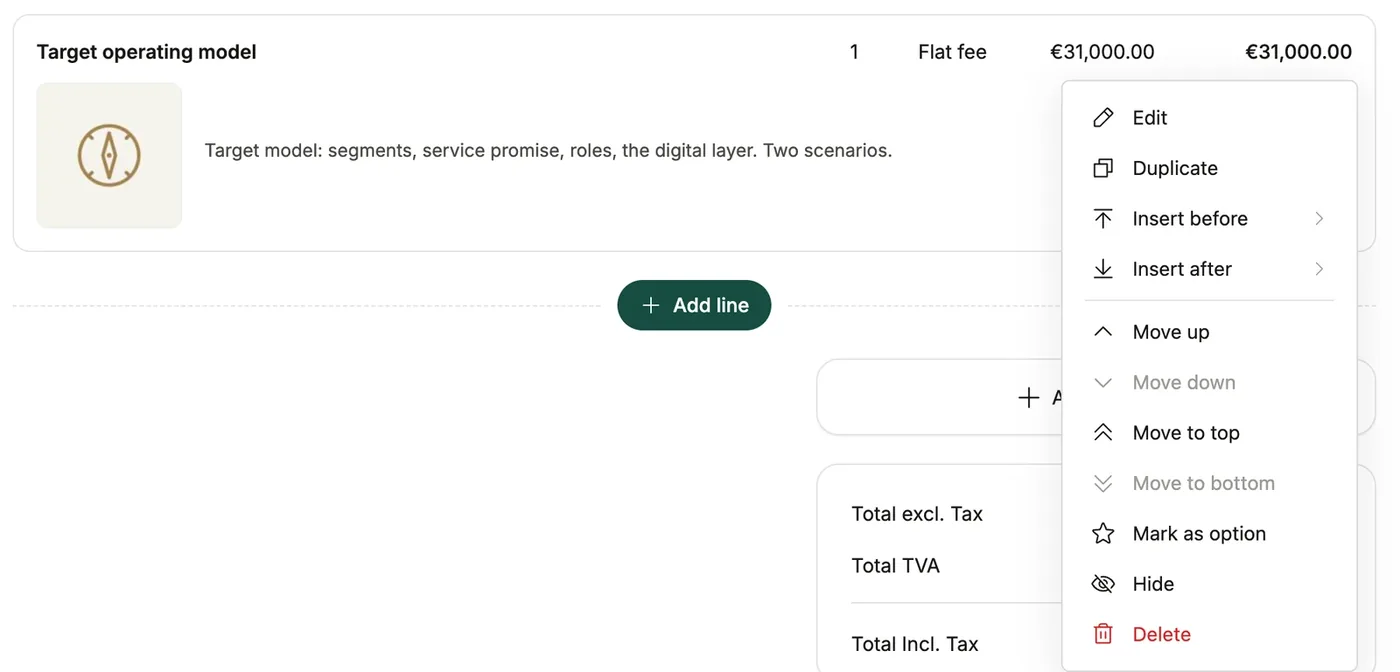
Tip: the "Move…" commands are handy for very tall lines (long description, large photo) that are hard to drag.
Optional lines
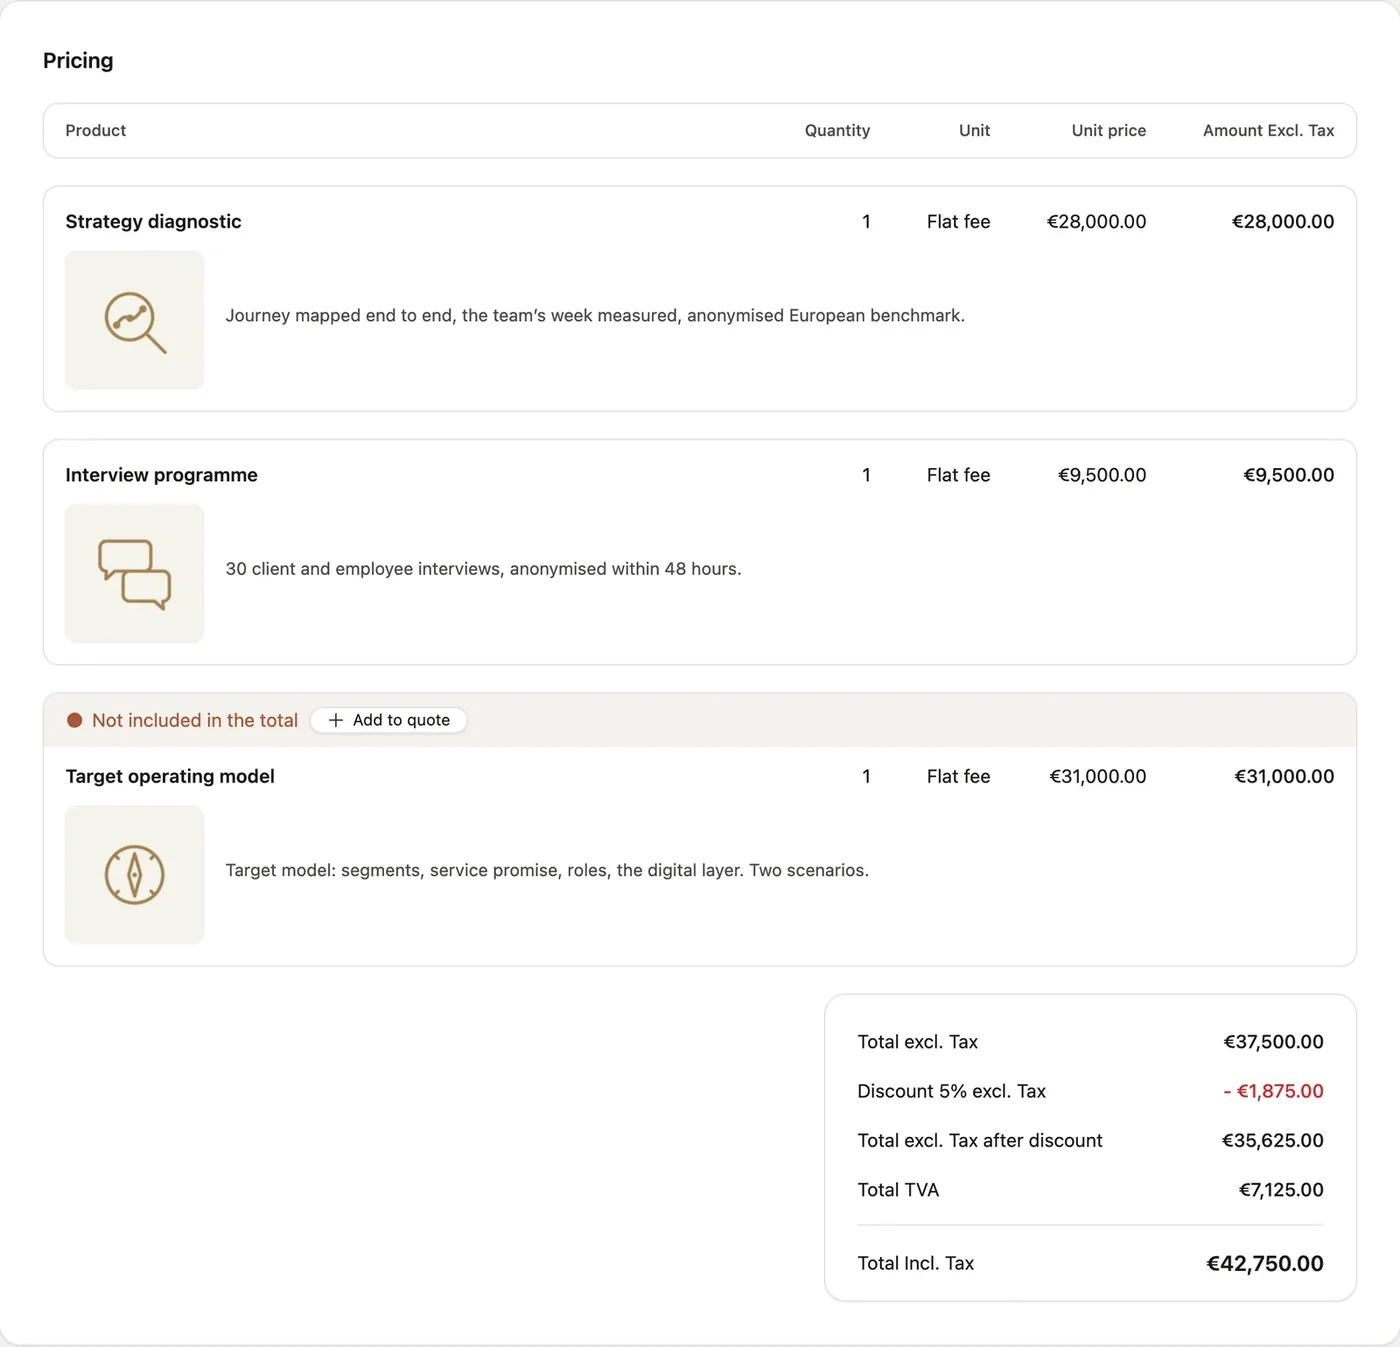
What it does Offer an "extra" and let your client decide. They choose it themselves, from the page they receive.
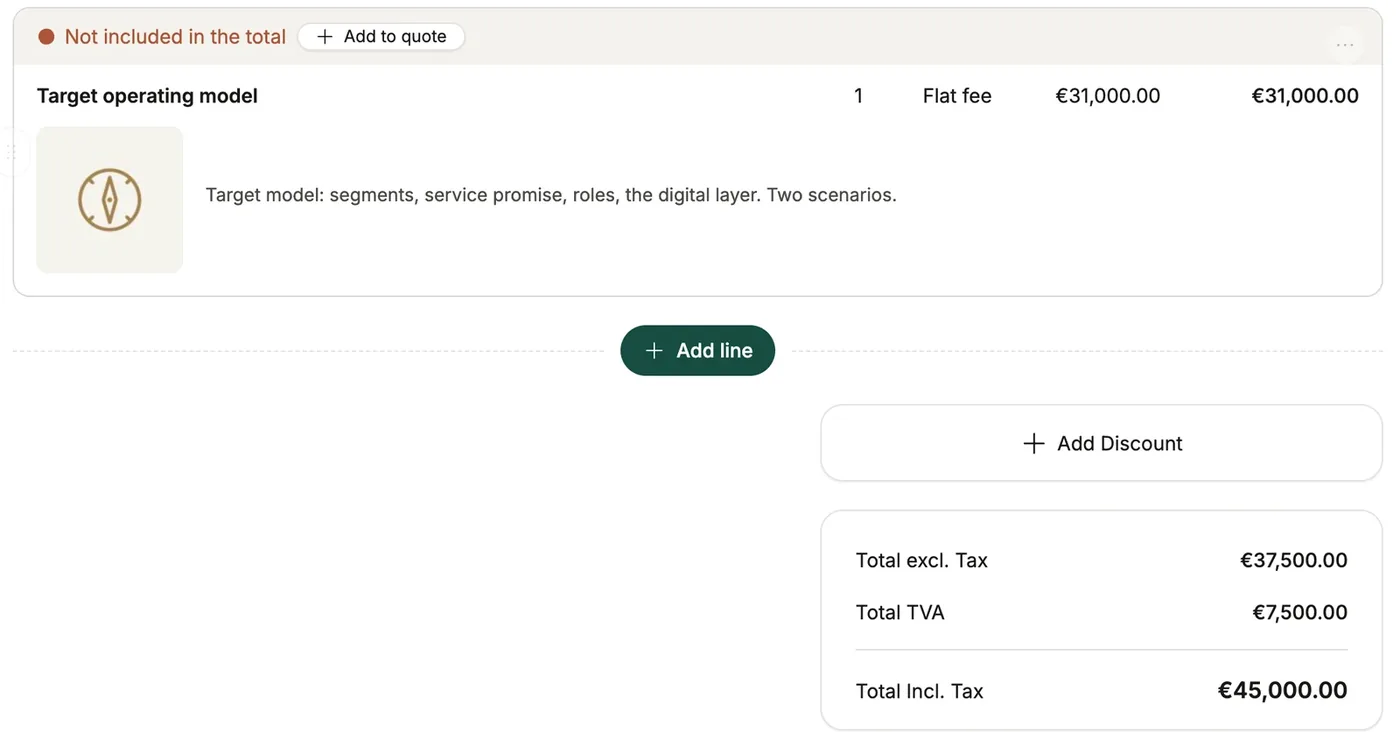
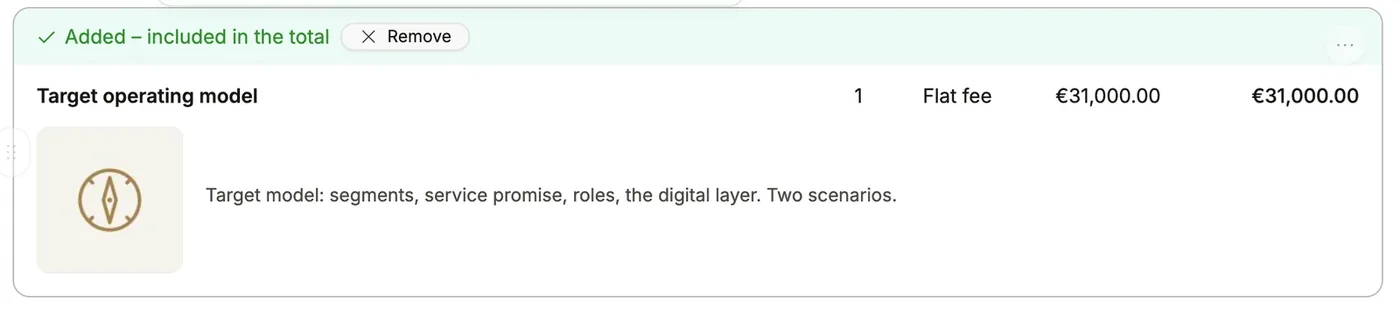
How to use it Make a line optional (form checkbox or Mark as option). A strip appears above the line:
- "Not included in the total" with an Add to quote button: the line is offered but not counted;
- "Added – included in the total" with a Remove button: it's taken and counted.
Good to know
- The choice instantly updates the subtotals, the summary, the payment schedule, the card amount and the amount shown at signing time.
- You see the client's choice in the editor and can change it.
- The strip's wording can be rewritten in the table settings (see below).
Discounts
Two discounts that can be combined:
- per line: in the line editor (% or amount);
- on the whole table: Add Discount, below the table, then the type (% or amount) and the value.
As soon as a discount applies, the totals show the discount (in red) and a Total excl. Tax after discount line.
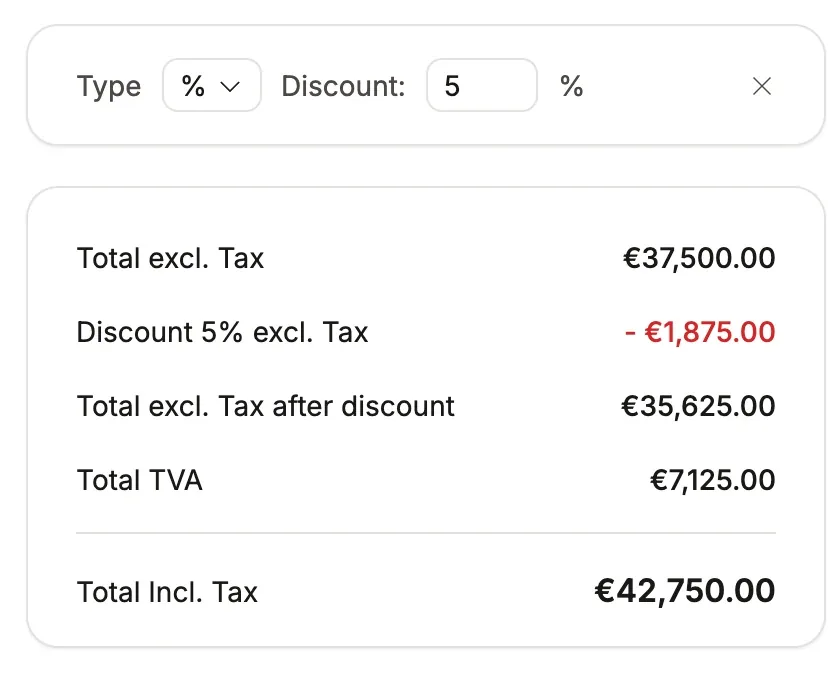
Table settings
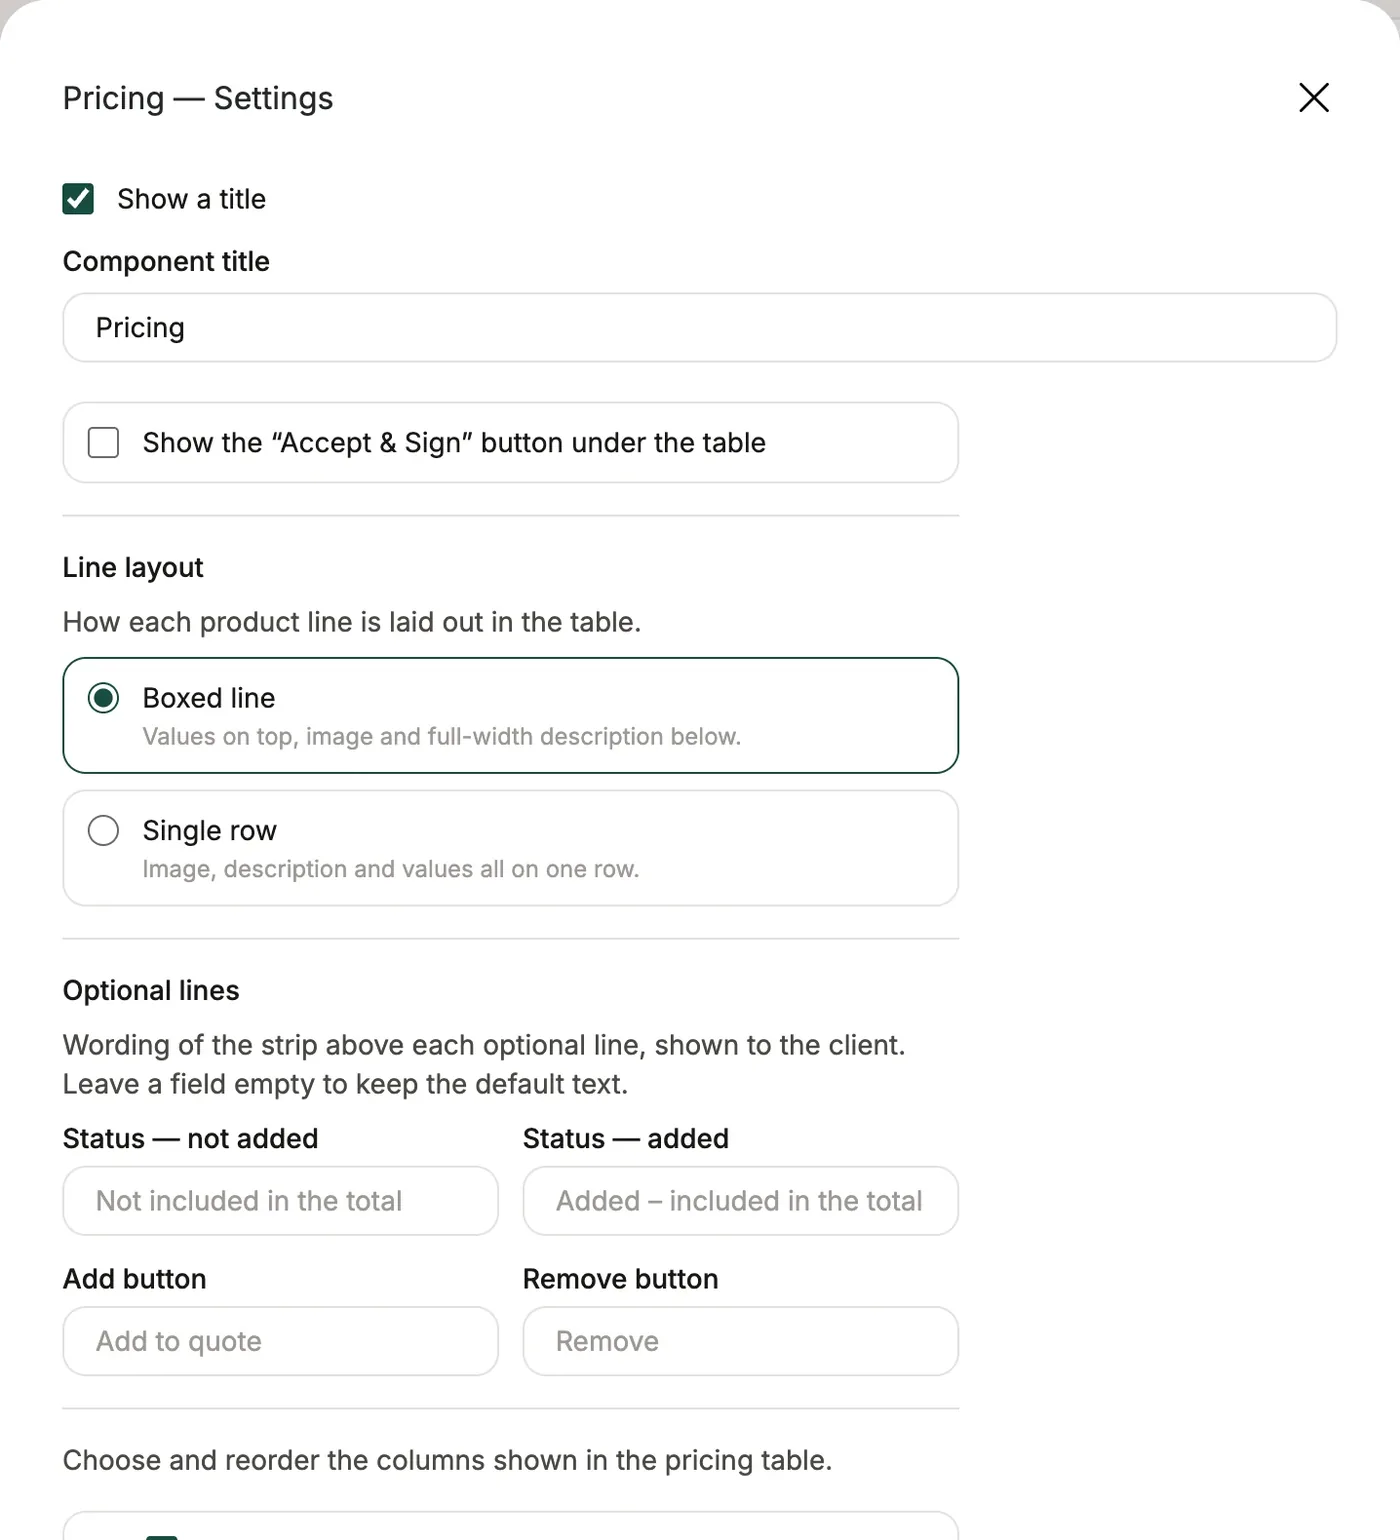
Block ⋯ menu → Settings:
- Show a title and the block title;
- Show the "Accept & Sign" button under the table: a button under the table that takes the client to the signature block;
- Line layout: Boxed line (each product in its own frame: values on top, image and description below) or Single row (everything on one row). Boxed line is the layout for new tables; your older quotes keep theirs;
- Optional lines: rewrite the four texts of the options strip (an empty field keeps the default text);
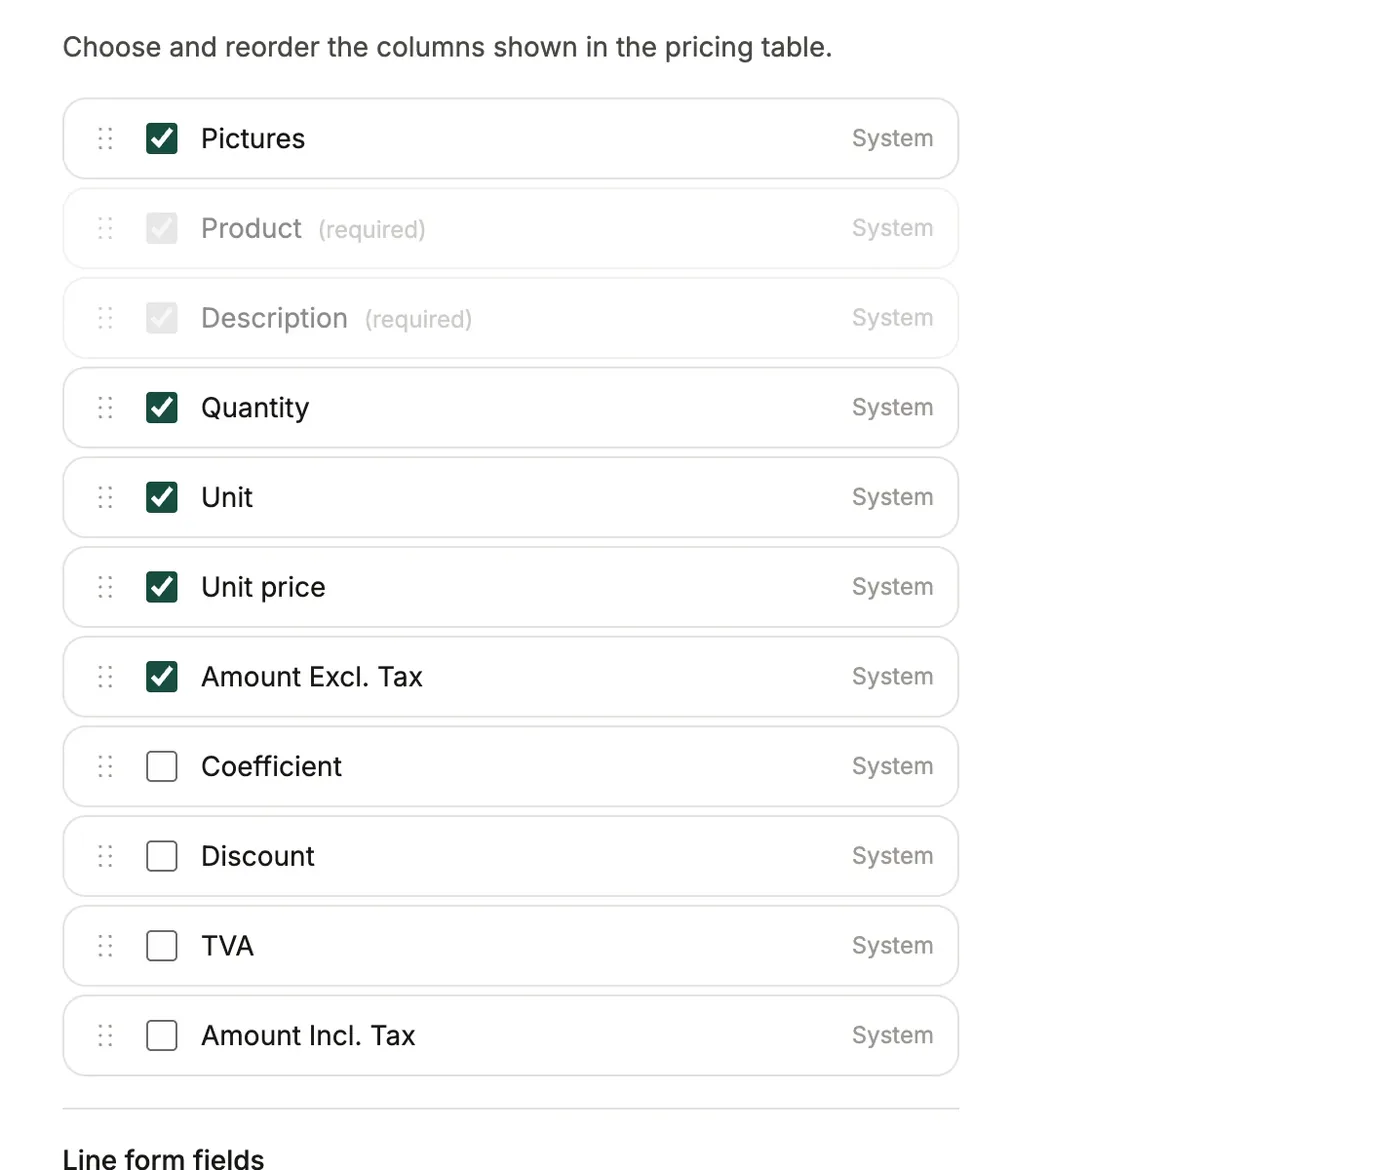
- the columns shown, to check and order;
- Line form fields: your line custom fields to fill in from the line editor.
Good to know
- 8 columns maximum. Description is required, and Product too in Boxed line layout.
- Your line custom fields can be used as columns, including a rich text field (shown formatted).
- The tax word in the totals ("VAT", "TVA"…) follows your account's country, not the interface language. Change it in Settings → Taxes, or for a single deal in its settings.
- Deleting a table that contains lines asks for confirmation.
Custom Fields
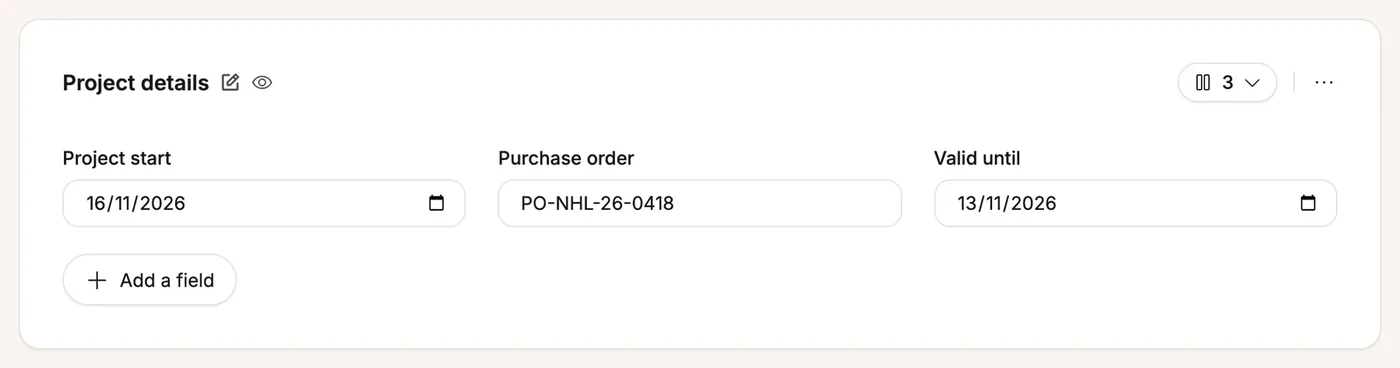
What it does Neatly display the quote's custom fields: start date, purchase order, valid-until date, internal reference…
How to set it up
- Add a field (or the block's Settings): check the fields to show and order them.
- The columns selector spreads them over 1 to 3 columns.
- Fill in the values right in the block.
Good to know Available fields are created in Settings → Custom Fields, "Quotation" tab. On the client side they're read-only.
Attachments
What it does Offer files to download: brochure, terms, appendices… taken from your media library.
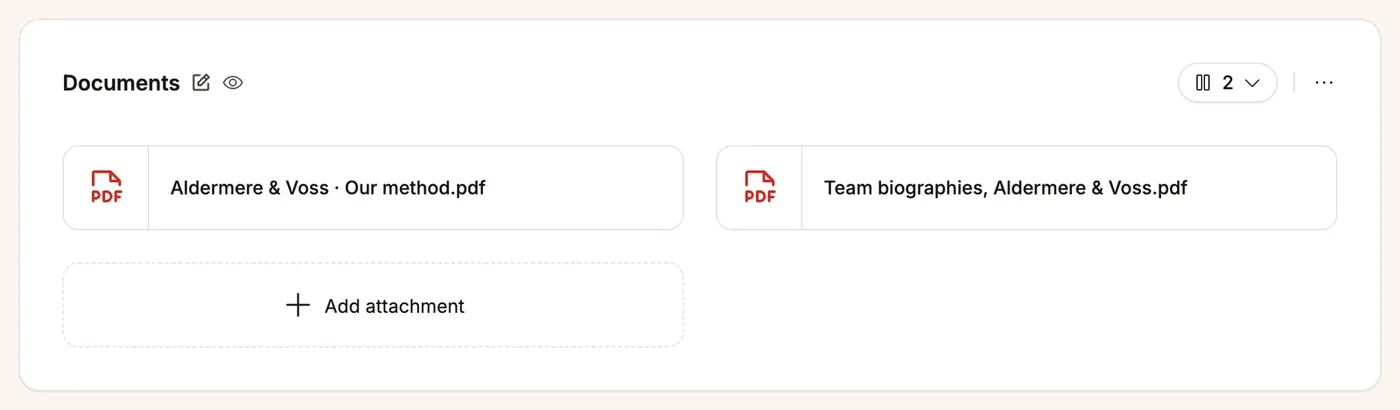
How to set it up Add attachment to pick one or more files (or upload them), and the columns selector for the layout. For a document to read right in the page, use PDF File instead.
Image gallery
What it does A grid of photos: past work, team, products… On click, the client opens the image full size and scrolls through the gallery.

How to set it up Add images to pick several images, then the columns (1 to 6) and rows selectors. The grid starts at 3 × 2.
Good to know Beyond the grid's cells, the last thumbnail shows a "+x" badge, but the viewer contains every image. Images load at the right size: sharp, without weighing the client down.
PDF File
What it does A PDF document readable right inside the page: brochure, method, specifications…
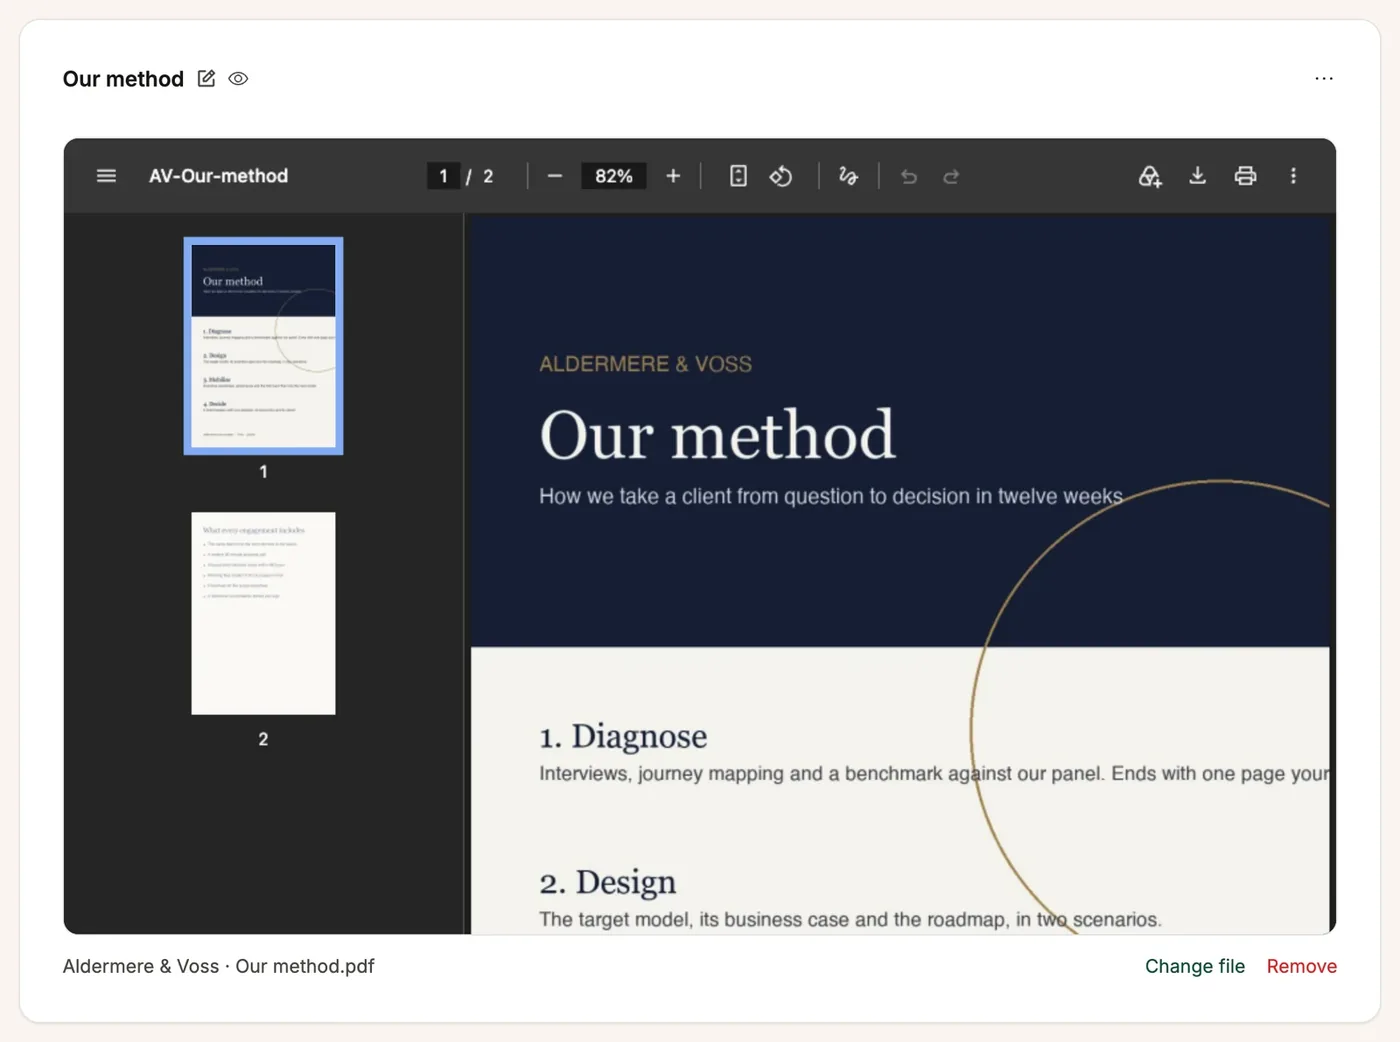
How to set it up Pick a PDF from the media library (or upload one). Change file replaces it, Remove removes it. One PDF per block.
YouTube, PowerPoint, Google Slides and Canva
What they do Embed an existing video or presentation, viewable without leaving the proposal.
How to set them up
- YouTube: paste the video link (watch, youtu.be, Shorts, live); several videos are spread over 1 to 3 columns. The video must be public or unlisted.
- PowerPoint presentation: pick the file from the media library; it's shown through the Microsoft Office Online viewer.
- Google Slides: paste the share, edit or "Publish to the web" link. The presentation must be shared with anyone who has the link.
- Canva: paste the design's share link, with public access.
Embed
What it does Insert content from another tool — a Guideflow demo, a Loom video, a Typeform form…
How to set it up
Paste the link or the full embed code (only the link is kept, https:// only), then choose the format: 16:9, 4:3, 1:1 or fixed height in pixels. A preview appears in the editor.
Good to know Use this block rather than an HTML block for embeds: inside an HTML block they stay blank.
FAQ
What it does Questions and answers as an accordion: the client clicks a question to read the answer. Ideal for handling classic objections.
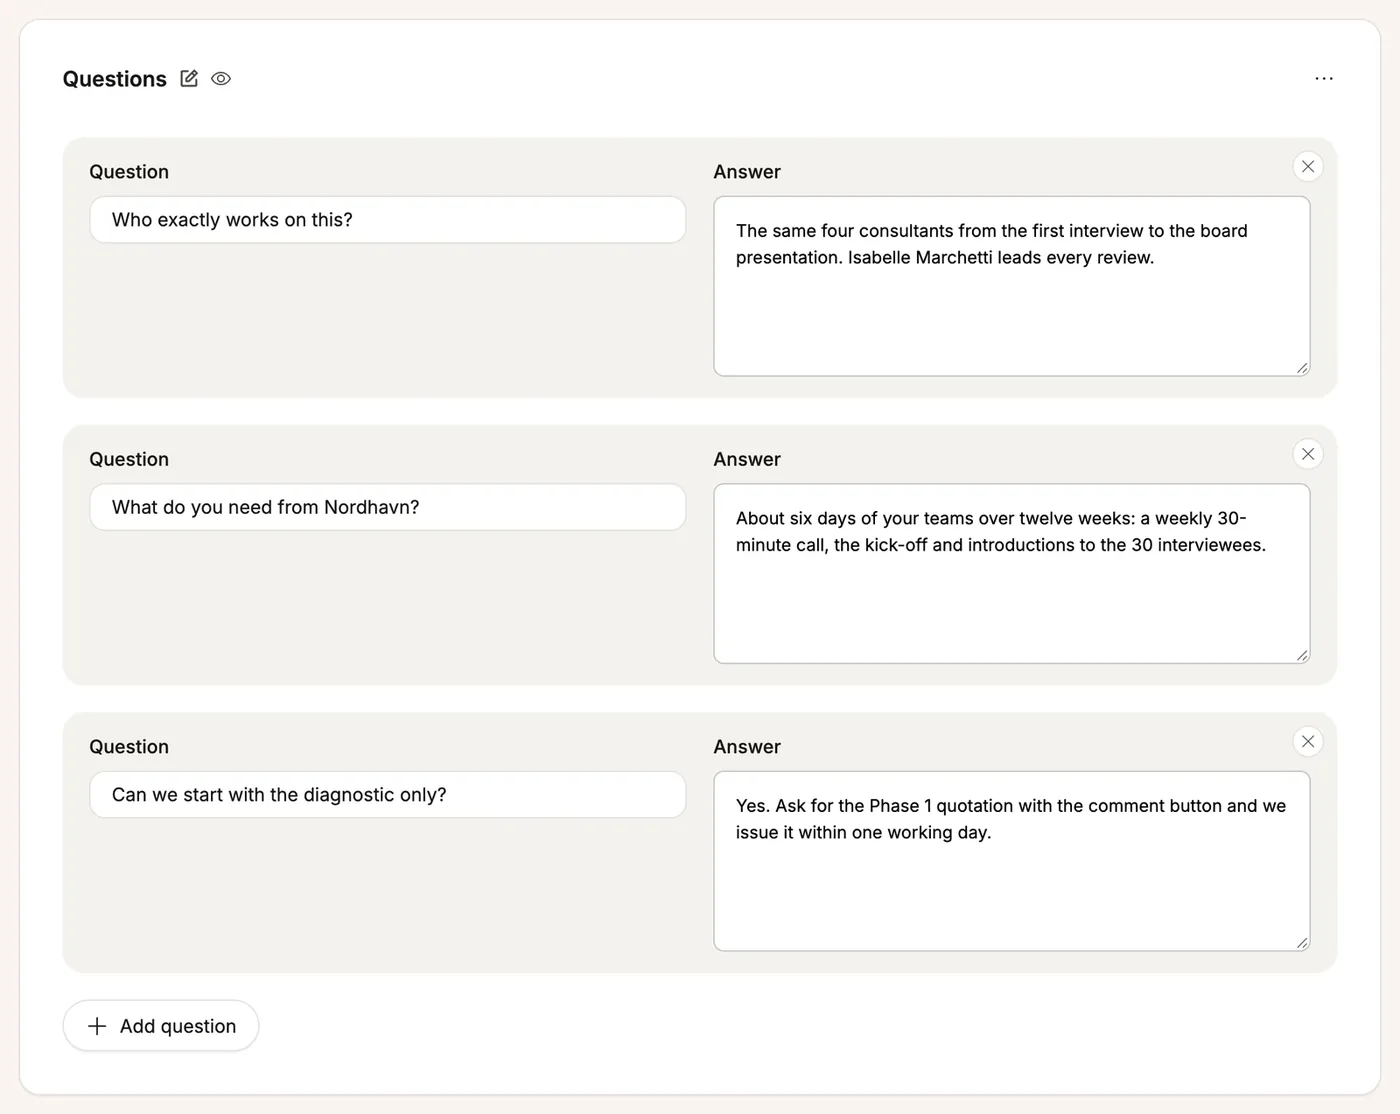
How to set it up Add question adds a question / answer pair; the cross removes it. The text is plain, without formatting.
Payment Schedule
What it does A payment schedule — deposit, then installments — calculated automatically from the quote total.
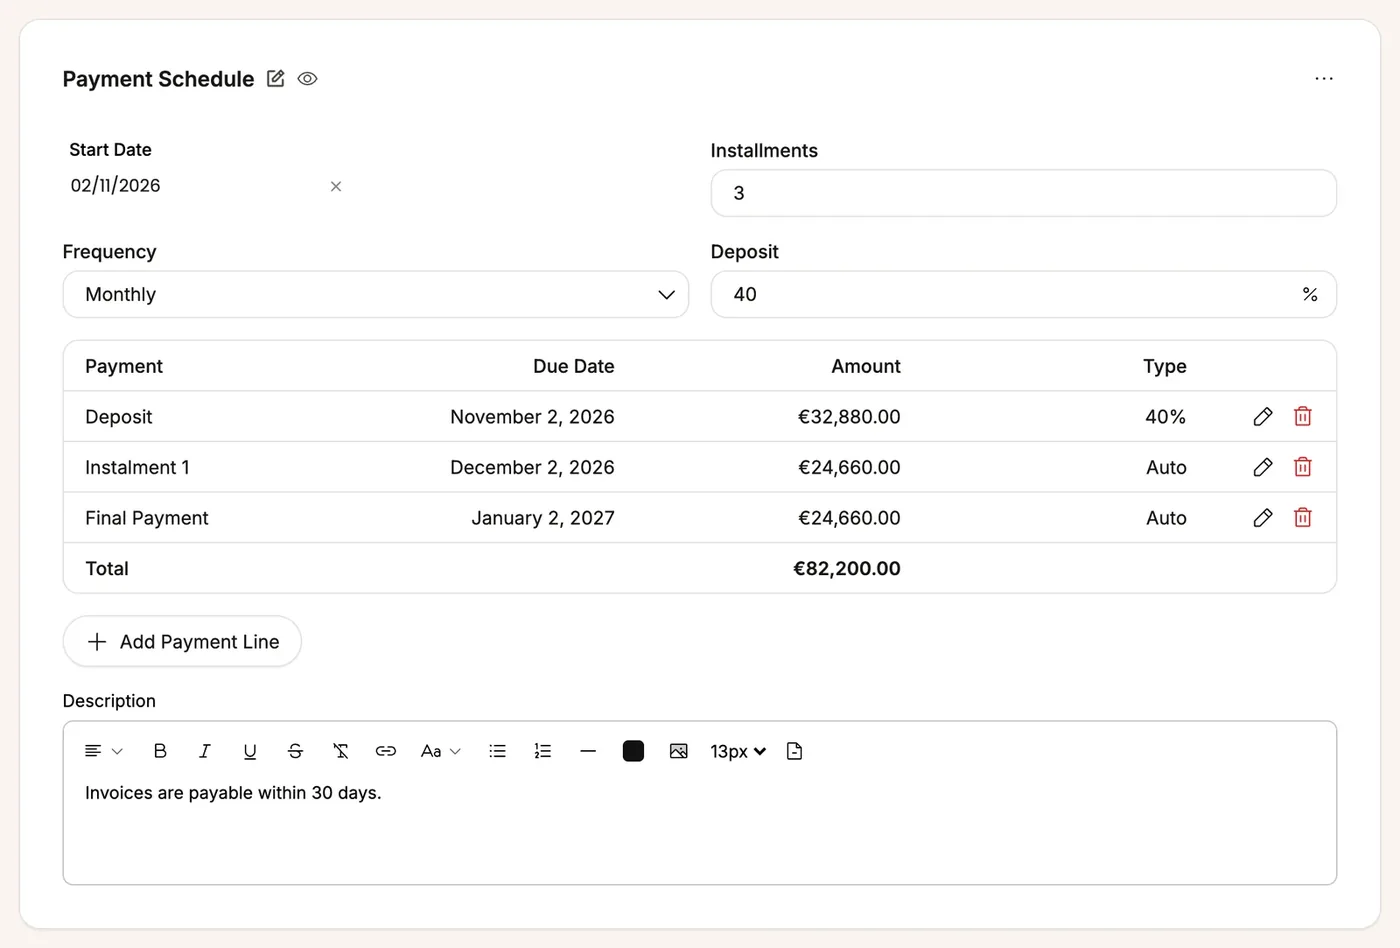
How to set it up
- Set the start date, the number of installments, the frequency (weekly, monthly, quarterly, yearly) and the deposit percentage.
- The lines are generated; adjust them by hand (pencil) or add more with Add Payment Line.
- The Description area holds your notes (payment methods, terms…).
Good to know
- The amount split is the quote total incl. tax: options not taken, hidden lines and hidden tables are excluded, discounts are deducted.
- The schedule updates by itself when the quote changes, without overwriting your dates, labels or manual lines.
Legal notices
What it does The legal footer: your company's logo, name and details, and the legal text (terms of sale, notices…).
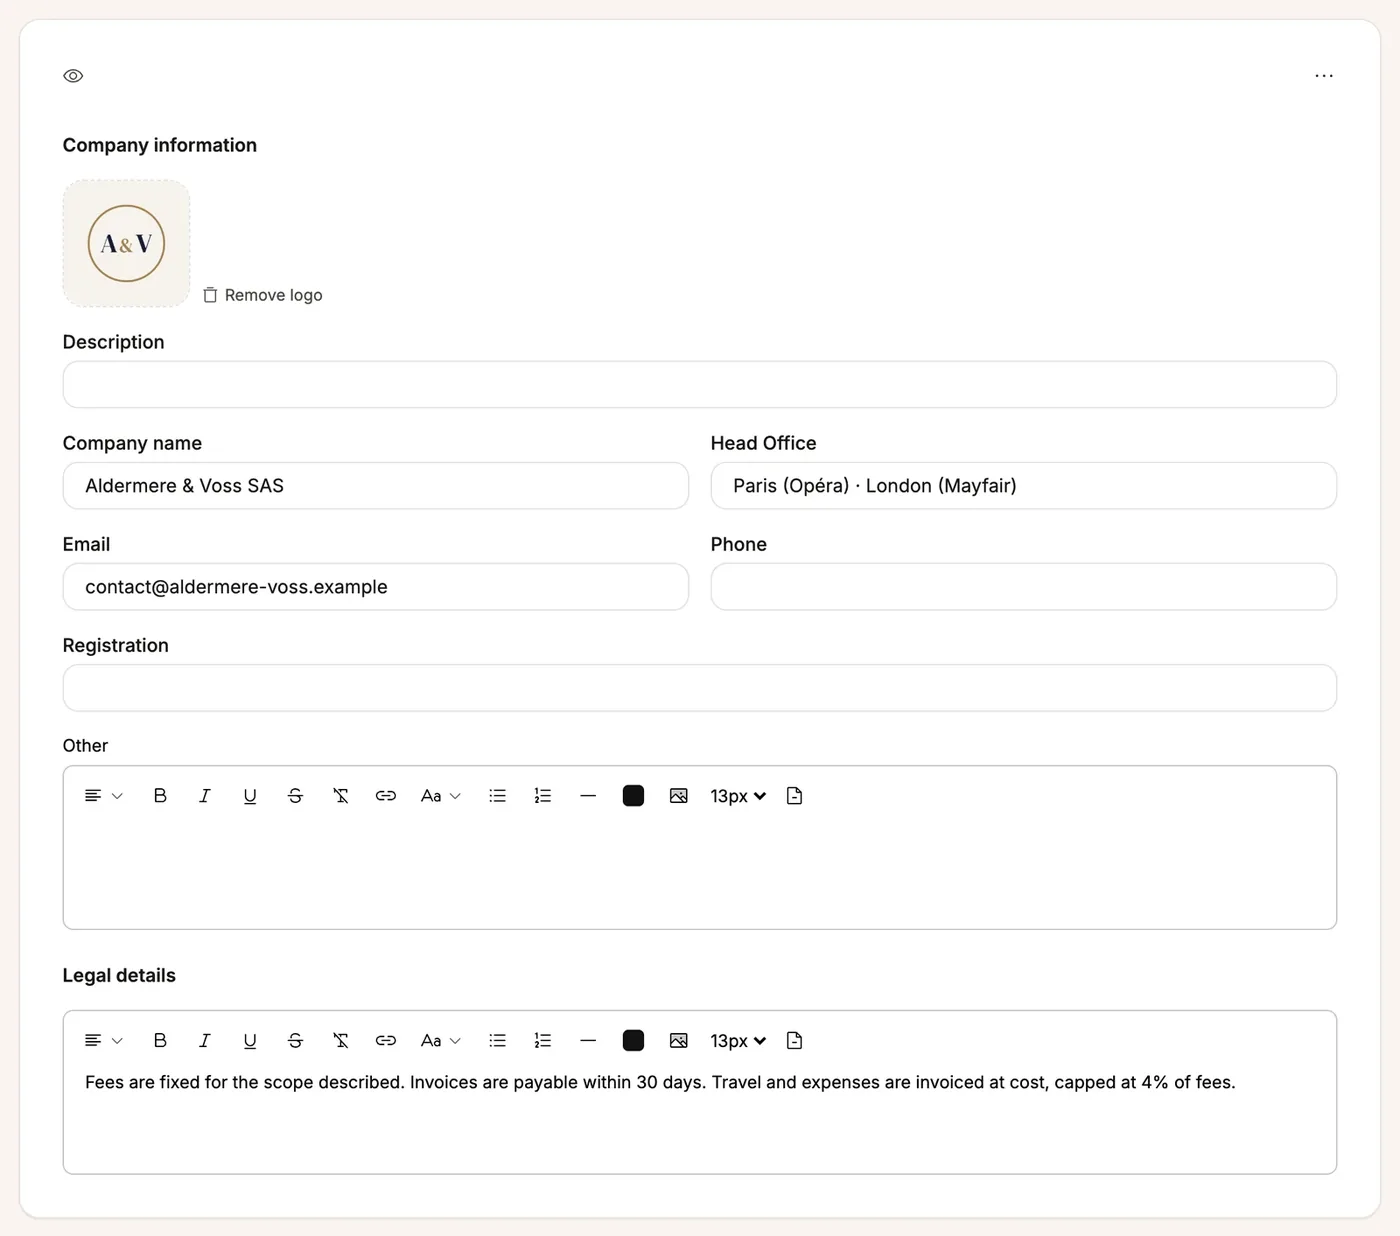
How to set it up When first opened, the block is pre-filled from your company and your legal texts. Adjust each field for this quote; Remove logo removes the logo.
Good to know A field you empty stays empty, and on the client side an empty field is hidden along with its label.
Accept and sign
What it does Get your client to sign online. Once the quote is signed, the block turns into a signature stamp in place.
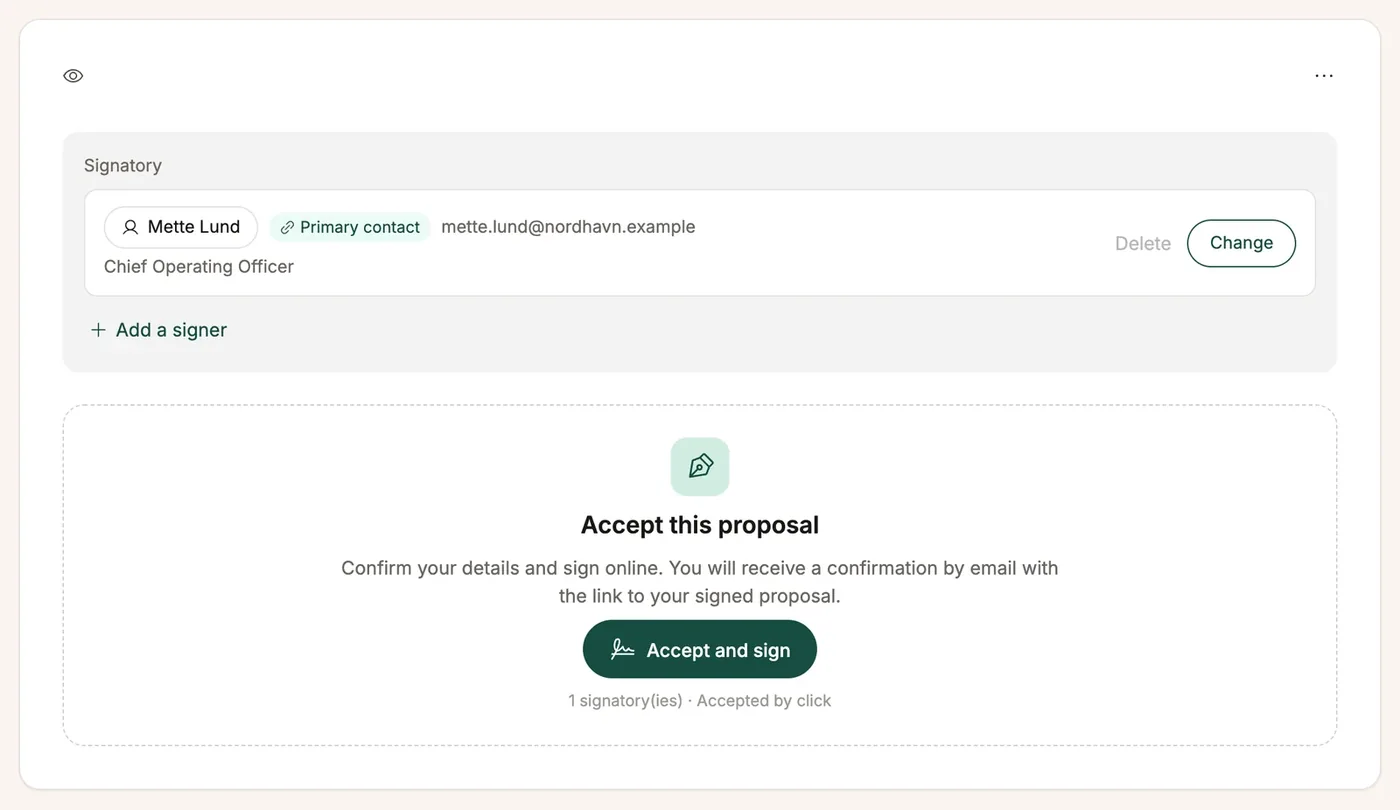
Who signs? At the top of the block (visible only in the editor), the Signatory area lists the signers:
- by default, the deal's primary contact;
- Add a signer adds a person; all signers must sign, in any order;
- Change opens the signer's form, Delete removes them.
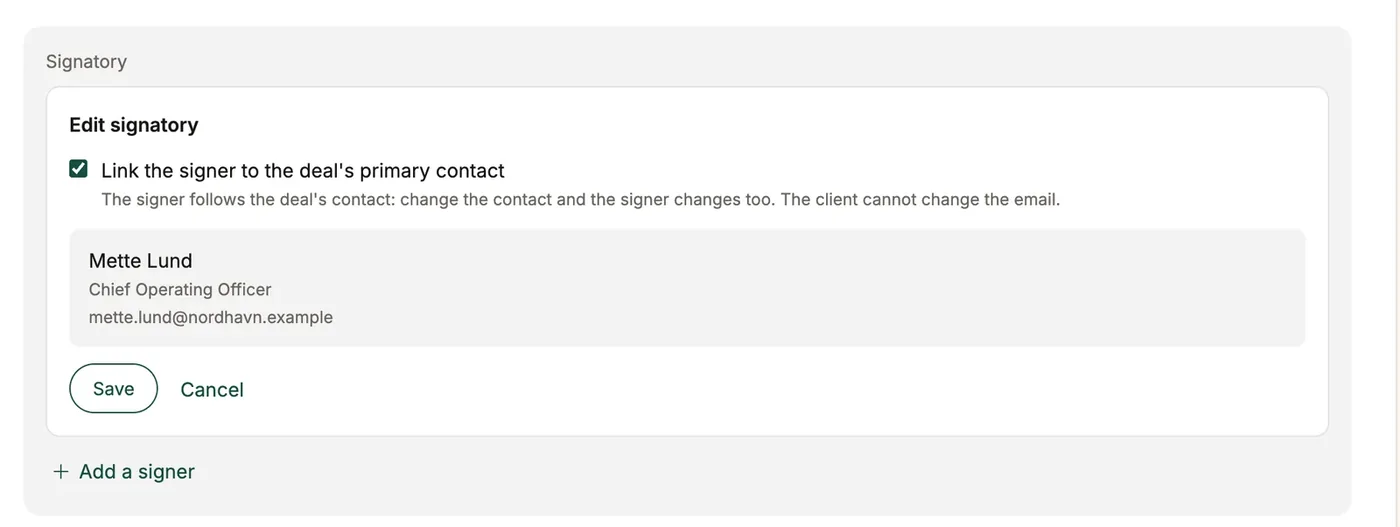
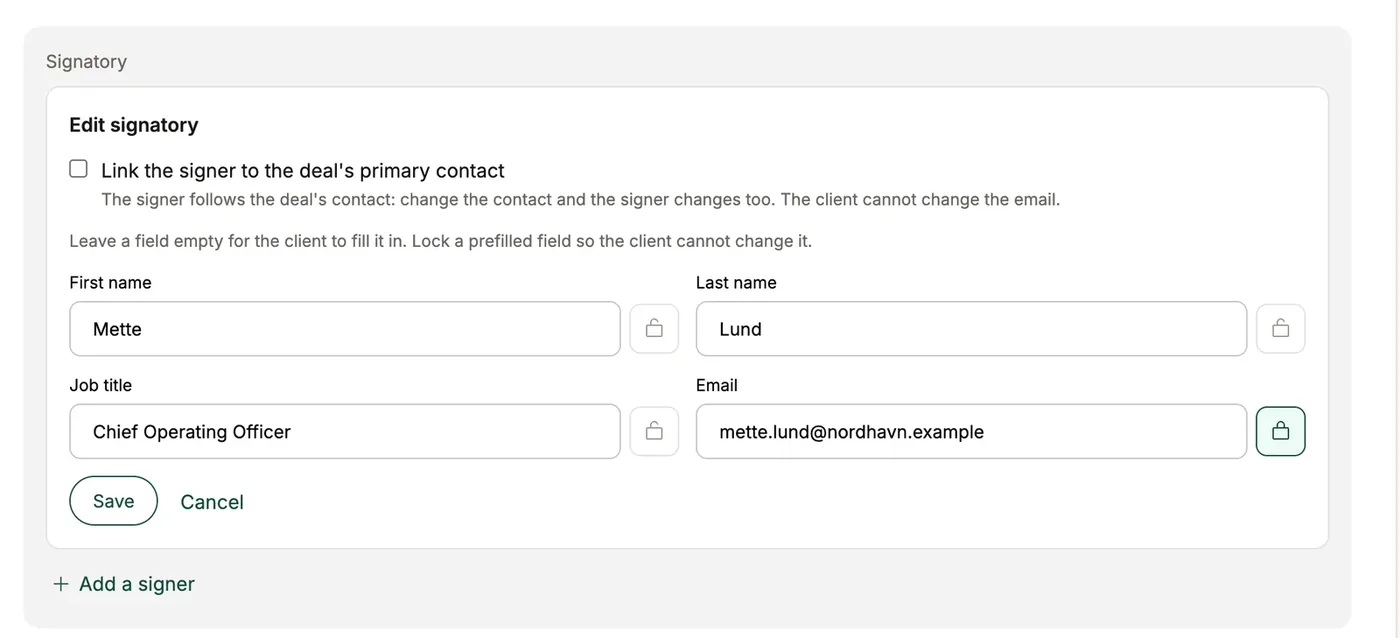
A signer's form:
- Link the signer to the deal's primary contact: the signer follows the deal's contact (change the contact and the signer changes too);
- otherwise, four fields — First name, Last name, Job title, Email. Leave a field empty for the client to fill in, or pre-fill it; the padlock locks a pre-filled field, which the client sees but can't change.
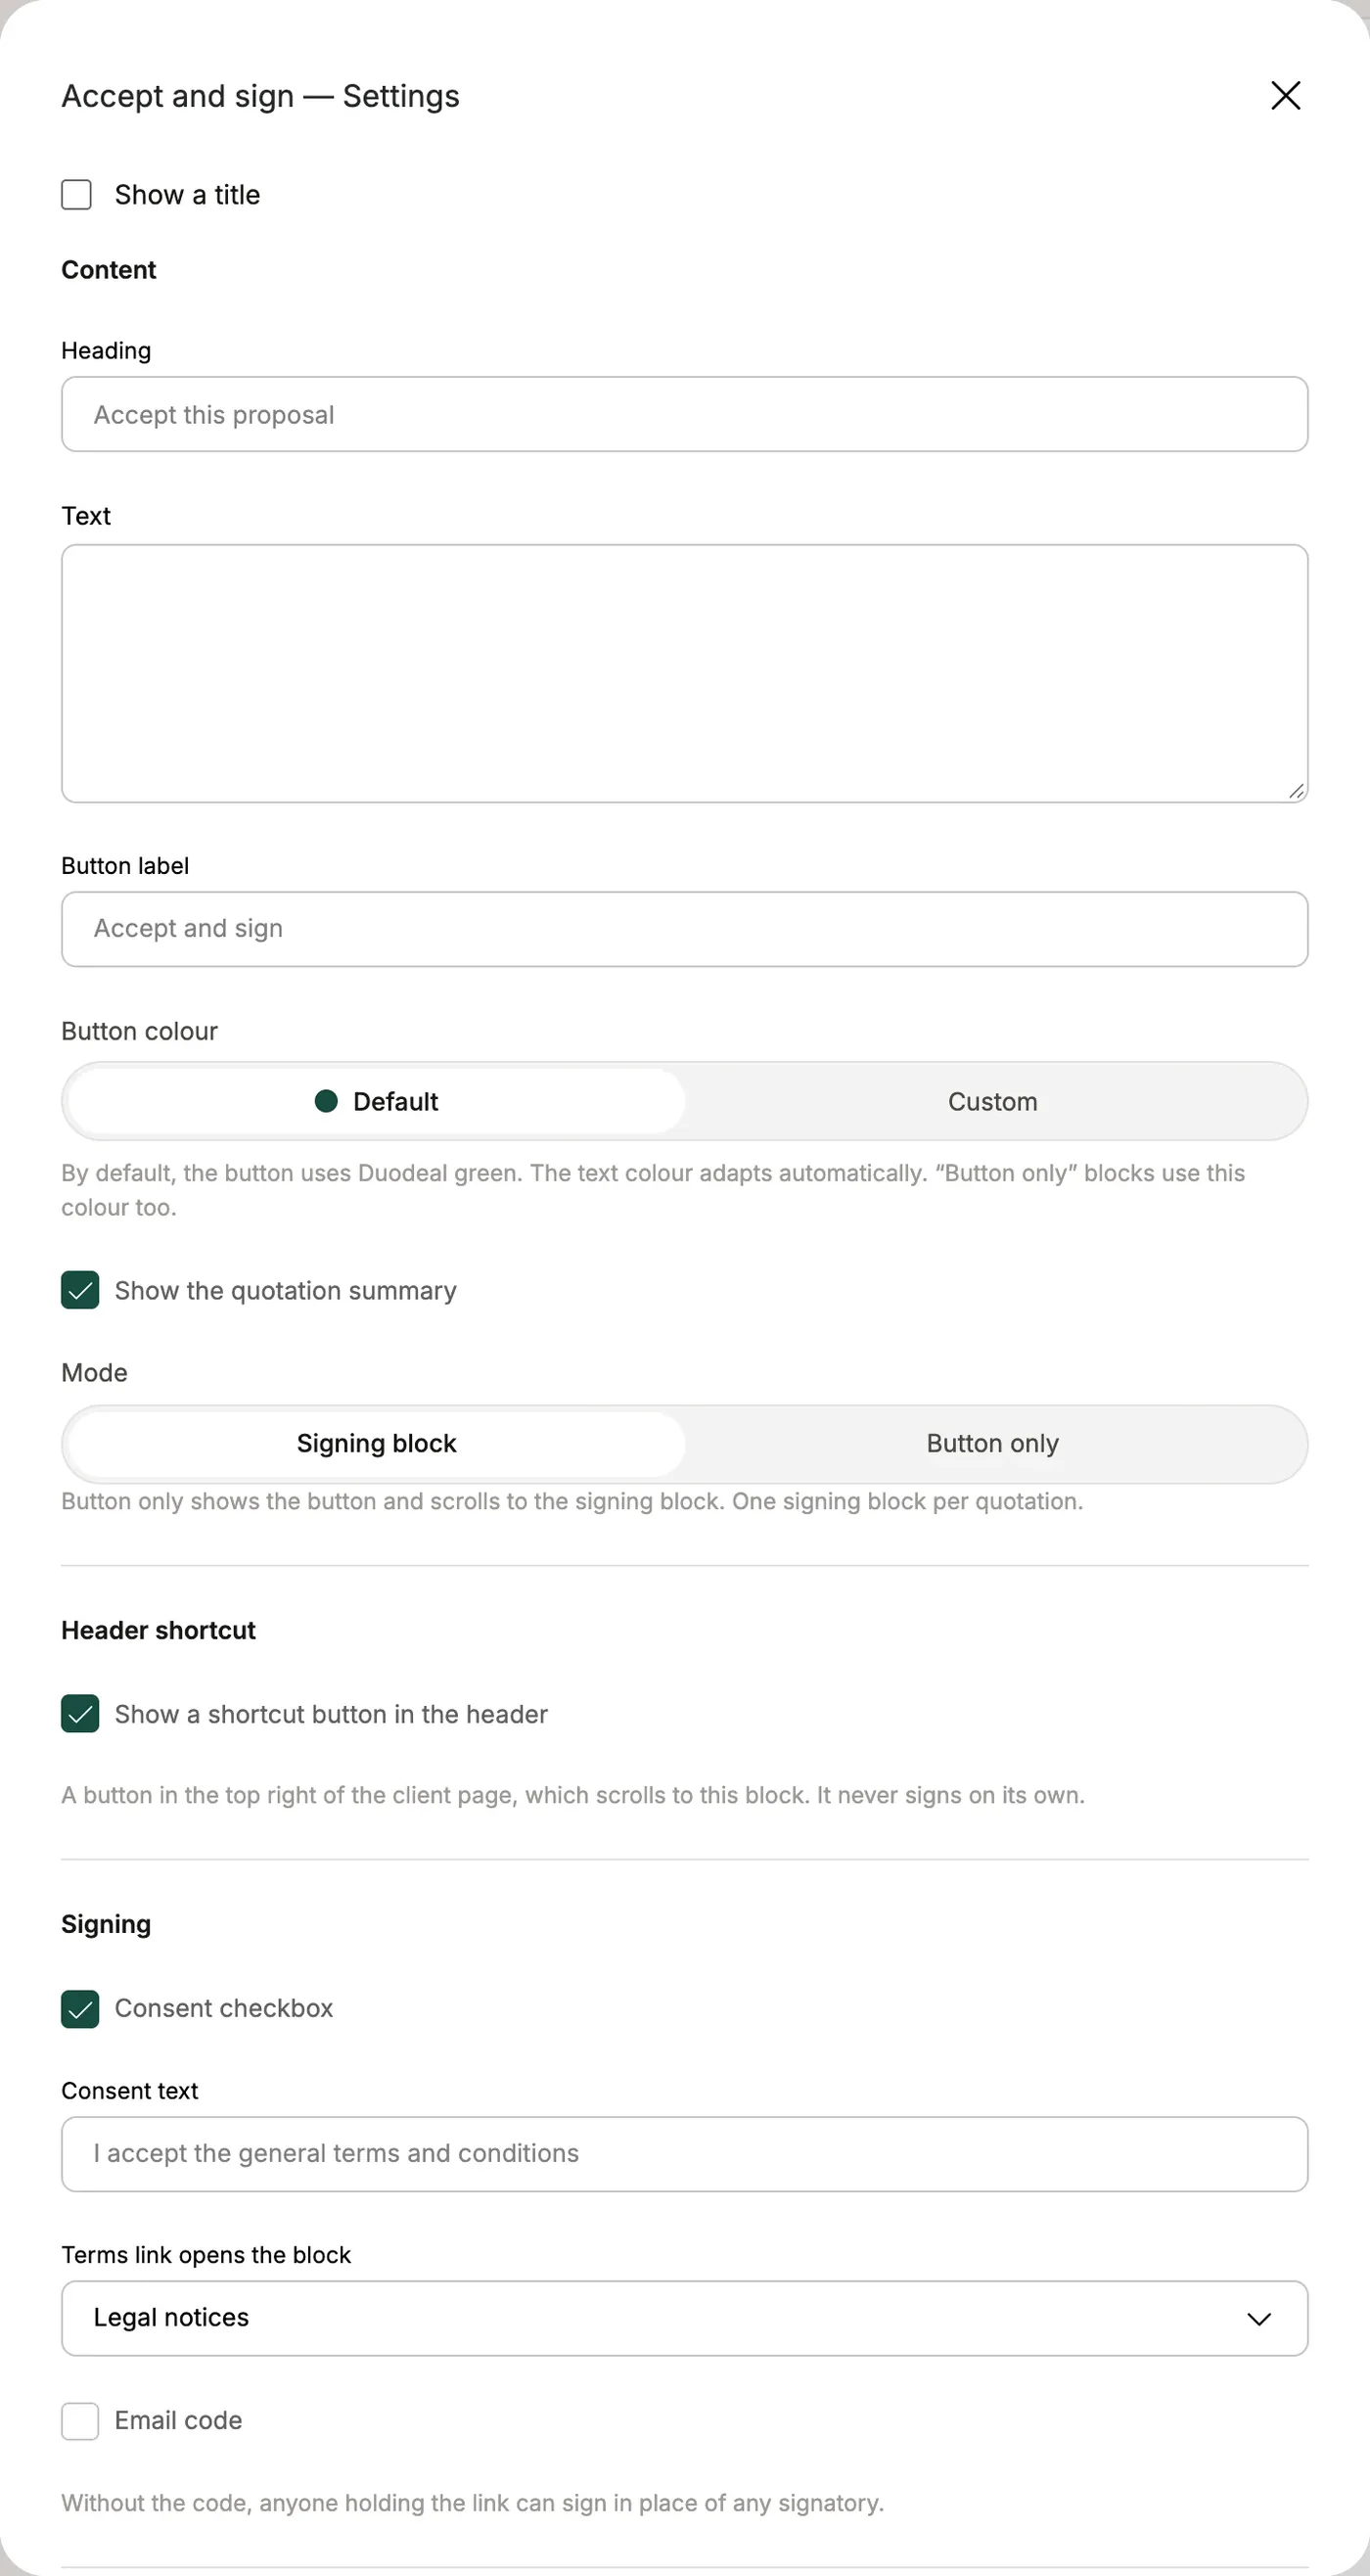
Block settings (⋯ menu → Settings):
- Content: heading, text, button label and color, Show the quotation summary, and the mode — Signing block (the block that collects the signature) or Button only (a simple button that scrolls to the signing block);
- Header shortcut: a button in the client page's top bar that takes the client to the block (on by default);
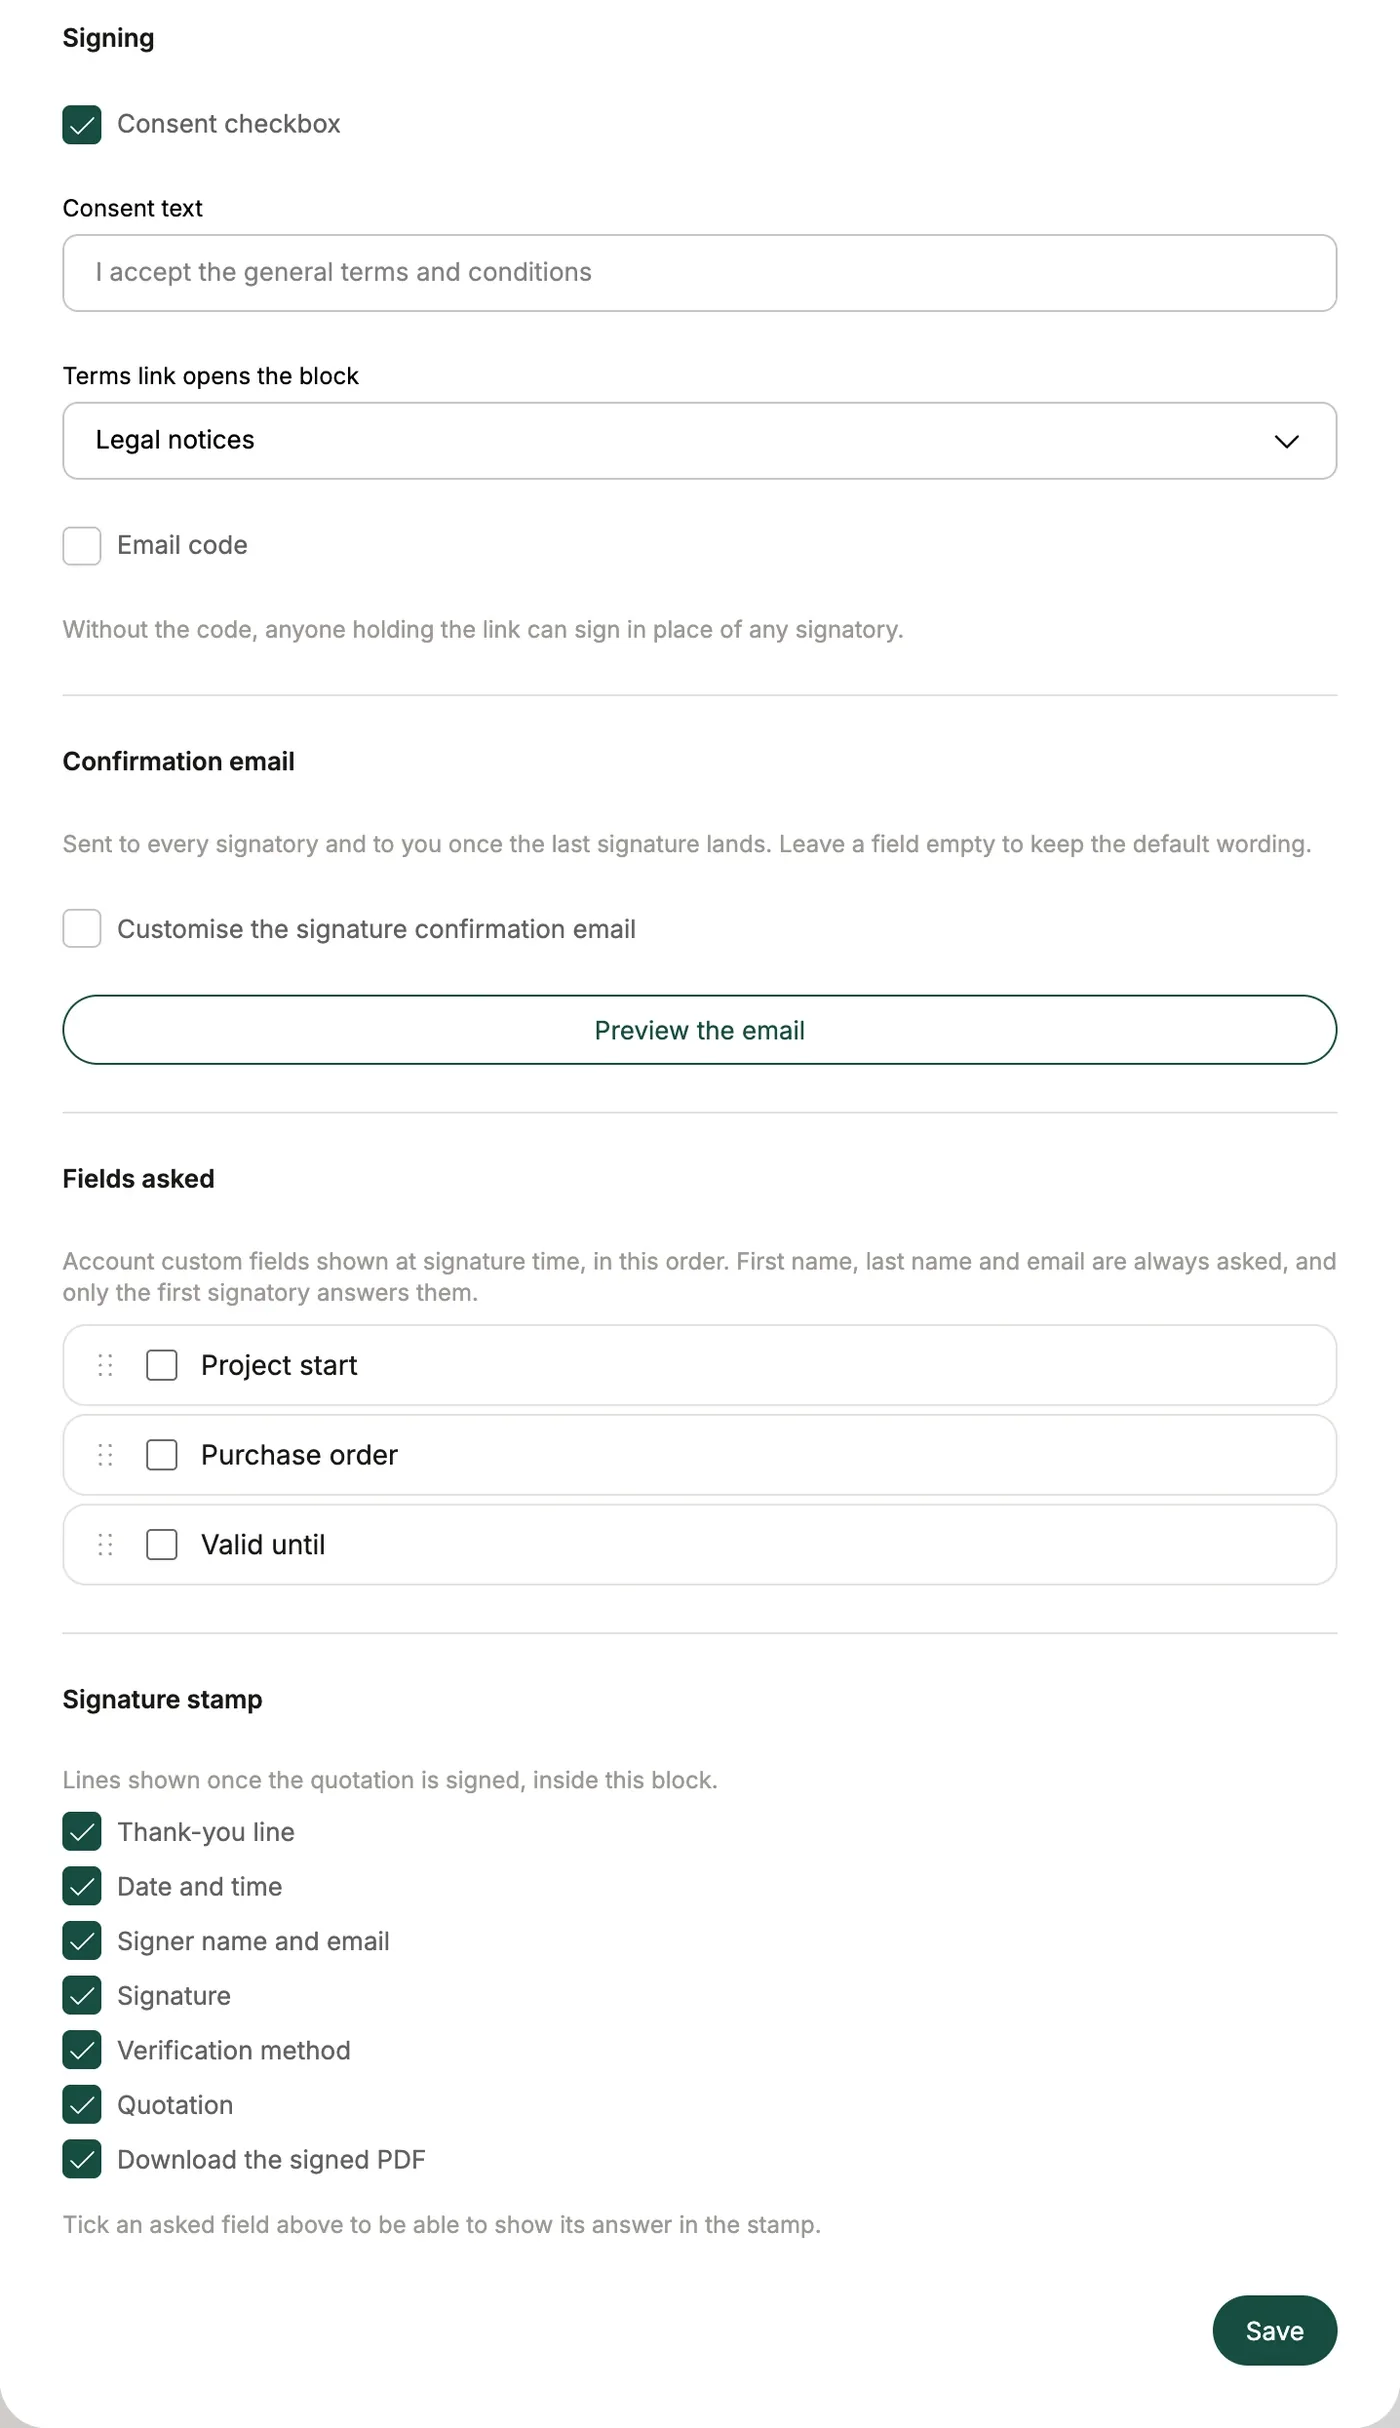
- Signing: the consent checkbox and its text, the block opened by the terms link (your Legal notices, for example), and the Email code — a 6-digit code sent to the signer before signing;
- Confirmation email: customize the "document signed" email (subject, message, button, with variables) and preview it;
- Fields asked: your quote custom fields to fill in at signing time;
- Signature stamp: the lines shown in the stamp (thank-you, date, signer, signature, method, quote, signed PDF link), and the answers to the fields asked.
Good to know
- With Email code off, anyone holding the link can sign in place of a signer. The setting reminds you of this.
- Only one block signs per quote; others can be set to "Button only".
- The block's default texts are shown in the deal's language.
- The stamp's lines lock at the first signature, so a signed document never changes appearance.
- The Accept button under the pricing table also leads to this block.
Page break
What it does Force a page break in the PDF. Invisible on screen for the client.

HTML (custom content)
What it does A completely free space for custom content: key figures, plan comparison, testimonial, form… Usually prepared by your team or the AI assistant, but you can edit it.
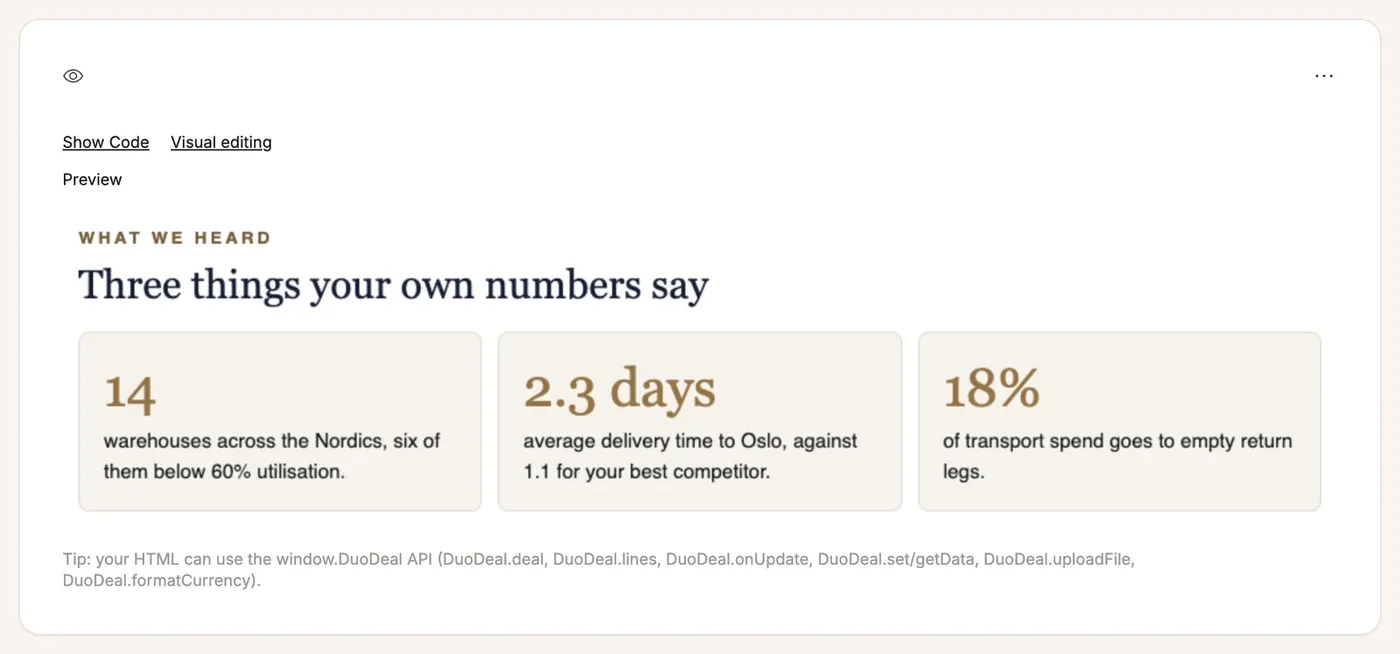
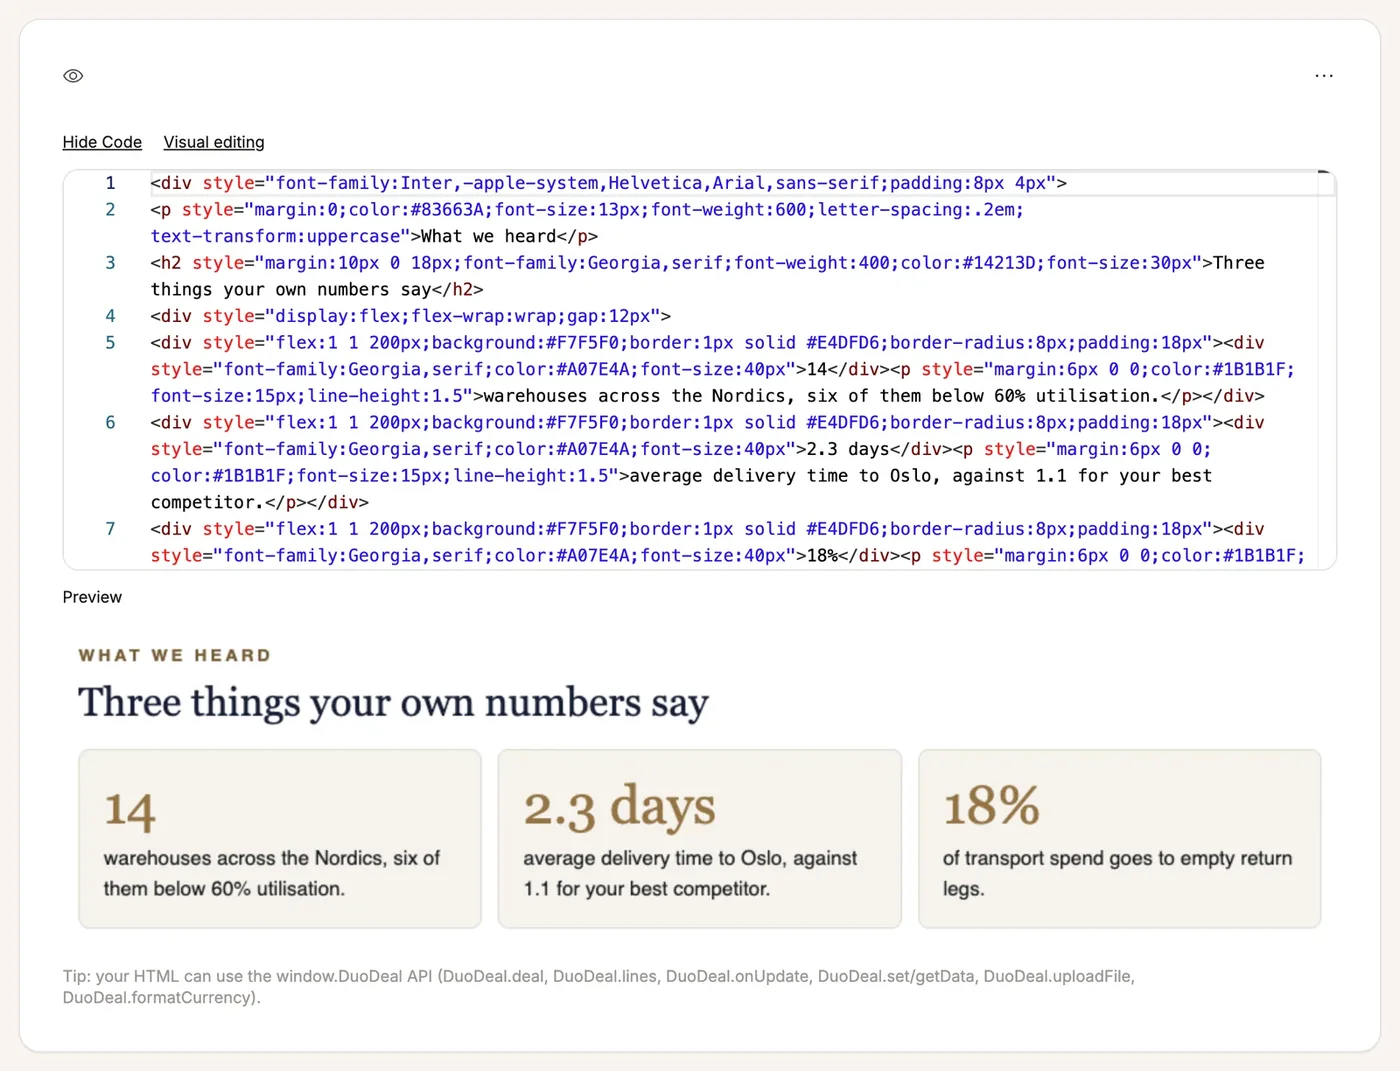
Two ways to edit it:
- Show Code: the code (HTML/CSS/JS), with the preview right below. For advanced use.
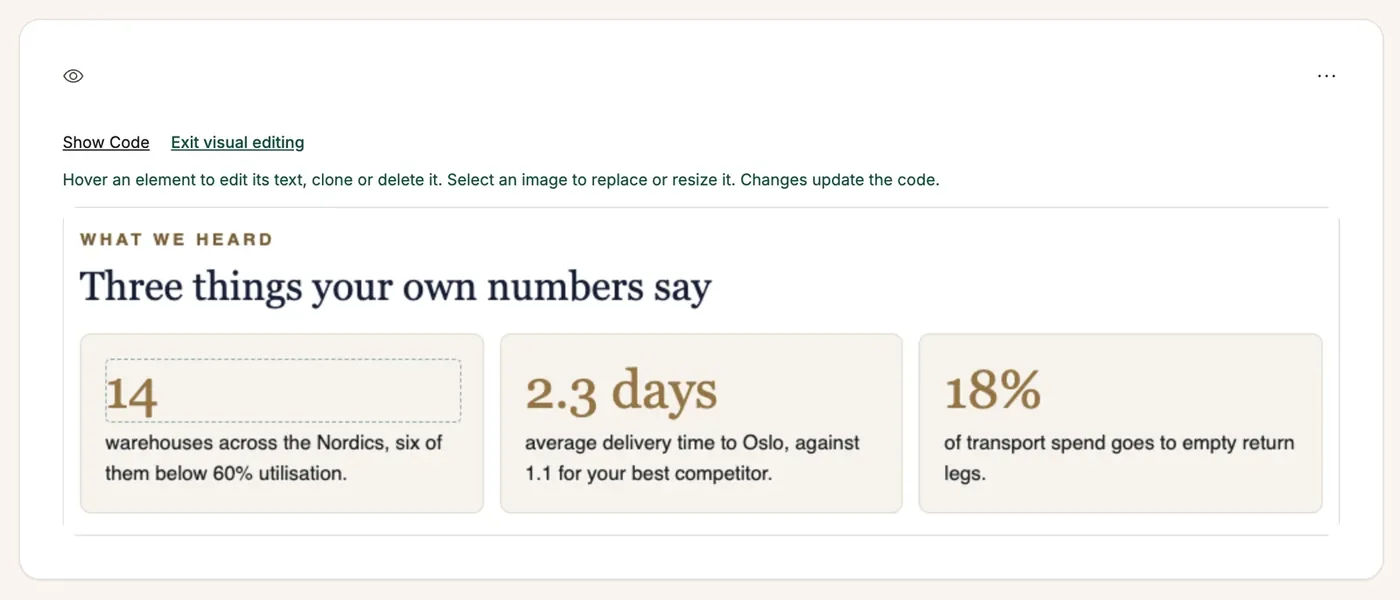
- Visual editing: edit the content without touching the code.
Visual editing
- Click Visual editing: a help message appears and the link becomes Exit visual editing.
- Hover an element: it gets a dotted outline, and a small toolbar lets you edit its text, clone it or delete it.
- Select an image to replace it (media library) or resize it, with a crop mode. The original file isn't changed.
- Exit visual editing finishes; the quote is saved automatically.
Good to know
- What you see is what your client will see, on screen and in the PDF.
- Links and buttons in the block open in a new tab.
- An HTML block can show live quote data (client name, pricing lines…).
- To embed an external tool (Loom, Typeform…), use the Embed block.
Your client's answers
What it does An HTML block can contain a form — questions, checkboxes, document upload. Your client fills it in inside the proposal, without an account.
What it looks like for you As soon as they've answered, a green banner appears at the top of the block in the editor:
- Client answers: the block filled in with their answers (default view);
- Block template: the blank template, sent to all your clients.
The banner shows when they answered and offers Clear answers.
Good to know
- What you type in Block template mode goes to all your clients; in Client answers mode, it only concerns this client.
- Answers are saved as they're typed and appear in the PDF and, if you turn it on, in the signature stamp.
- Uploaded files are always encrypted.
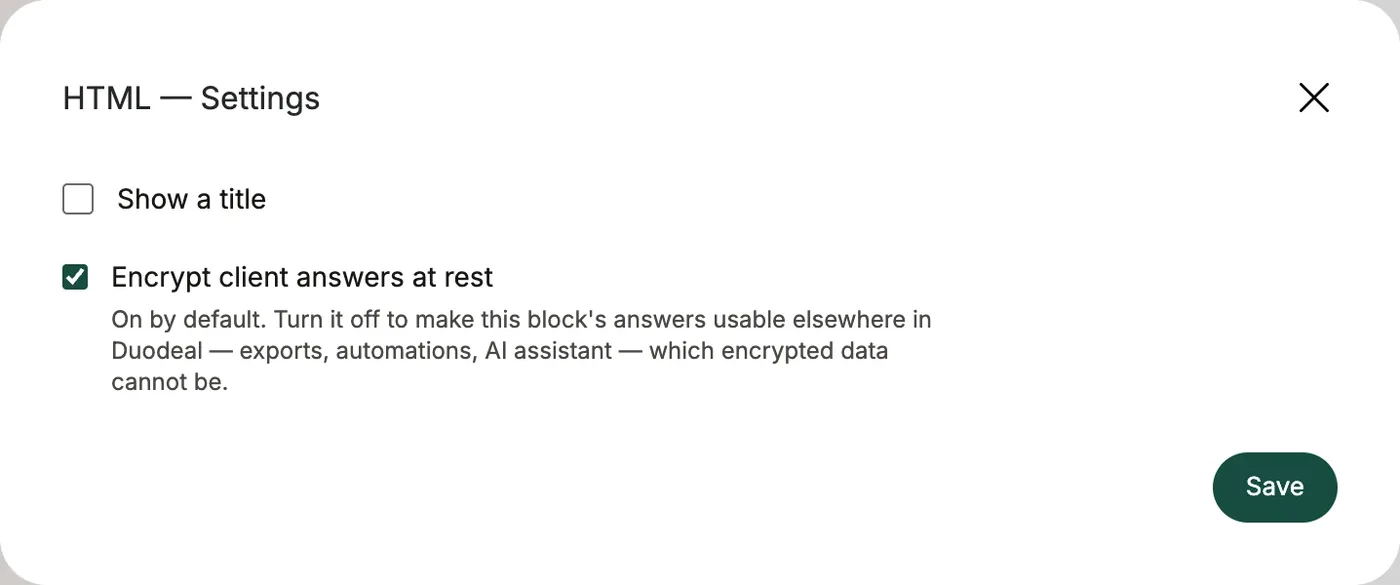
The "Encrypt client answers at rest" setting
Block ⋯ menu → Settings. Checked by default: answers are encrypted. Unchecked, they become usable elsewhere in Duodeal (exports, automations, AI assistant). It's a privacy decision: when in doubt, keep it checked.
Deal settings (gear icon)
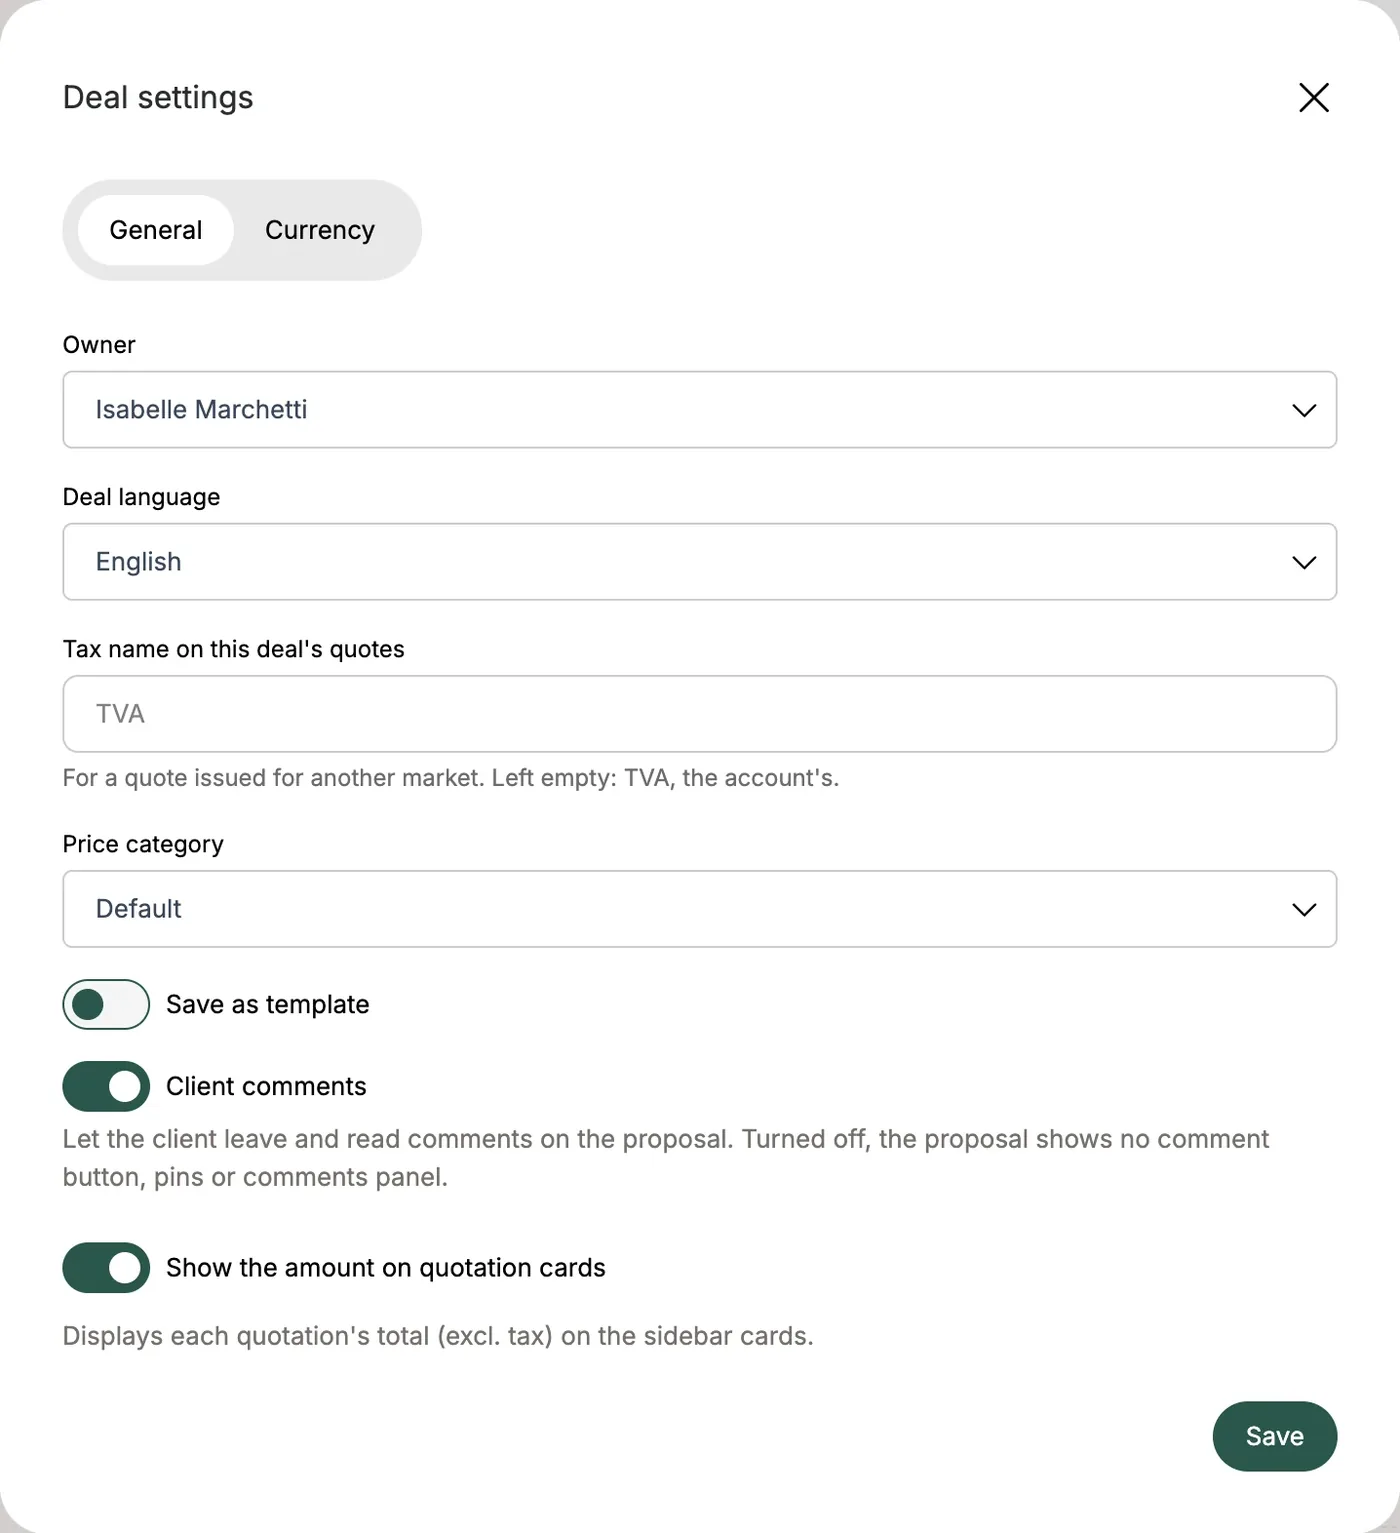
What it does The deal's general settings, in two tabs:
- General:
- Owner: the person in charge of the deal;
- Deal language: the proposal's language;
- Tax name on this deal's quotes: the tax word for this deal, useful for a quote issued for another market;
- Price category: the price list applied;
- Save as template: turn this deal into a reusable template;
- Client comments: allow the client to comment or not (on by default);
- Show the amount on quotation cards: show the amount excl. tax on the proposal cards, in the editor and on the client side.
- Currency: the currency, exchange rate, symbol position, separators and number of decimals.
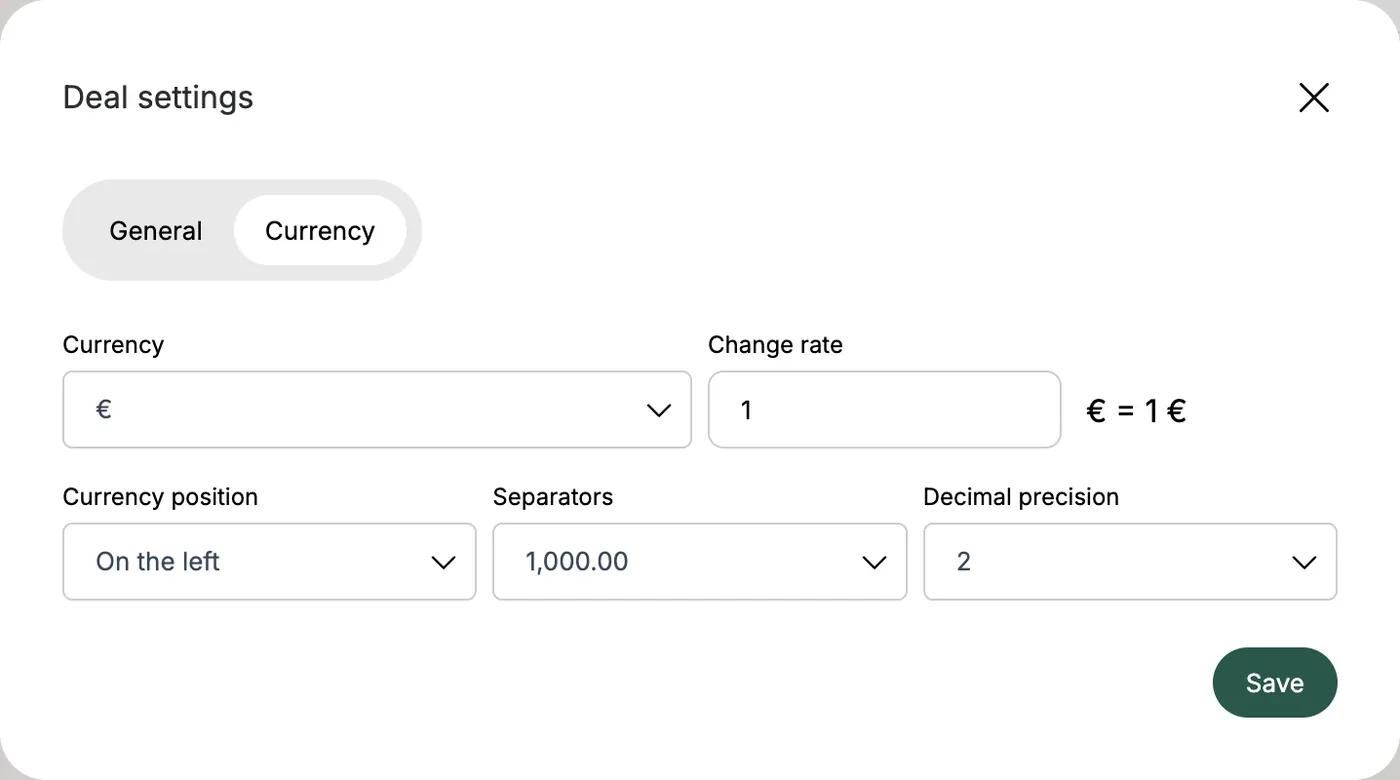
Good to know Amounts are shown in the deal's currency everywhere: editor, client page and PDF.
The AI assistant
What it does The assistant (magic wand) answers your questions about the deal and can actually edit the quote: add or rephrase content, adjust lines, fill in fields.
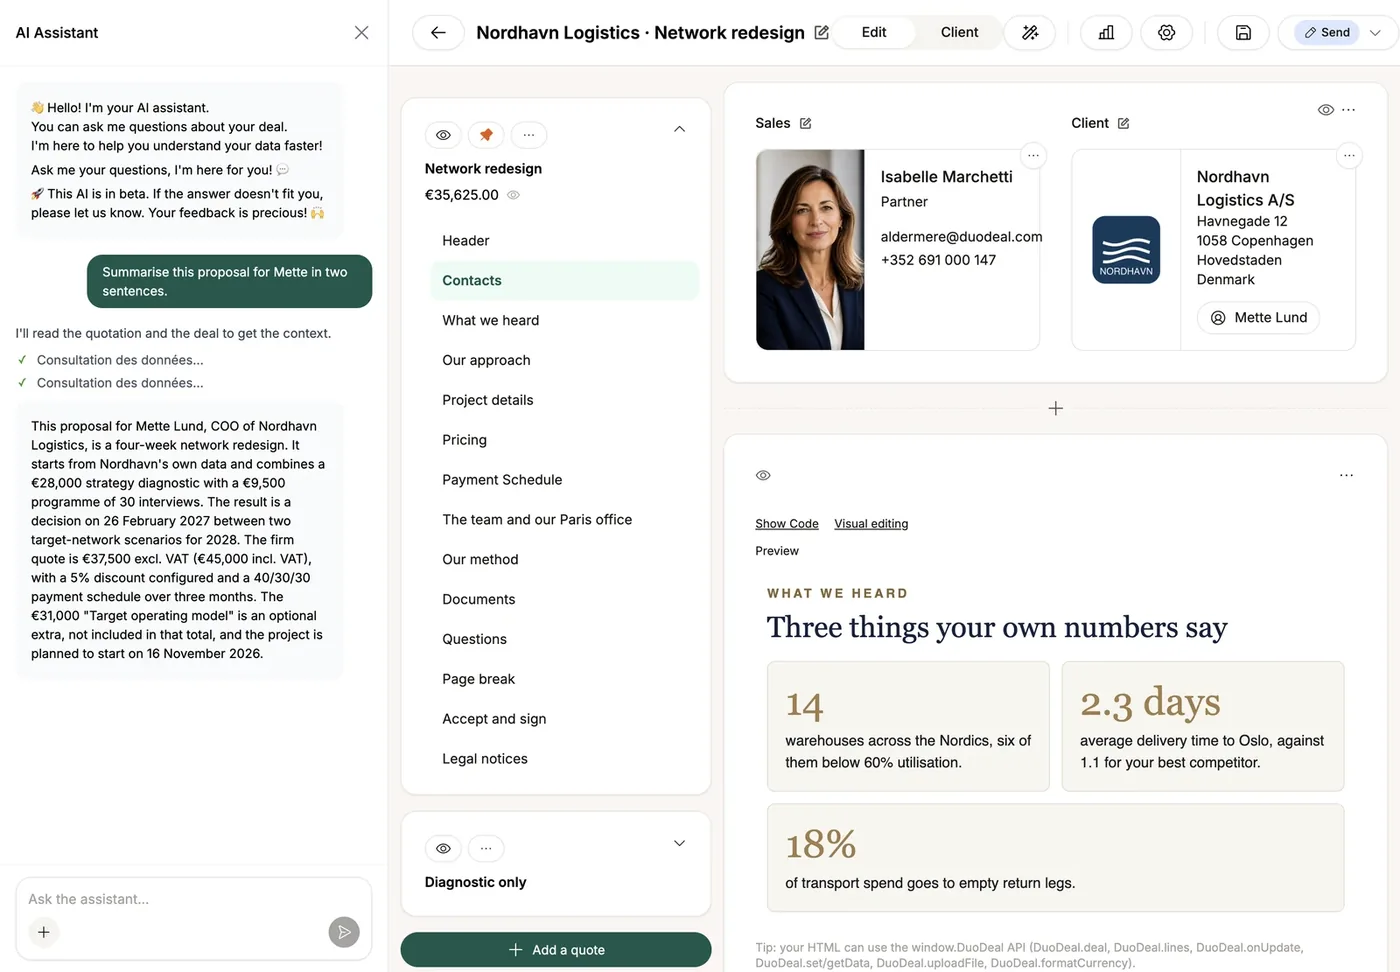
How to use it Click the wand and describe what you want ("summarize this proposal", "add an FAQ about delivery times"…). The assistant shows its steps, then its answer; the quote updates at the end.
Good to know
- Always review its changes: you stay in control of the content.
- It follows your company's skills (Settings → AI) when the task matches.
- If it fails, a message says so; try again.
5. Sharing the proposal with your client
The share button
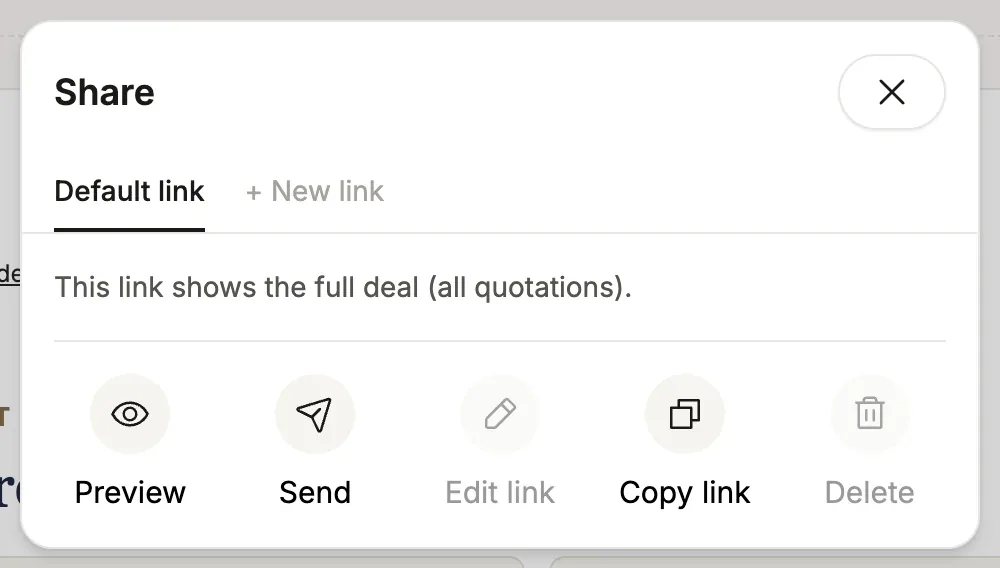
What it does This is how your client receives the proposal: a link they open in their browser, with no account or password. The green button at the top right of the editor opens the Share window.
How to use it The Default link tab shows the full deal (all its visible proposals). For this link, five actions:
- Preview: open the client-side page;
- Send: send the email from Duodeal (see below);
- Copy link: copy the address to send it yourself;
- Edit link and Delete: for custom links.
Custom links
What it does Create several links that show different things: a full link for your main contact, a link without prices for an intermediary, a lighter link for a first contact…
How to use it
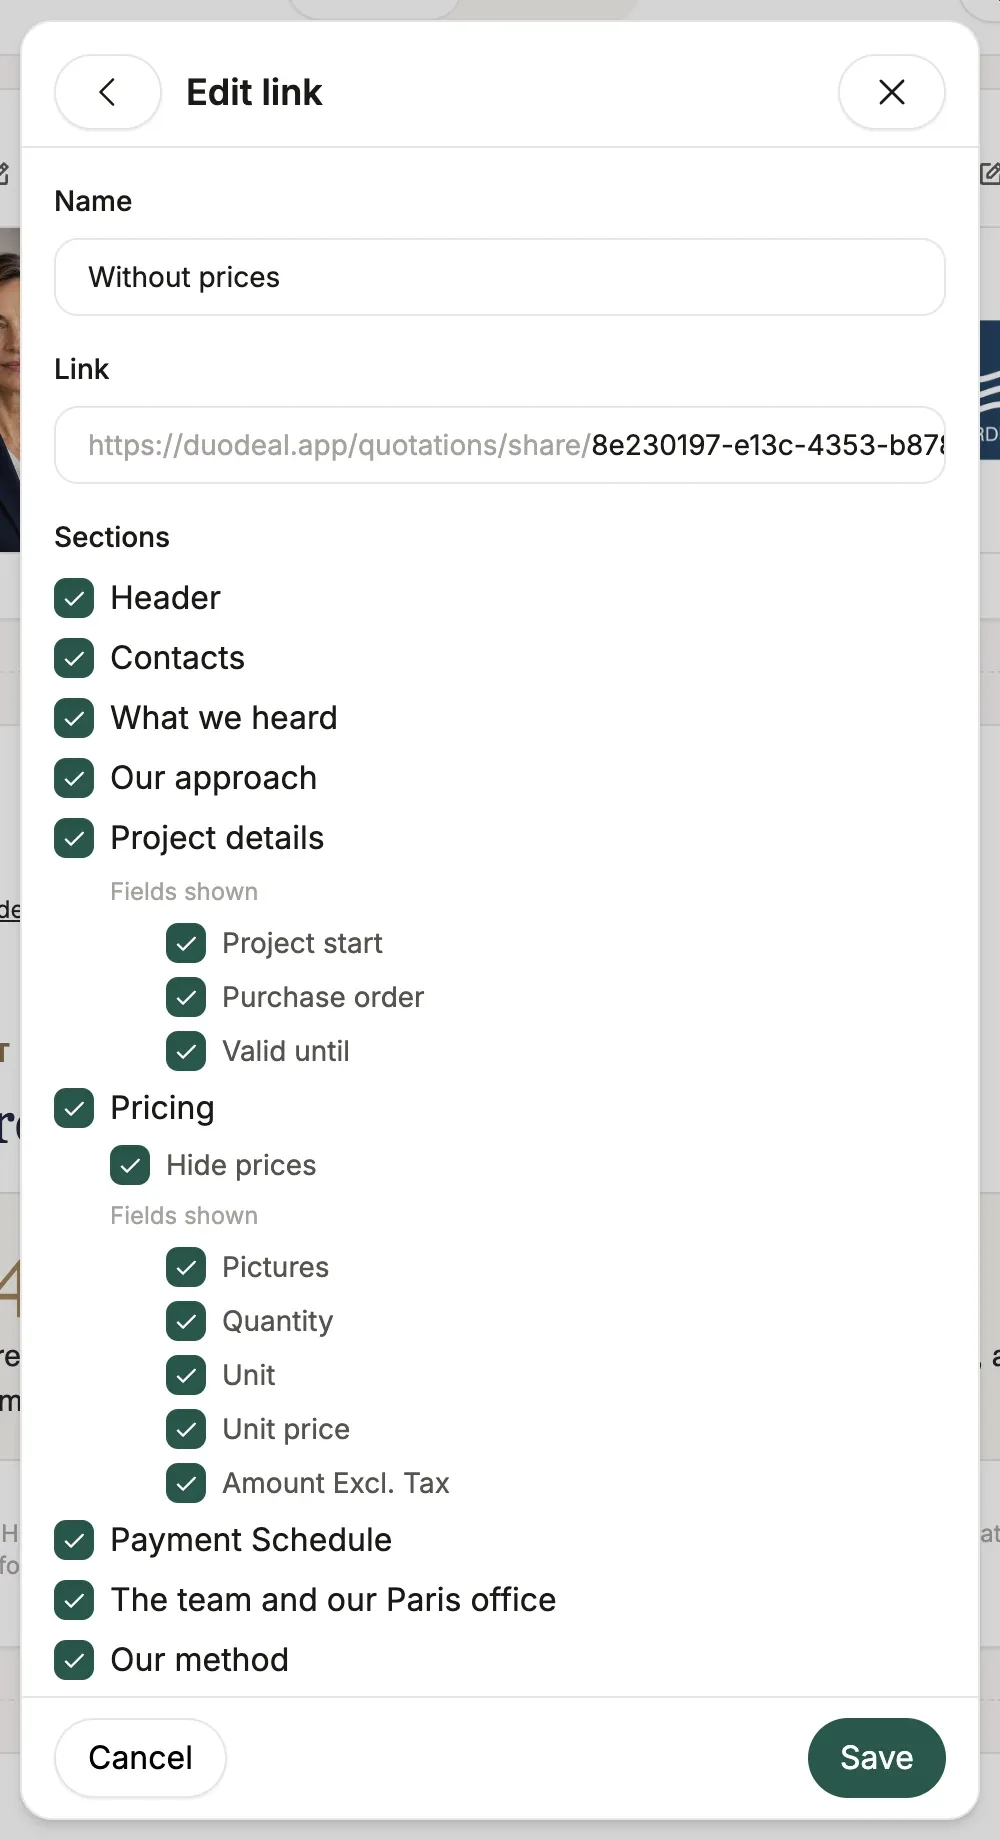
- In Share, click + New link.
- Give the link a name (for example "Without prices").
- Check the visible sections; for each block, choose the fields shown. On the pricing table, Hide prices hides every amount.
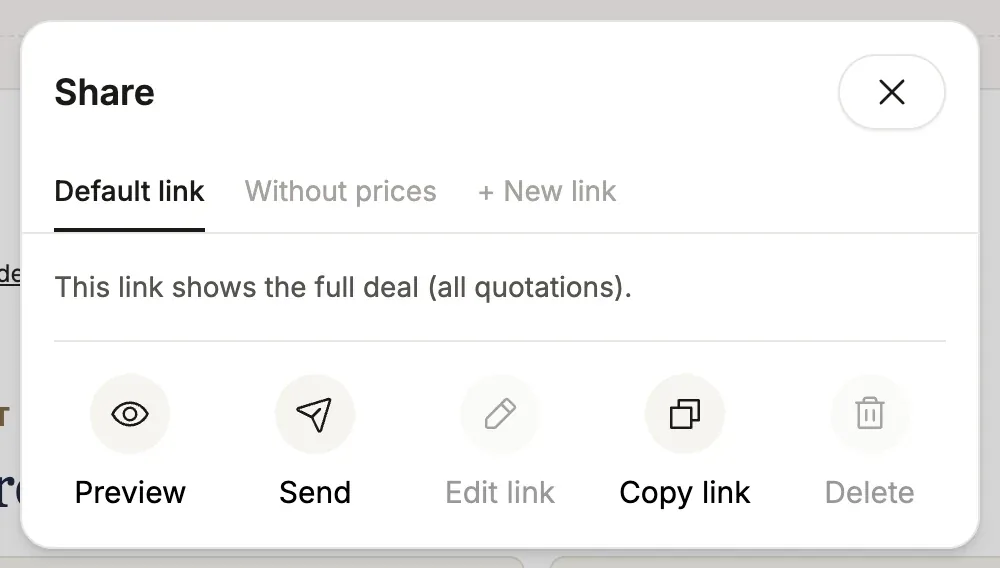
- Save. The link appears as a tab of the Share window.
Good to know
- A link shows the blocks checked when it was set up: if you add a block later, reopen the link (Edit link) to check it.
- You can delete a link at any time: its address stops working.
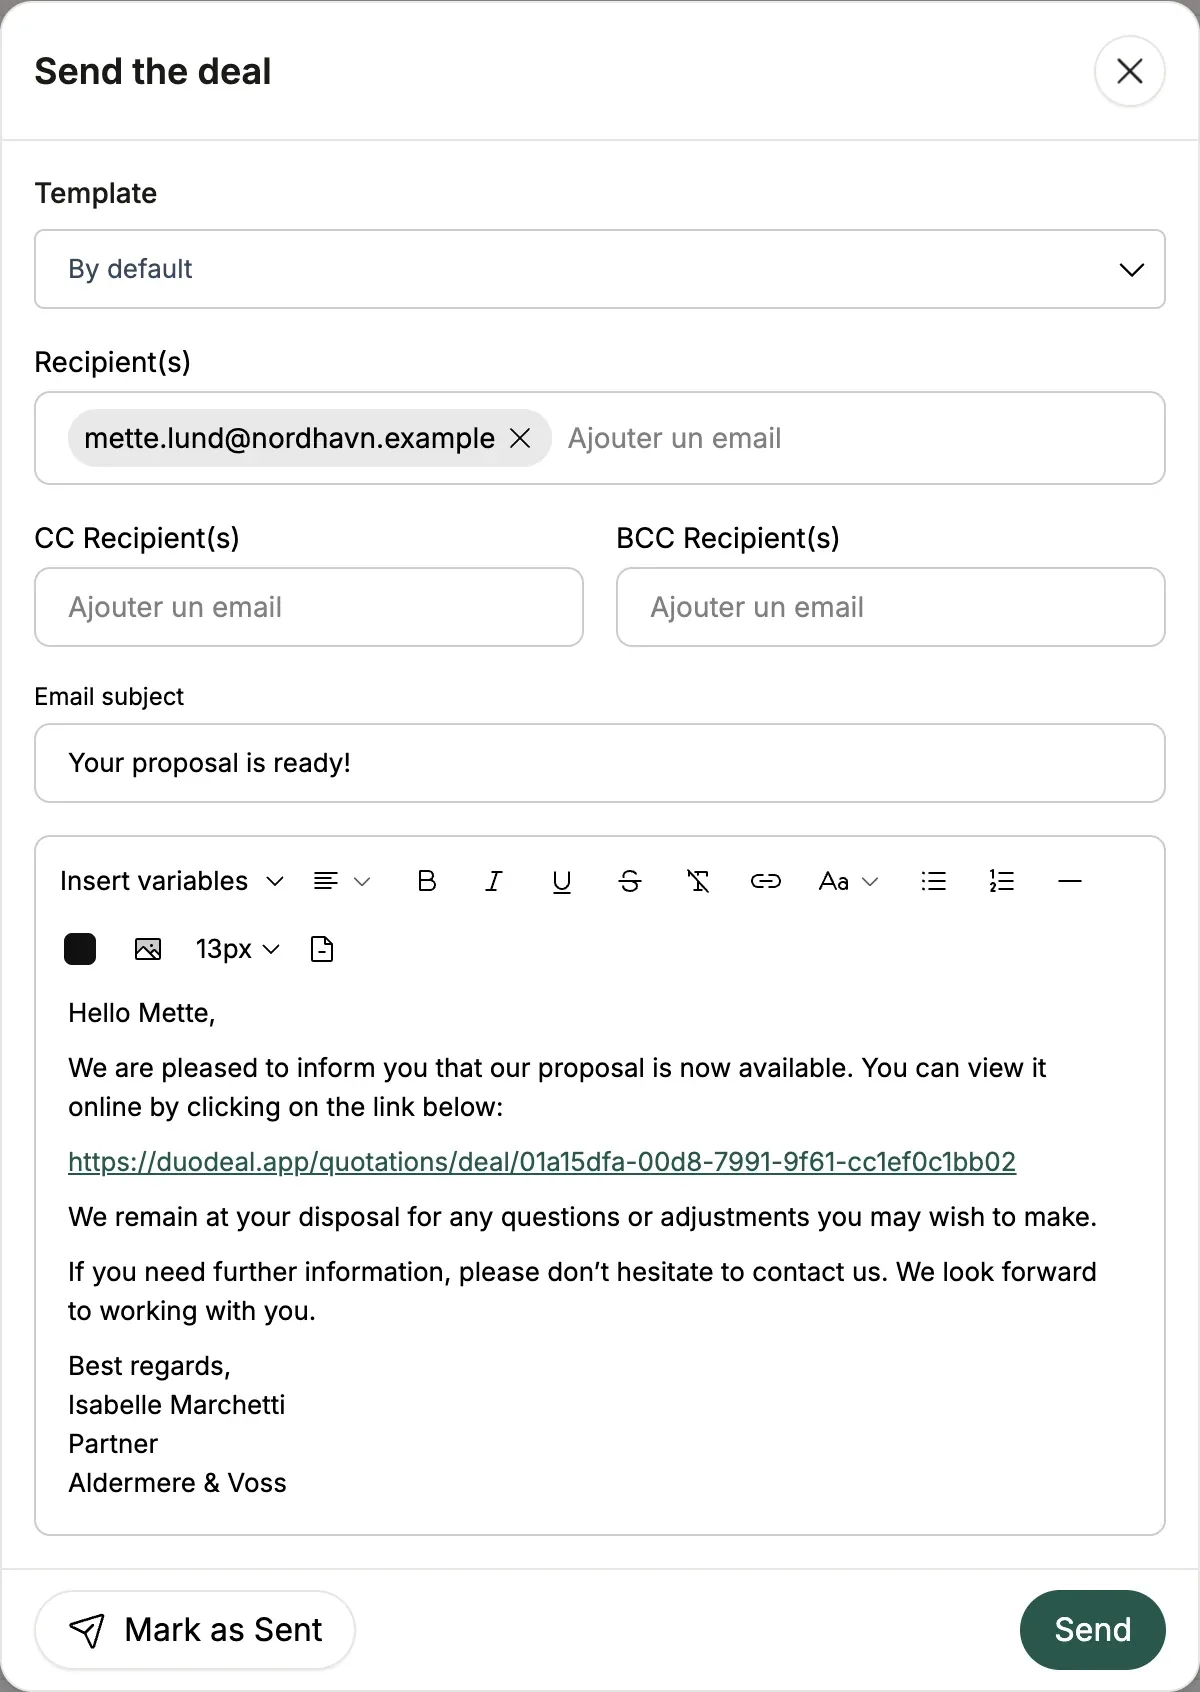
Sending the proposal by email from Duodeal
How to use it
- In Share, click Send on the link you want.
- The Send the deal window opens: choose an email template, the recipients (and CC / BCC), adjust the subject and message — pre-filled, with Insert variables.
- Click Send. If you sent the link another way, Mark as Sent simply marks the proposal as sent.
Good to know
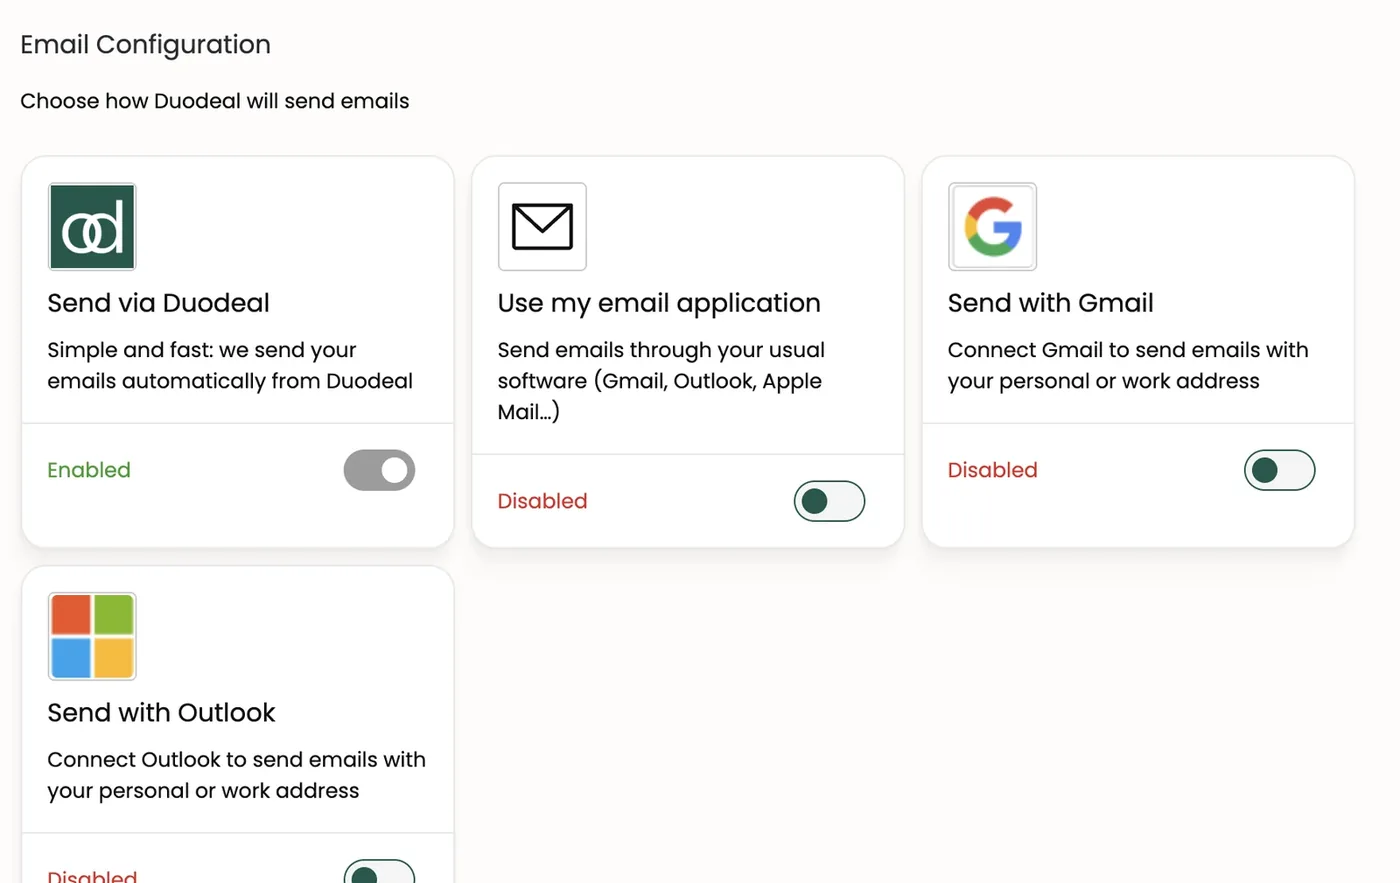
- Sending uses the mode chosen in Settings → Emails configuration: via Duodeal, Gmail, Outlook, or your own mail app (the button then becomes Open in my mail app).
- Resending an already signed proposal doesn't set it back to "Send".
6. What your client sees (the sales page)
The client page
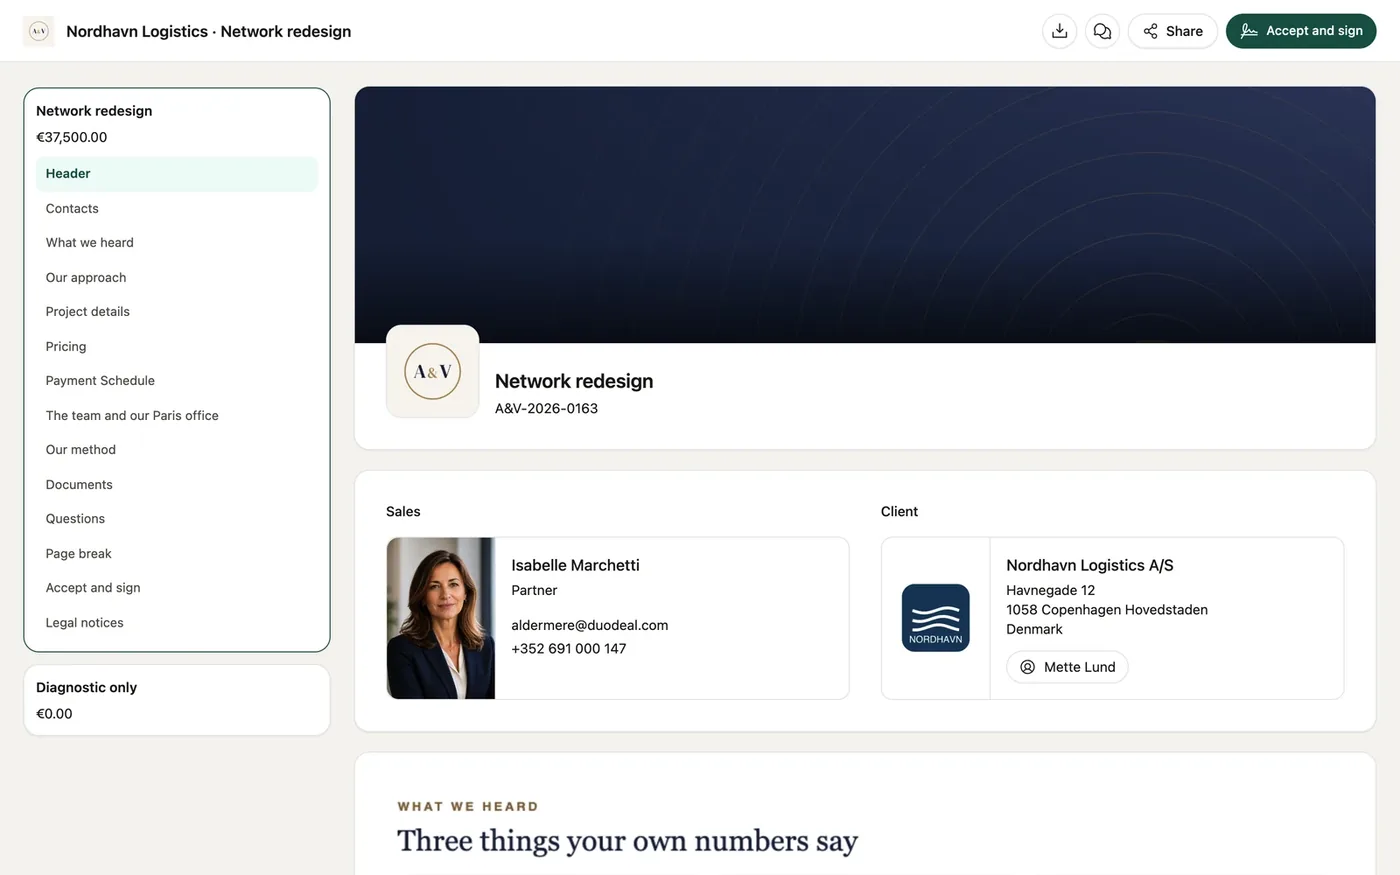
What it does When your client opens the link, they discover your proposal as a polished web page — not a PDF attachment. They don't need an account.
What the client sees:
- at the top, a bar with your logo, the deal name and four buttons: download the PDF, comment, Share and Accept and sign;
- on the left, an outline: the deal's proposals (with their amounts, unless you've hidden them) and the blocks of the open proposal, with the block being read highlighted;
- in the center, your proposal, block by block.

Good to know
- With a custom link, the client only sees what you chose to show.
- Amounts are shown in the deal's currency.
- The page adapts to mobile: the outline moves into a menu, and the top-bar buttons keep only their icon.
- Client pages aren't indexed by search engines and contain no marketing tracking tools.
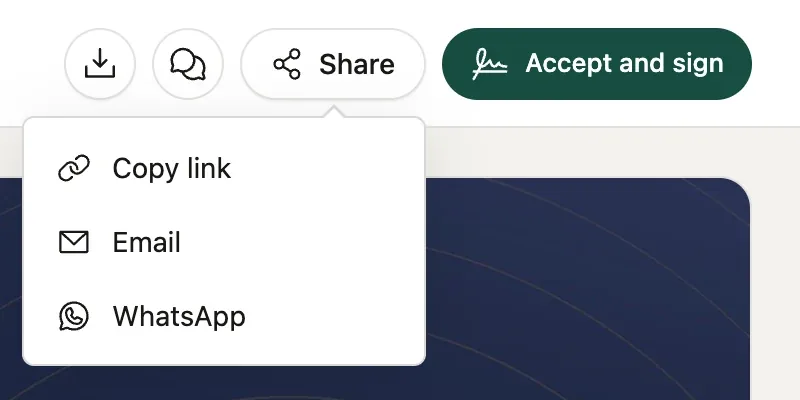
Sharing with colleagues
The Share button in the bar lets your client pass the proposal on: Copy link, Email or WhatsApp on a computer, or the phone's share menu on mobile.
Choosing options
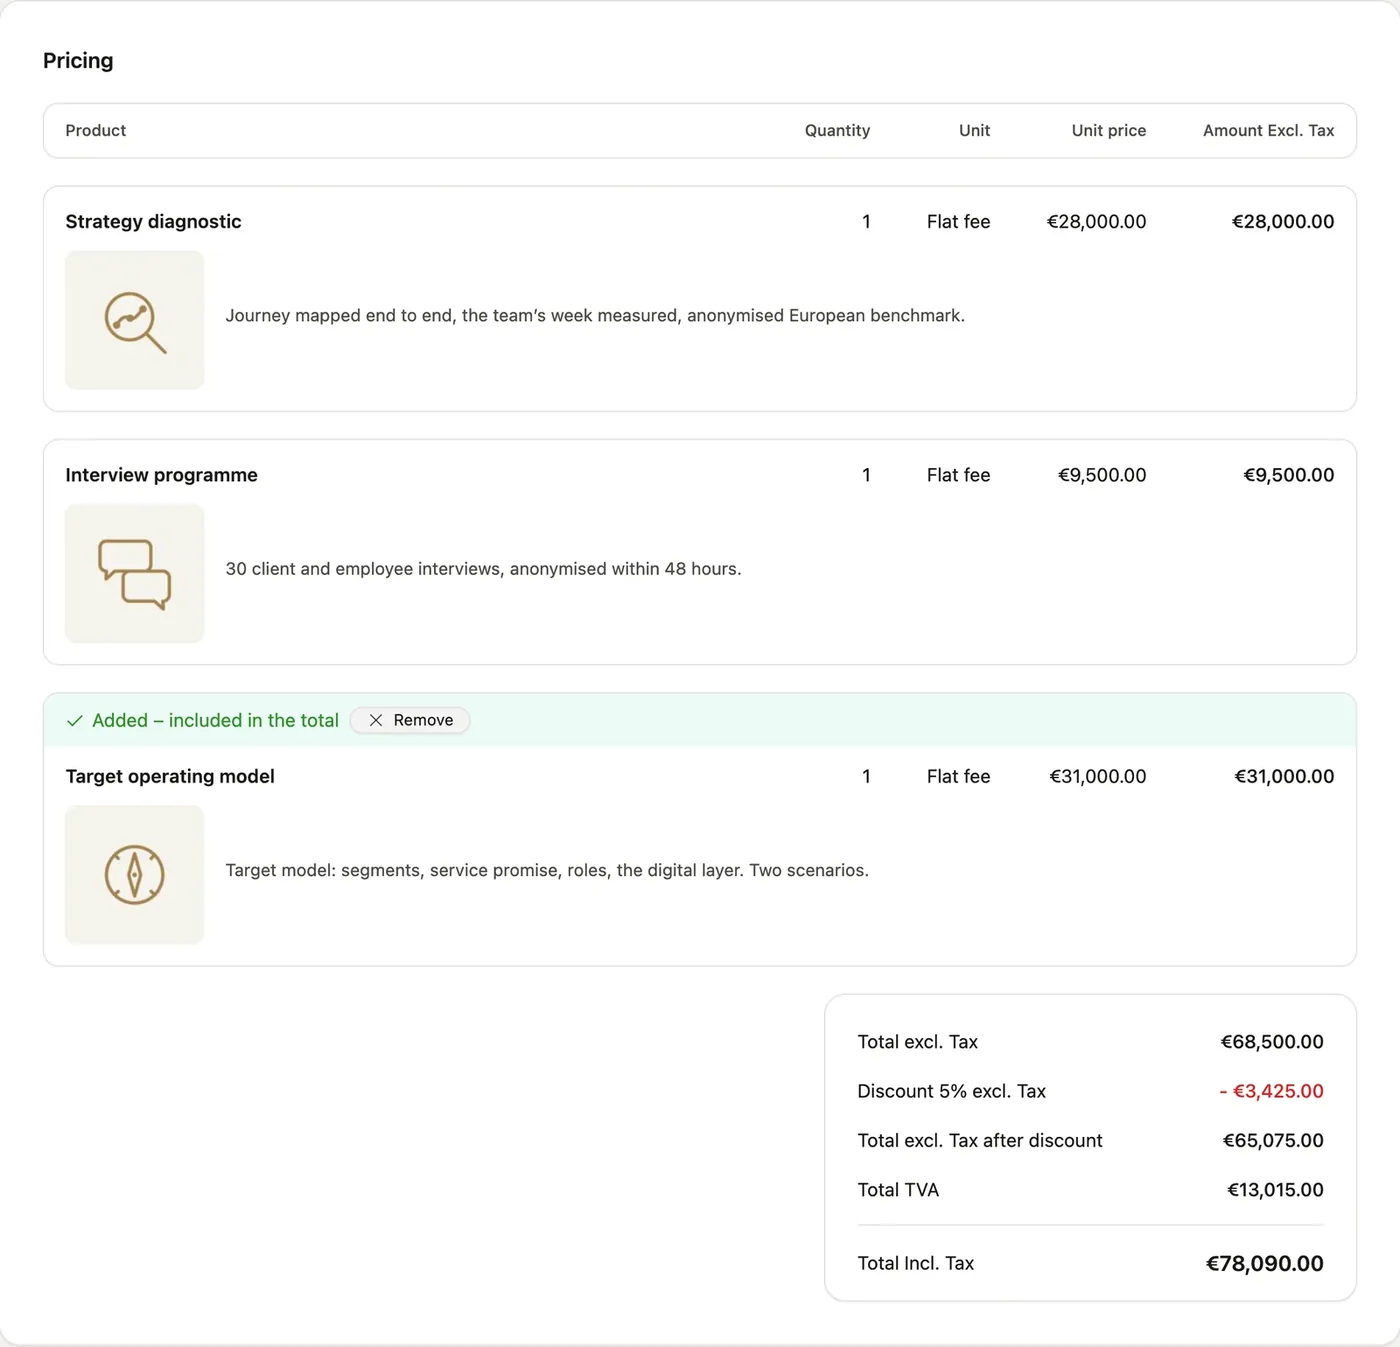
An optional line shows the "Not included in the total" strip with Add to quote. One click and it becomes "Added – included in the total", with Remove to undo. The totals, the schedule and the amount to sign recalculate instantly, and you see their choice in the editor.
Client comments
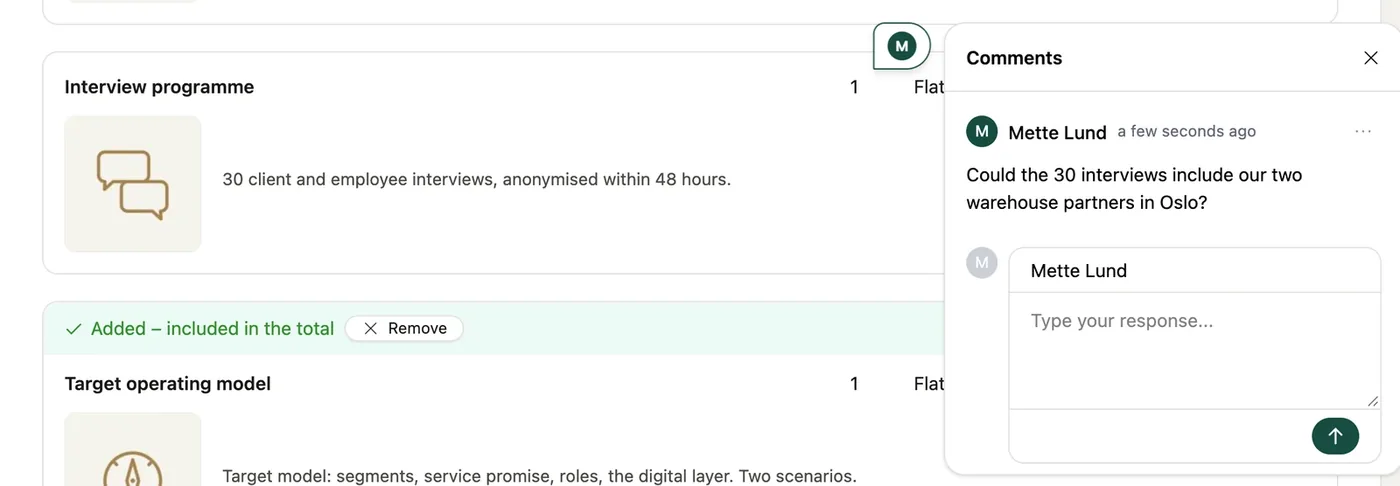
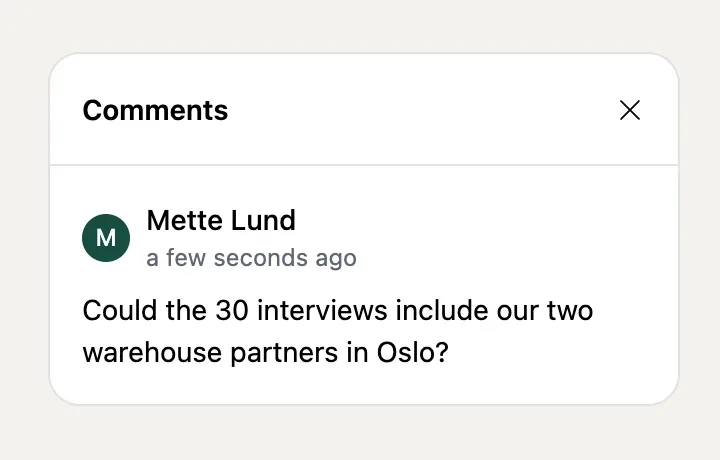
What it does Your client reacts right on the proposal, at the exact spot that catches their attention — like a sticky note on the page.
How it works
- The client clicks the comment button (speech bubbles) in the top bar.
- They click where they want and write their comment: a pin with their initials appears.
- Each pin opens the discussion thread: you can reply, and so can they. The left panel lists every comment.
Good to know
- You get an email for each new comment; its link opens the comment directly.
- Everyone can delete their own comments.
- You can turn comments off for a deal (deal settings → Client comments).
Signing online
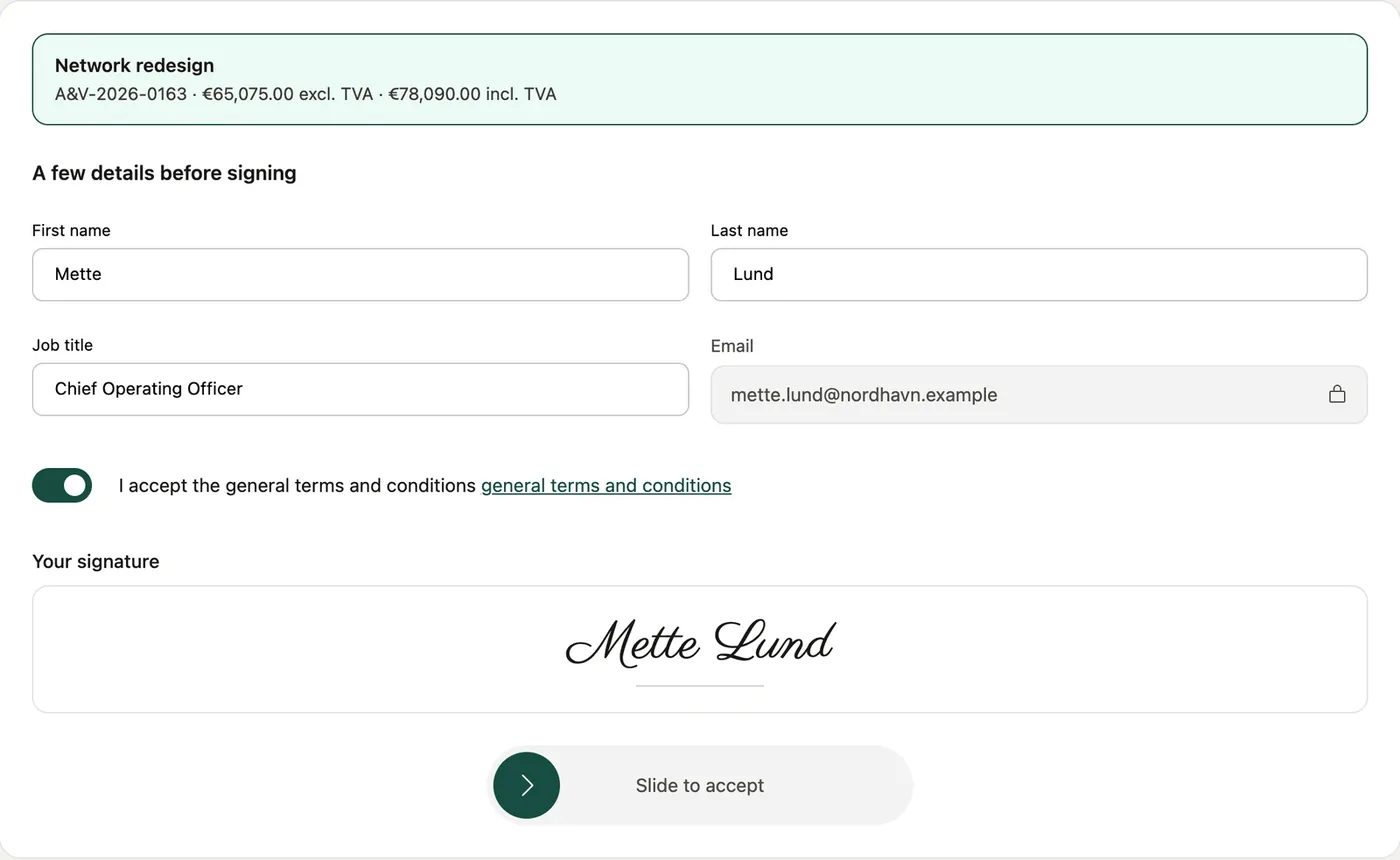
How it works
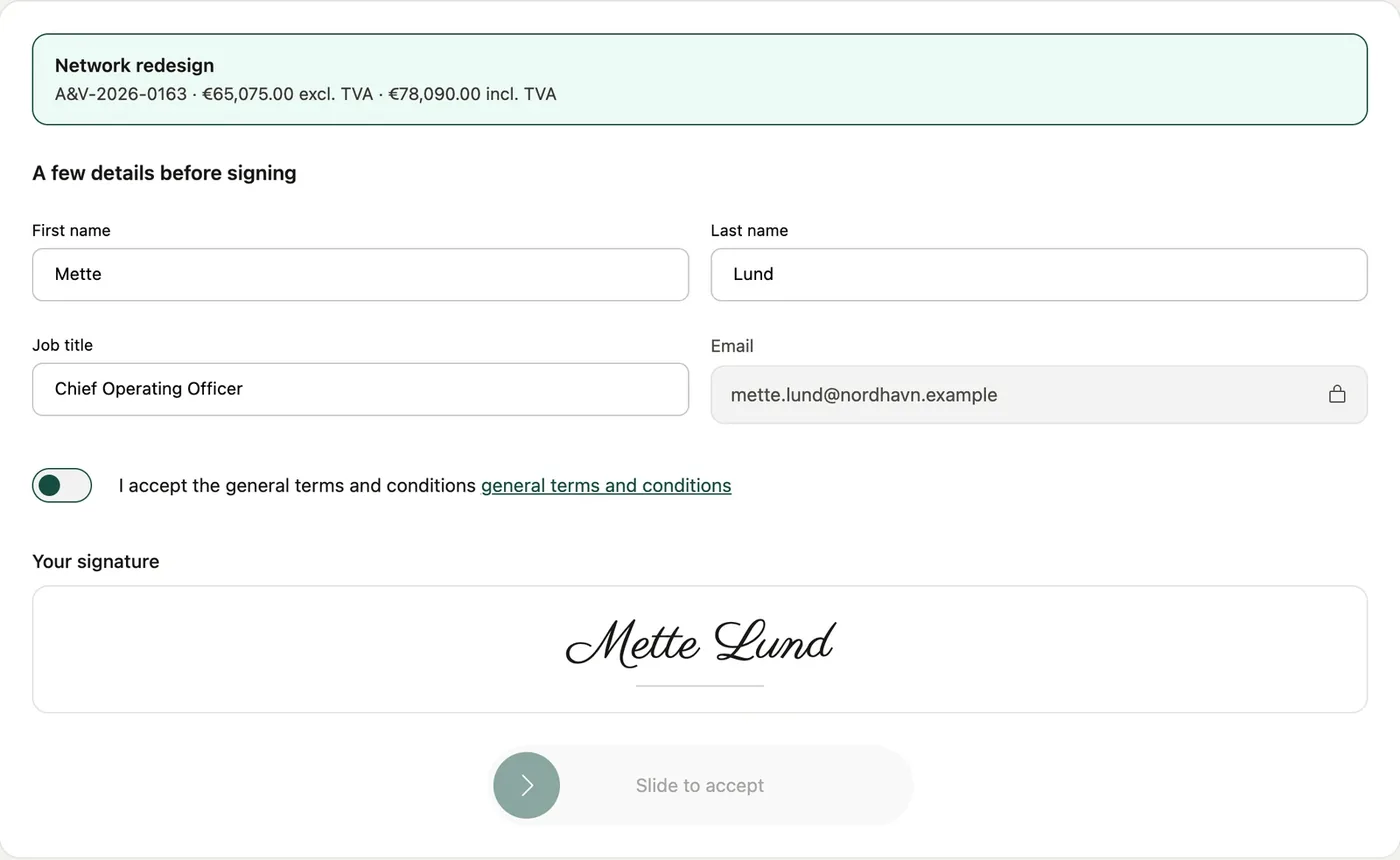
- The client clicks Accept and sign (in the top bar, under the pricing table or in the signature block): the page scrolls to the block.
- The block shows a summary of the quote (reference, amounts excl. and incl. tax, options included) and asks them to confirm their details (pre-filled; a locked field can't be changed).
- They accept the terms and conditions (the link opens your legal notices).
- Their signature is drawn from their name.
- They drag the "Slide to accept" slider all the way. If the email code is on, they first enter the code they received.
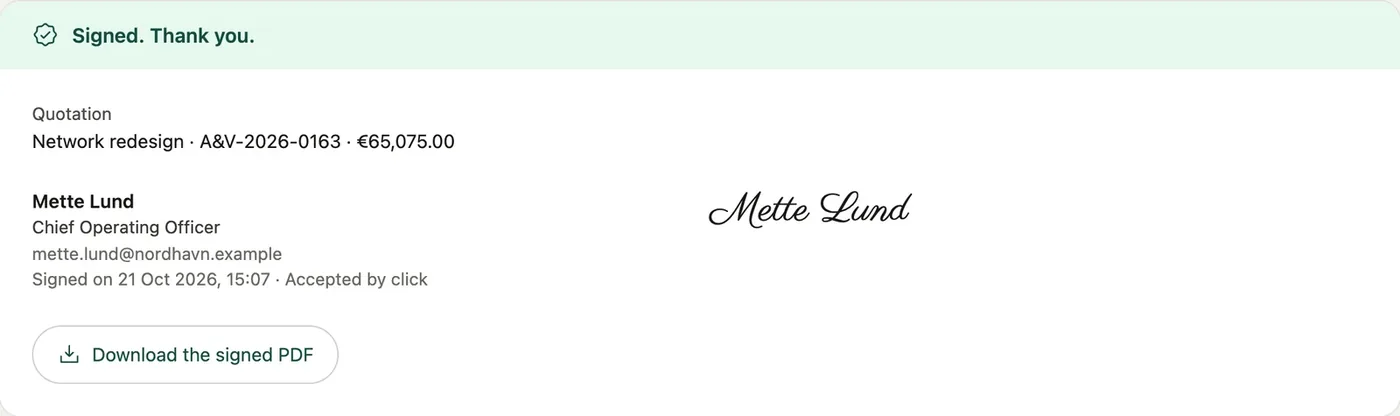
After signing:
- the block becomes a stamp: "Signed. Thank you.", the quote, the signer's name, job title and email, the date, the signature and Download the signed PDF;
- the outline shows "Signed on…" with the signed PDF;
- the Accept and sign button disappears from the top bar;
- each signer and the salesperson receive the confirmation email;
- in the editor, the quote moves to the signed status and can no longer be edited.
7. Tracking your prospect's interest (Analytics)
Viewing statistics
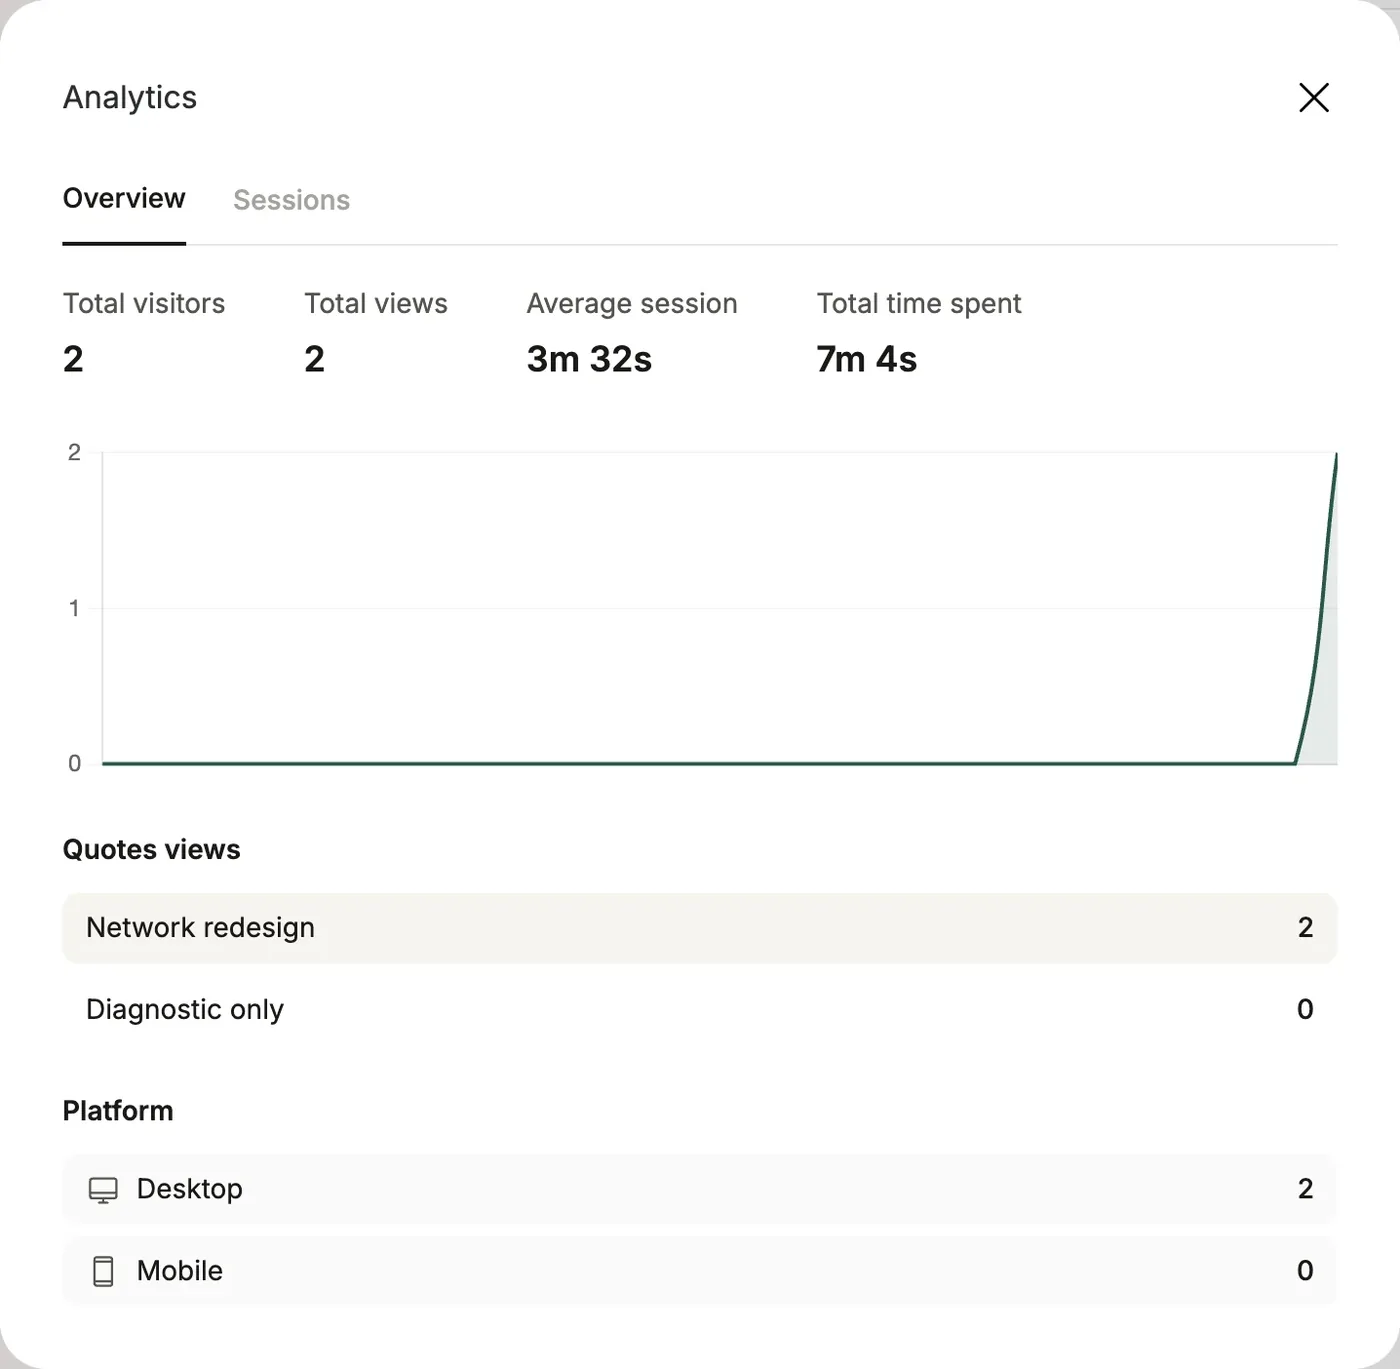
What it does Know what your prospect does with your proposal: did they open it? How many times? For how long? Which offer did they look at? You follow up at the right time, with the right information.
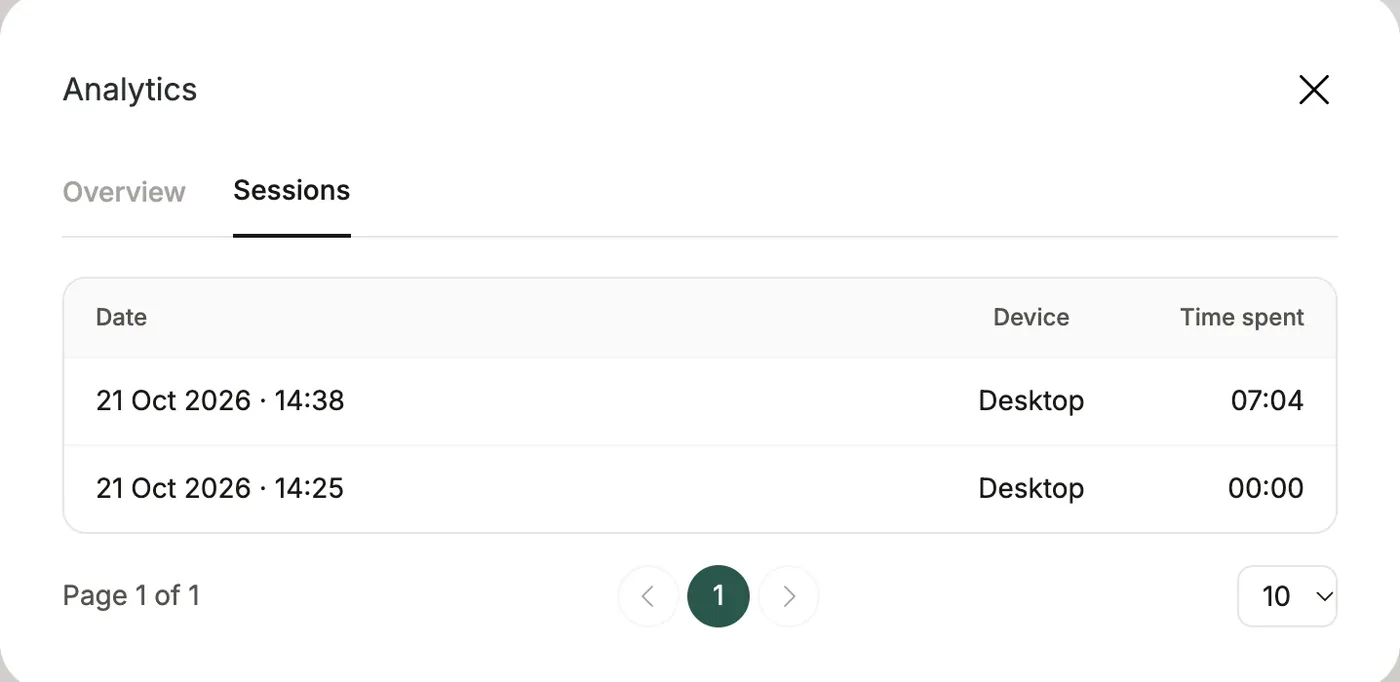
How to use it In the editor, click the chart button. Two tabs:
- Overview: visitors, views, average session, total time, a 30-day chart, views per proposal and the desktop / mobile split;
- Sessions: the details of each visit (date, device, time spent).
Good to know
- Visits are measured automatically and anonymously; time only counts while the page is actually on screen.
- Your own visits and those of your logged-in colleagues aren't counted.
- This data feeds the Hot Deal Score.
8. Contacts and companies
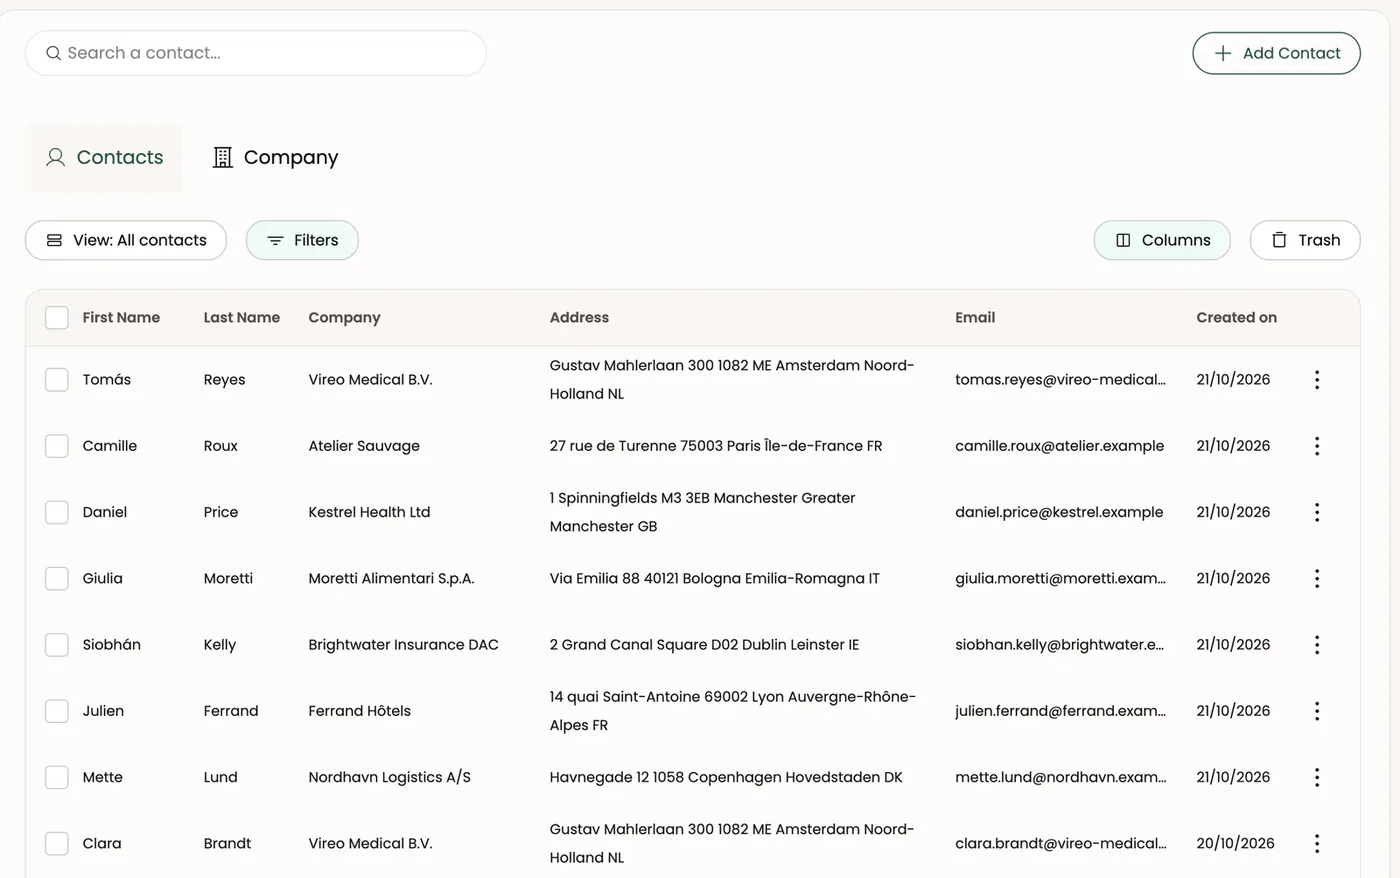
The two tabs: Contacts and Company
What it does The Contacts section is your address book: people (Contacts tab) and their companies (Company tab). These are what you attach to your deals.

Both tabs work like the deal list: search, views, filters, columns, trash and pagination.
Creating or editing a contact
How to use it
- Add Contact (or ⋮ menu → Edit on a row): a panel opens on the right.
- Fill in First Name, Last Name, Email (required), Phone, and the Company — search the list or create it on the fly.
- Your contact custom fields appear too.
- Save.
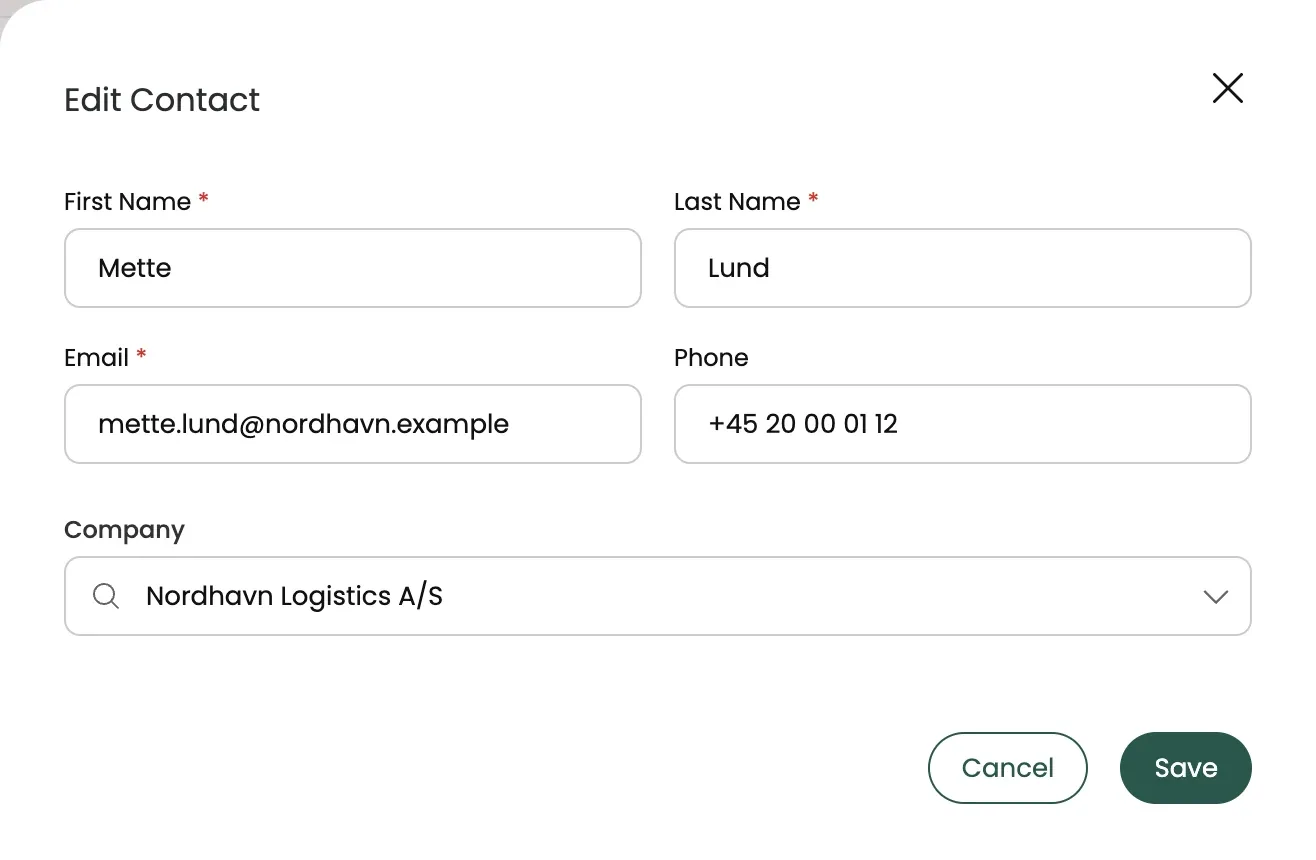
Good to know The address field only appears when the contact isn't linked to a company: otherwise the company's address is used.
Creating or editing a company
How to use it
- Company tab → Add Company (or ⋮ menu → Edit).
- Fill in the logo (PNG or JPEG, 2 MB max), the name (required), the registration number, the VAT number and the address (street, state, postal code, city, country).
- Save.
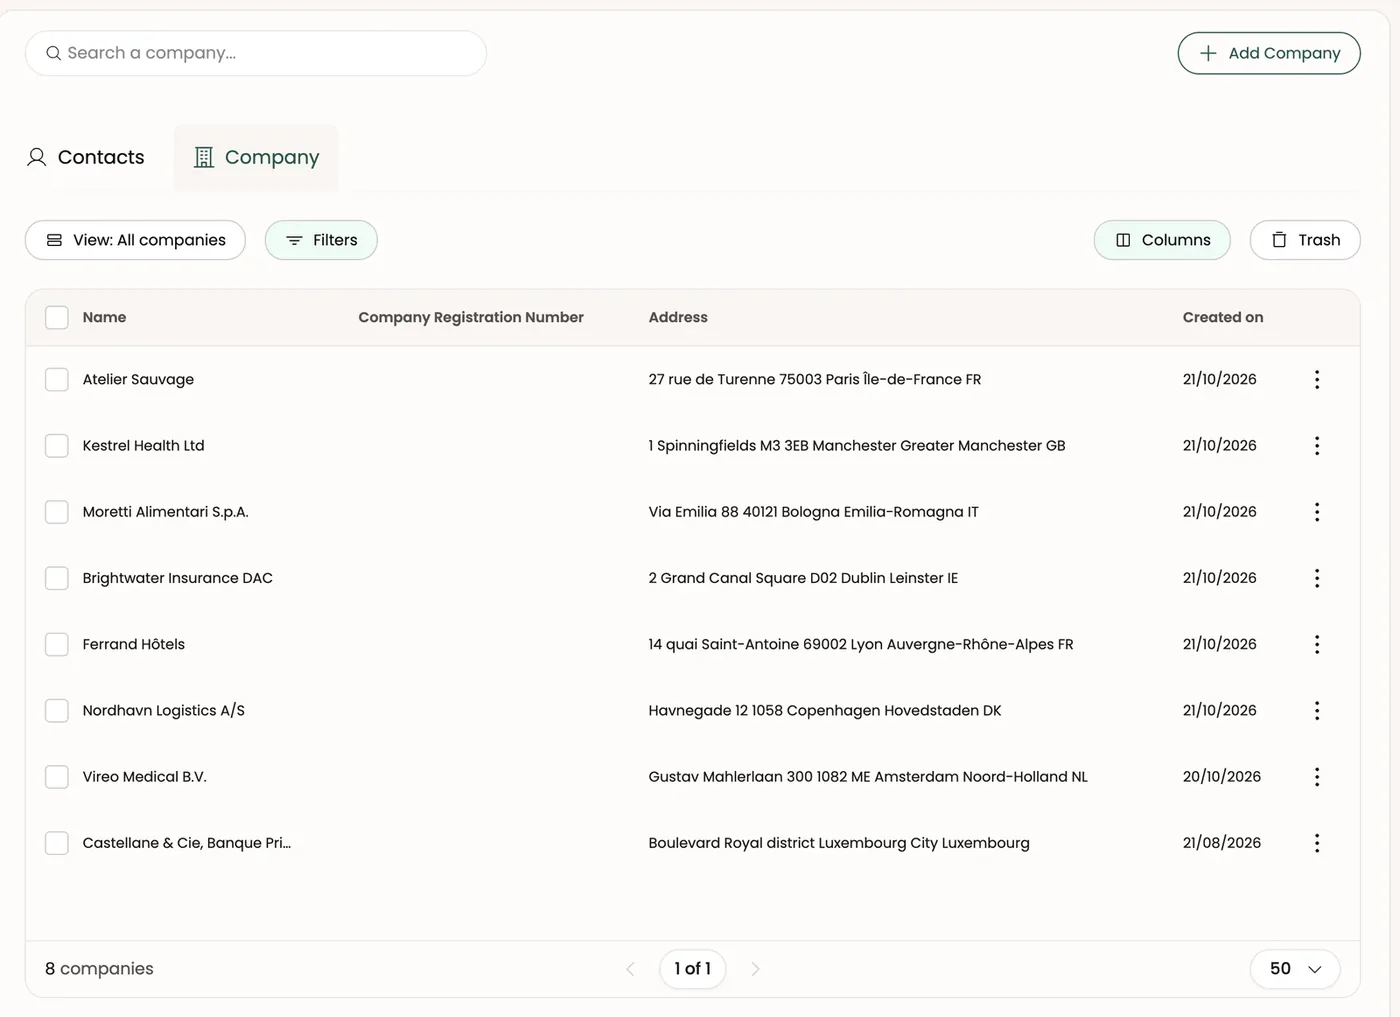
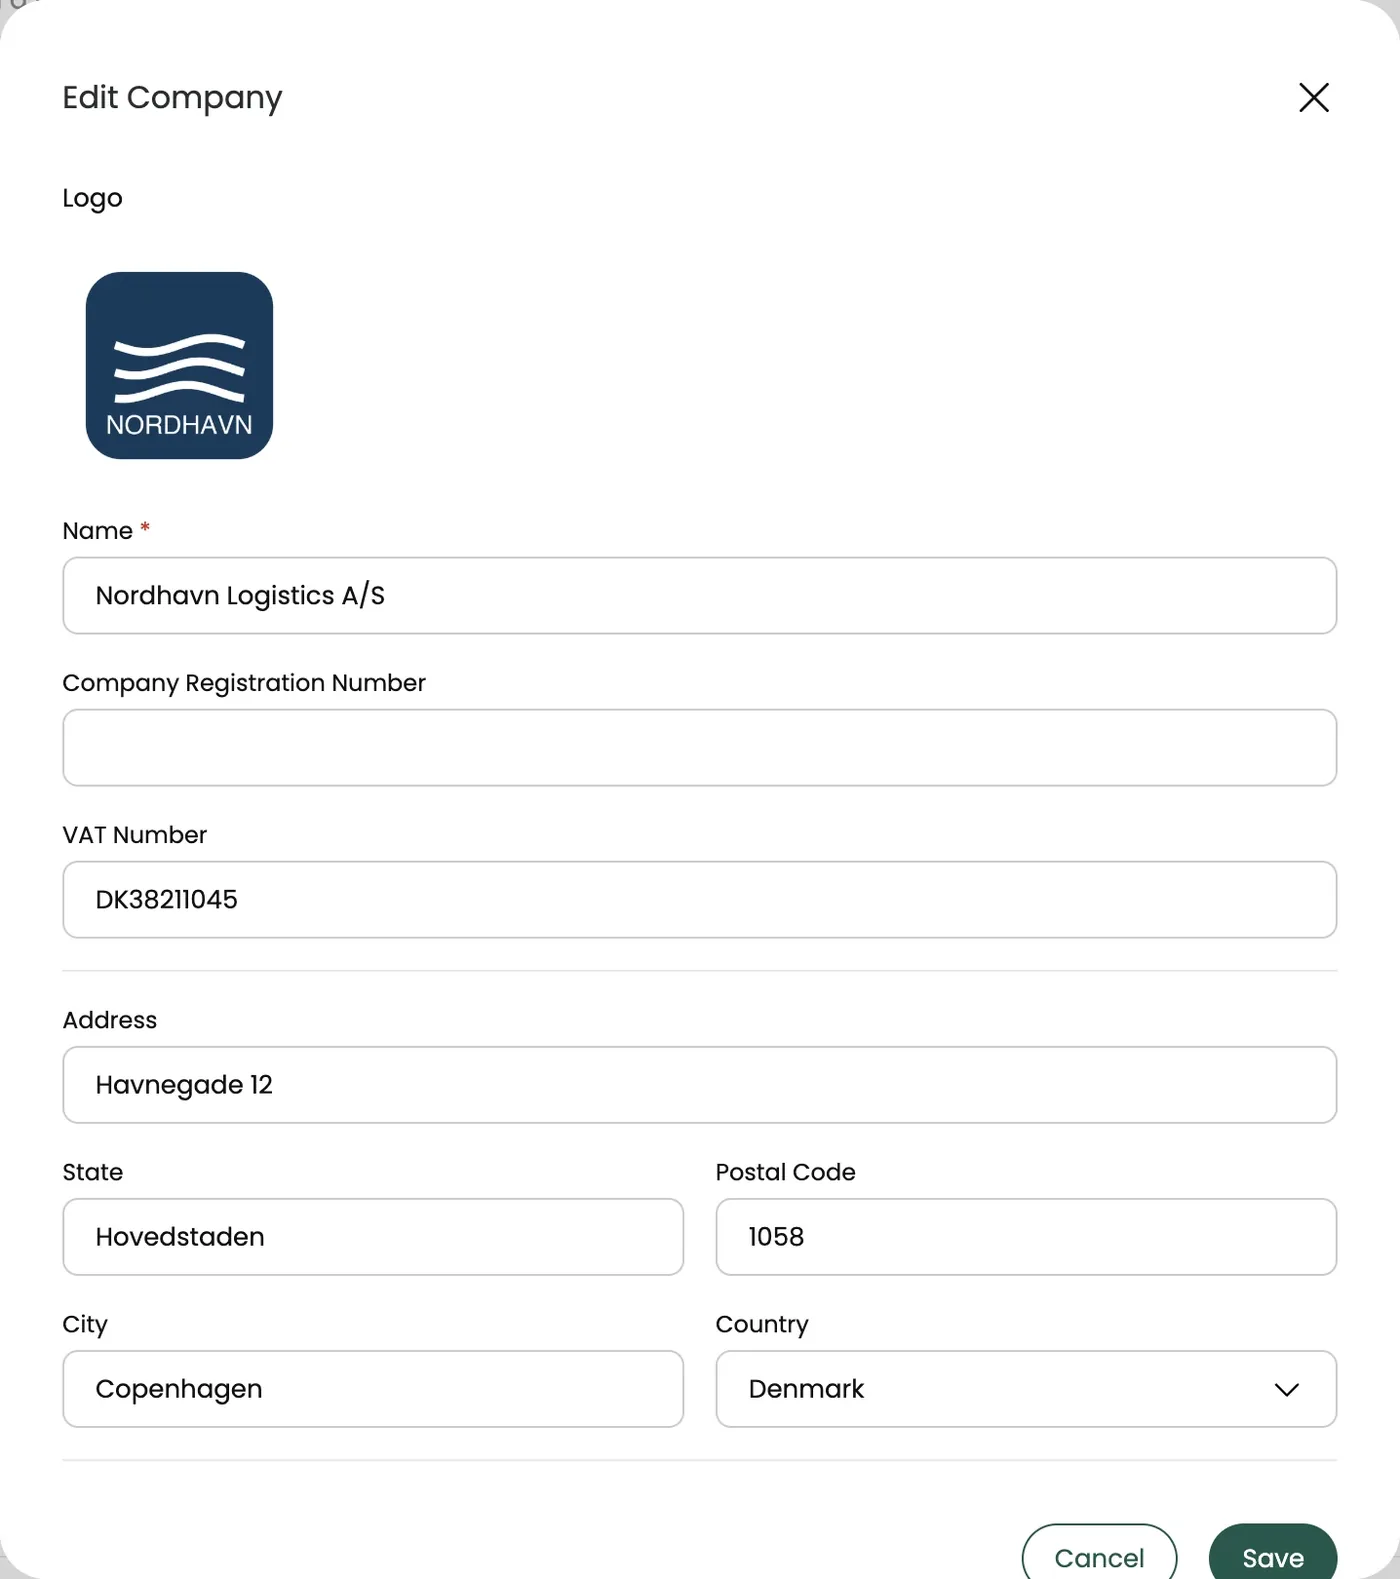
Good to know The company's logo appears in the Contacts block of your proposals.
Trash and actions
Each row's ⋮ menu: Edit and Move to Trash. Multiple selection acts in bulk, and Trash opens the trash (restore or delete permanently).
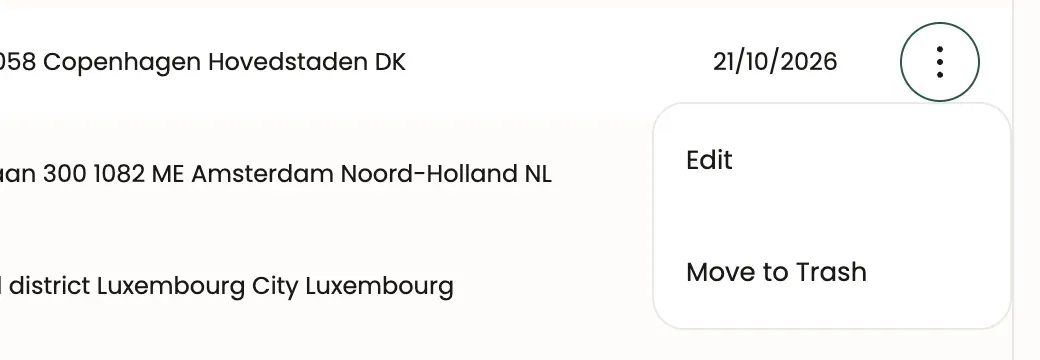
Good to know A contact or company linked to a deal can't be permanently deleted: your deals always keep their client.
Adding a client right from a deal
No need to go through the Contacts section: in the Contacts block of a proposal with no client, search for an existing contact or create one with + Add a Customer. It's linked to the deal straight away.
9. The product catalog
The product list
What it does The catalog centralizes your products and services: name, reference, description, images, unit, prices and taxes. Once a product is created, you add it to any quote in two clicks.
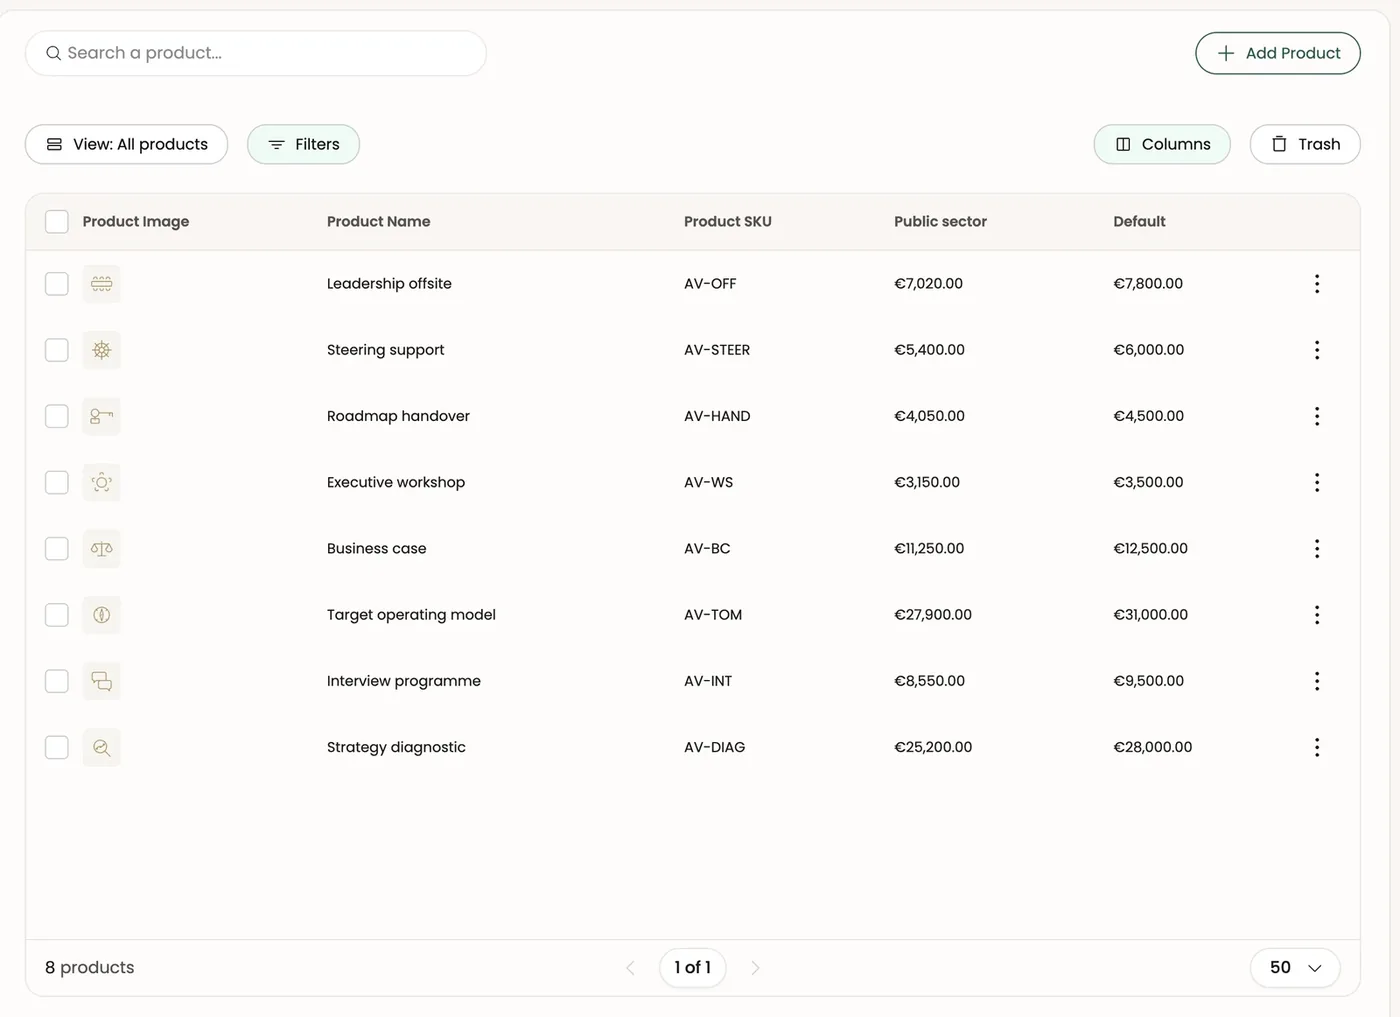
How to use it Like the other lists: search, views, filters, columns, trash and multiple selection. A row's ⋮ menu: Edit, Duplicate (the copy appears straight away) and Move to Trash.
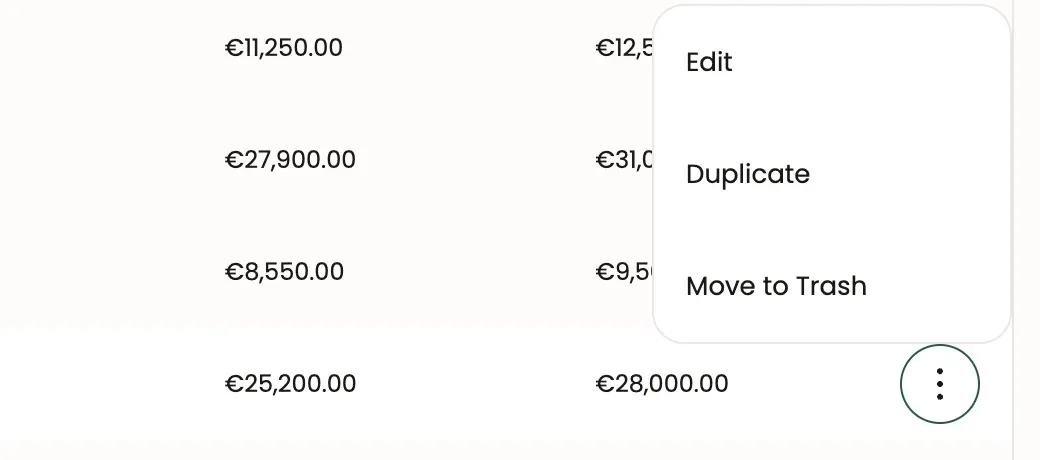
Good to know The list shows one price column per price category: you see each product's price for each type of client at a glance.
Creating or editing a product
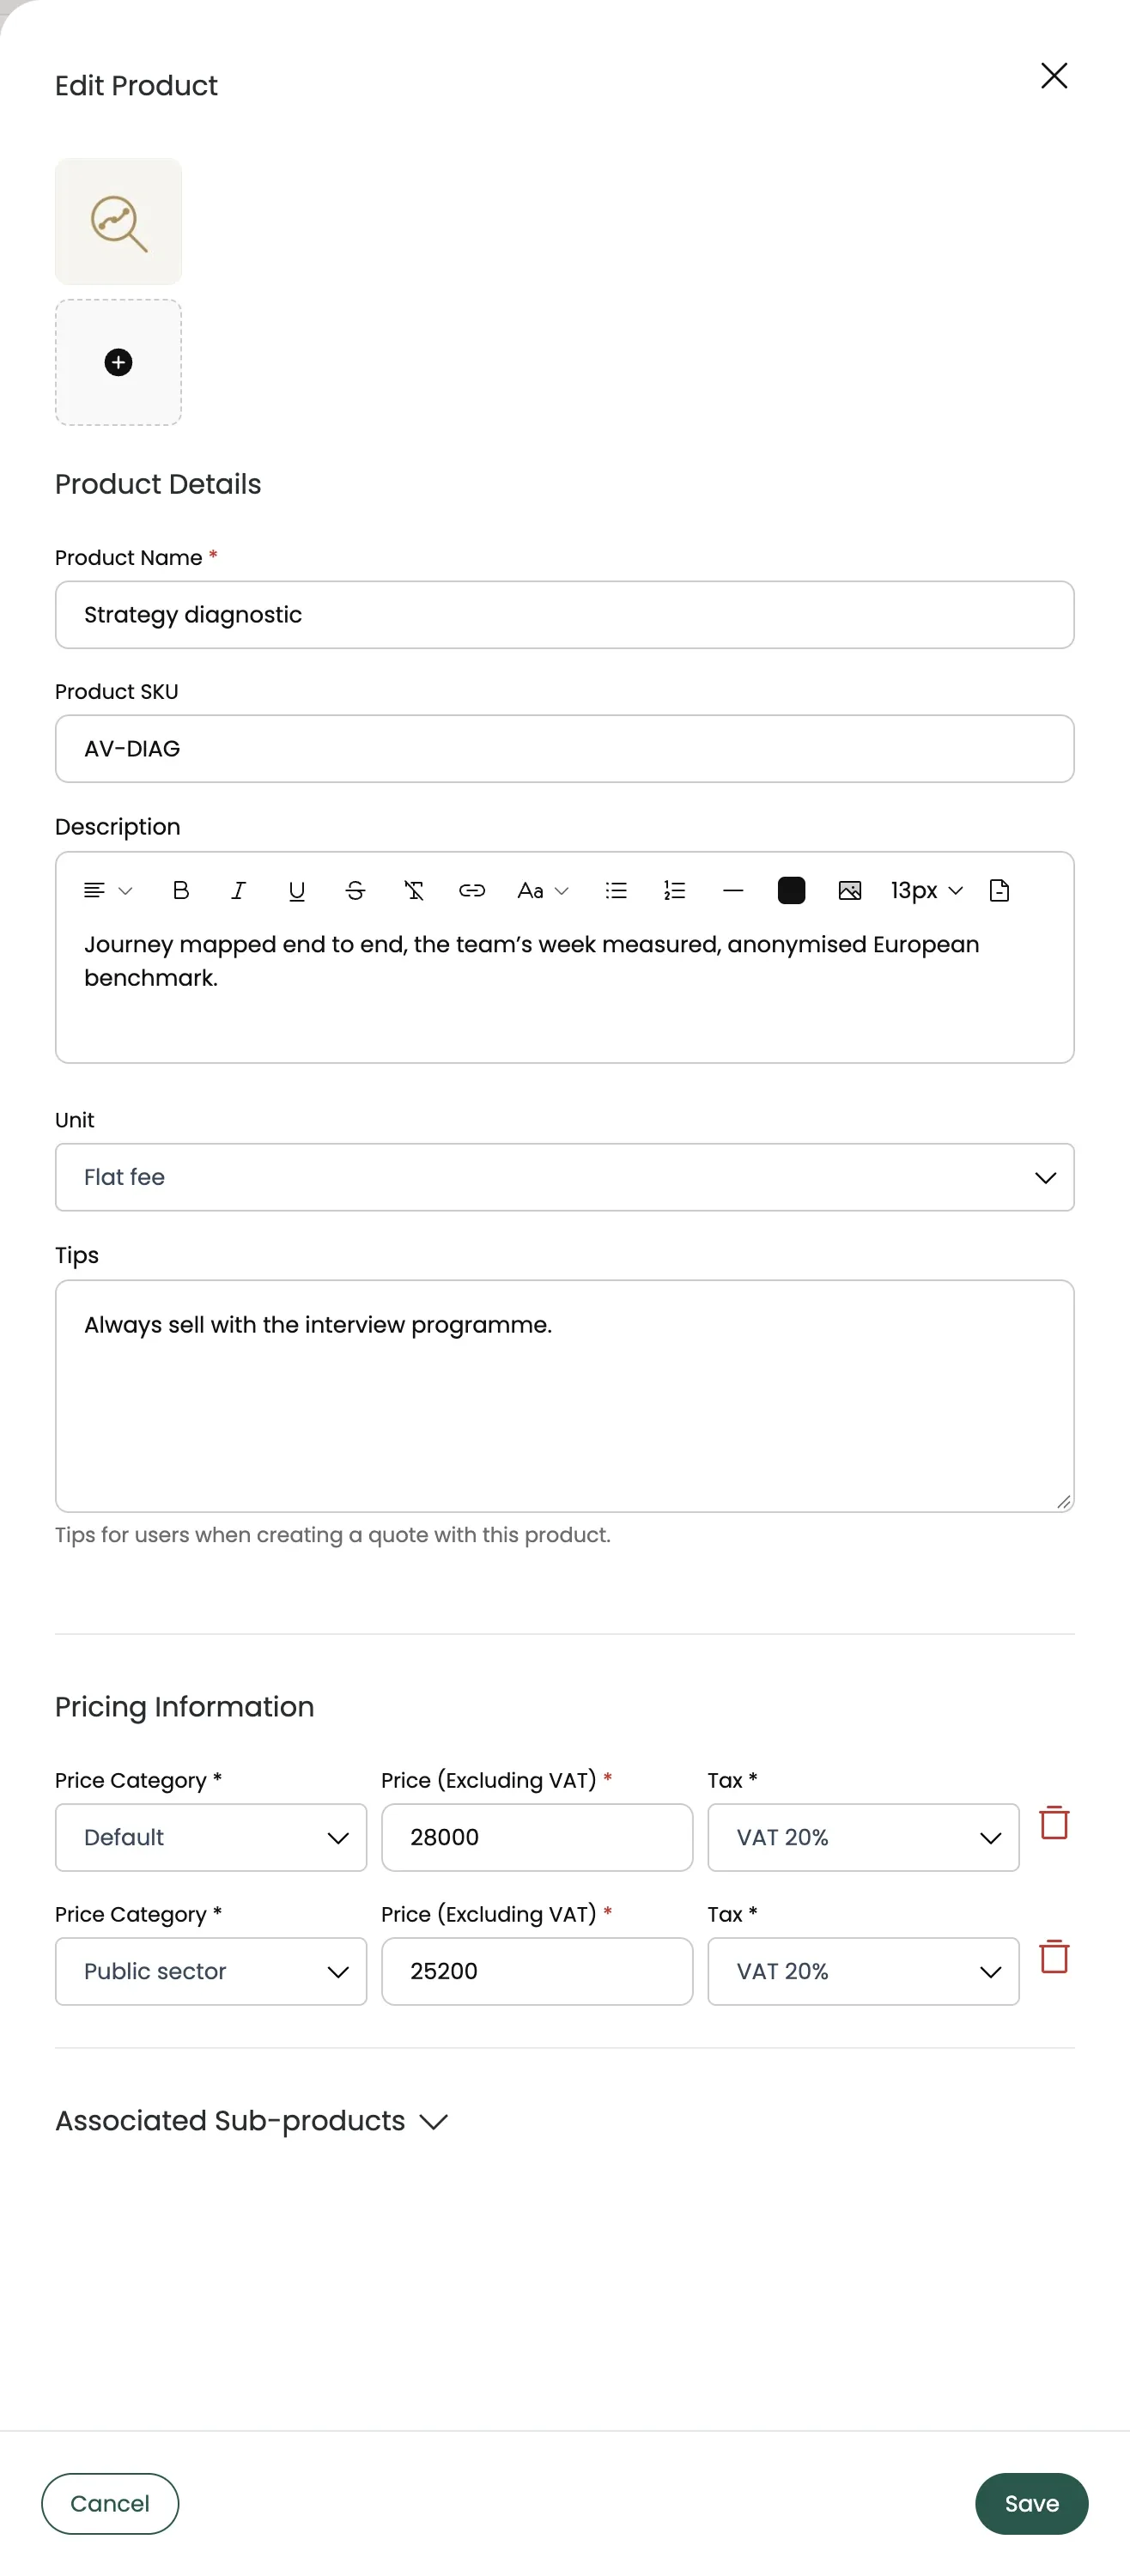
How to use it Add Product (or Edit) opens a panel:
- The product's images.
- Product Details: Product Name (required), Product SKU, formatted Description.
- Unit: the sales unit.
- Tips: a note for your salespeople, shown when they use the product in a quote (for example "always sell with the interview programme").
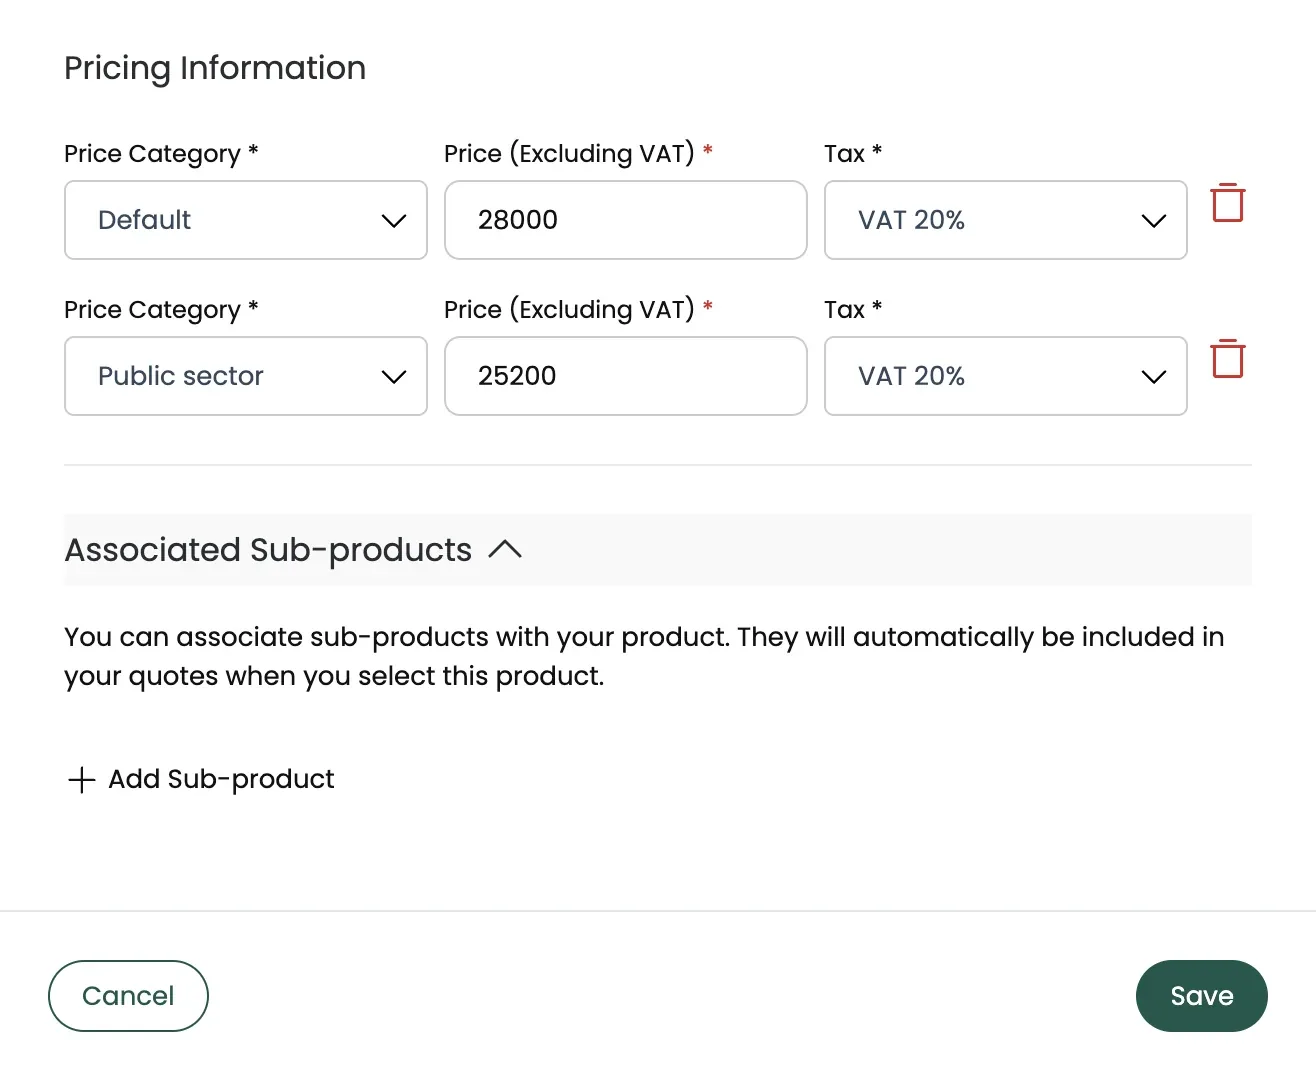
- Pricing Information: one price per price category, with its tax. Add Price adds a price for another category.
- Associated Sub-products: products added automatically along with this one.
Good to know If you close the panel with unsaved changes, you're asked to confirm.
Sub-products (bundles)
Example: the "Strategy diagnostic" product has "Interview programme" as a sub-product — when you add the diagnostic to a quote, the interview line is added too. In the product's details, click Add Sub-product, search for the product (3 characters minimum) and order the list by drag and drop.
How the catalog and quotes connect
A pricing line's search field searches this catalog, at the price of the deal's price category. Editing the quote line afterwards doesn't change the catalog — unless you click Update in catalog (see section 4).
10. Settings
Settings open from the user menu (Settings, at the bottom of the sidebar). They configure Duodeal for your whole team; depending on your role, some pages may not be visible to you. The settings menu has four groups: Account, User Management, Settings and Templates.
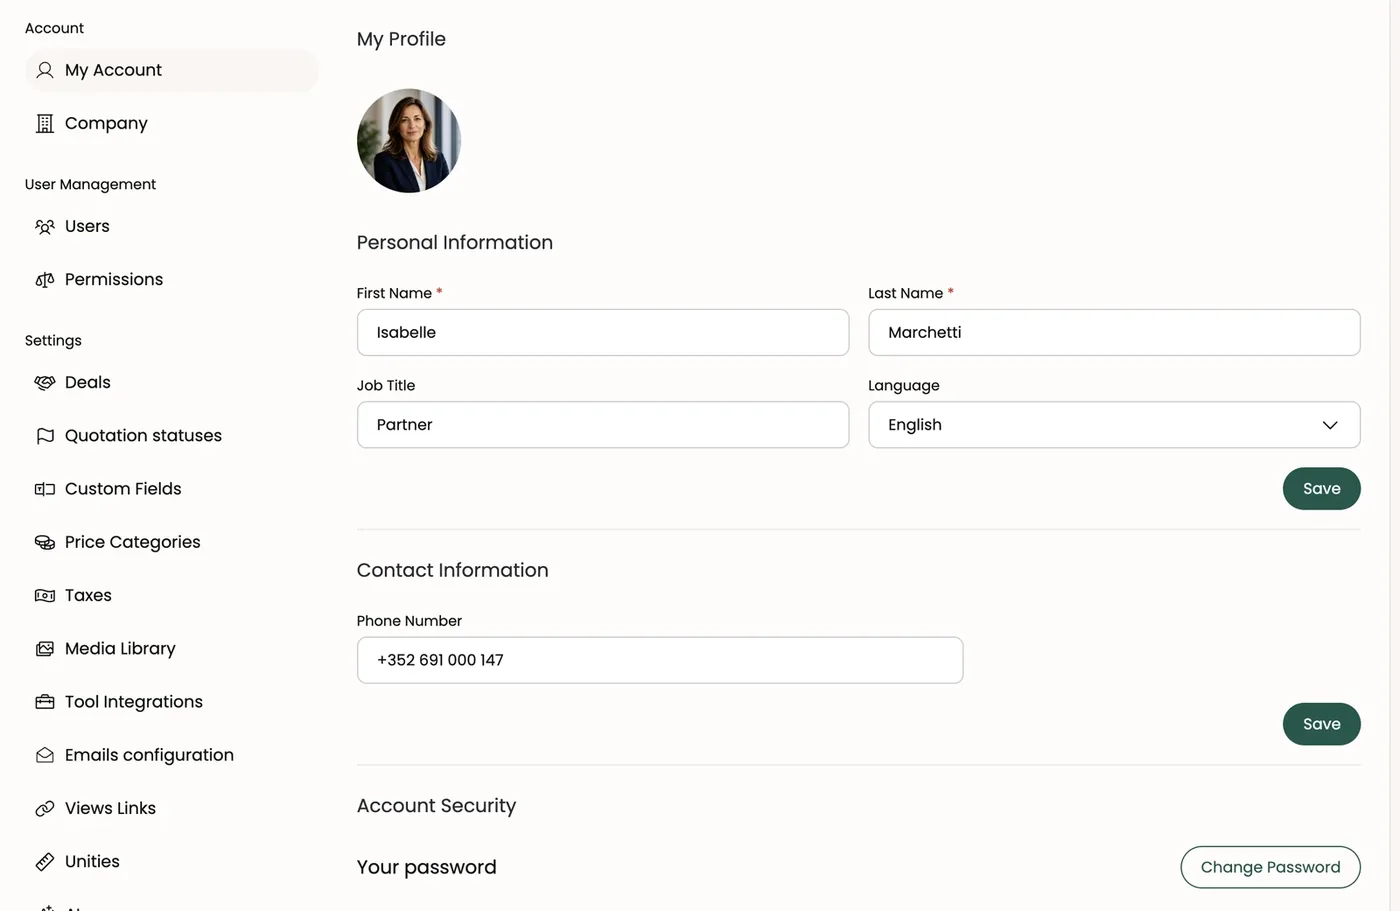
My Account
Your personal information: photo, first name, last name, job title, app language (English, French or Italian), phone, and password change.
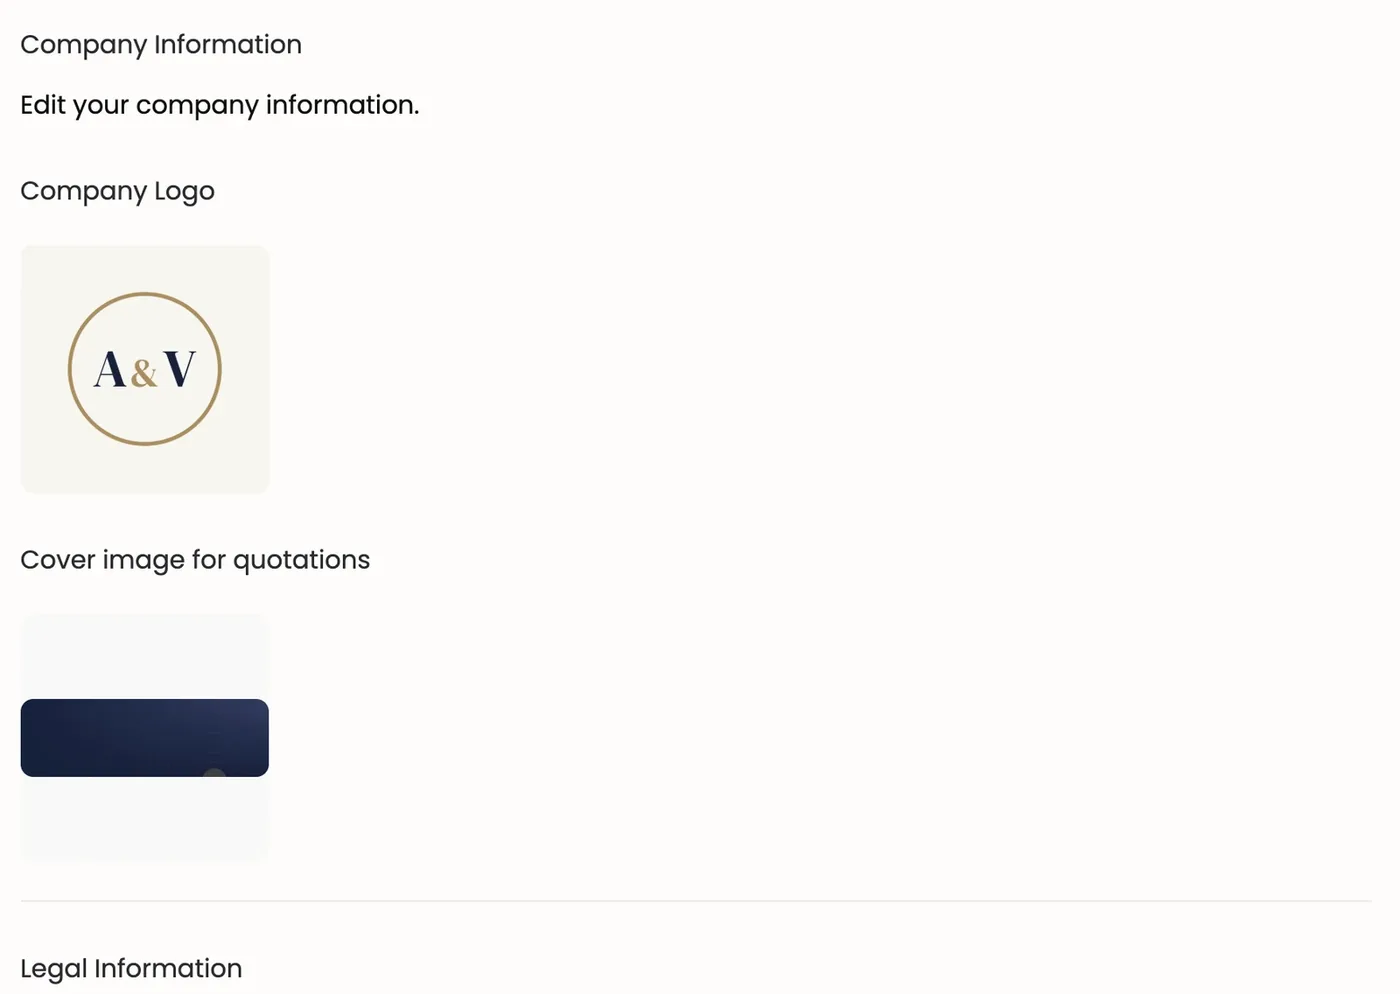
Company
Your company's identity, used on your quotes: logo, default cover image for quotes, country, company name, registration number, currency and its format.
Users
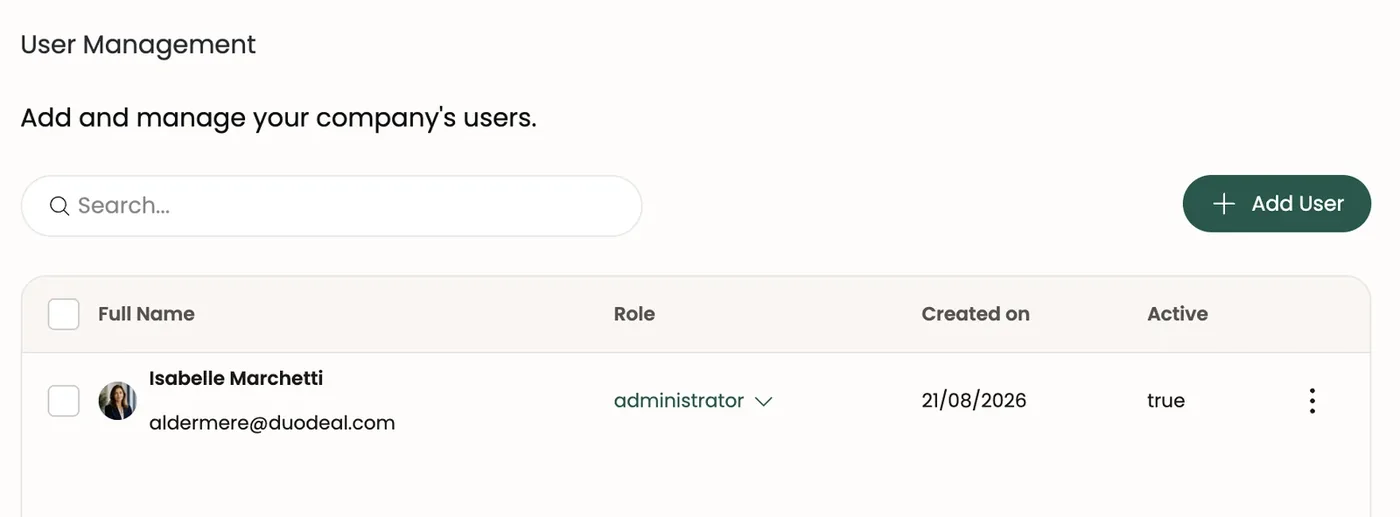
Your team members: invite a user (Add User), change their role, activate or deactivate them.
Permissions
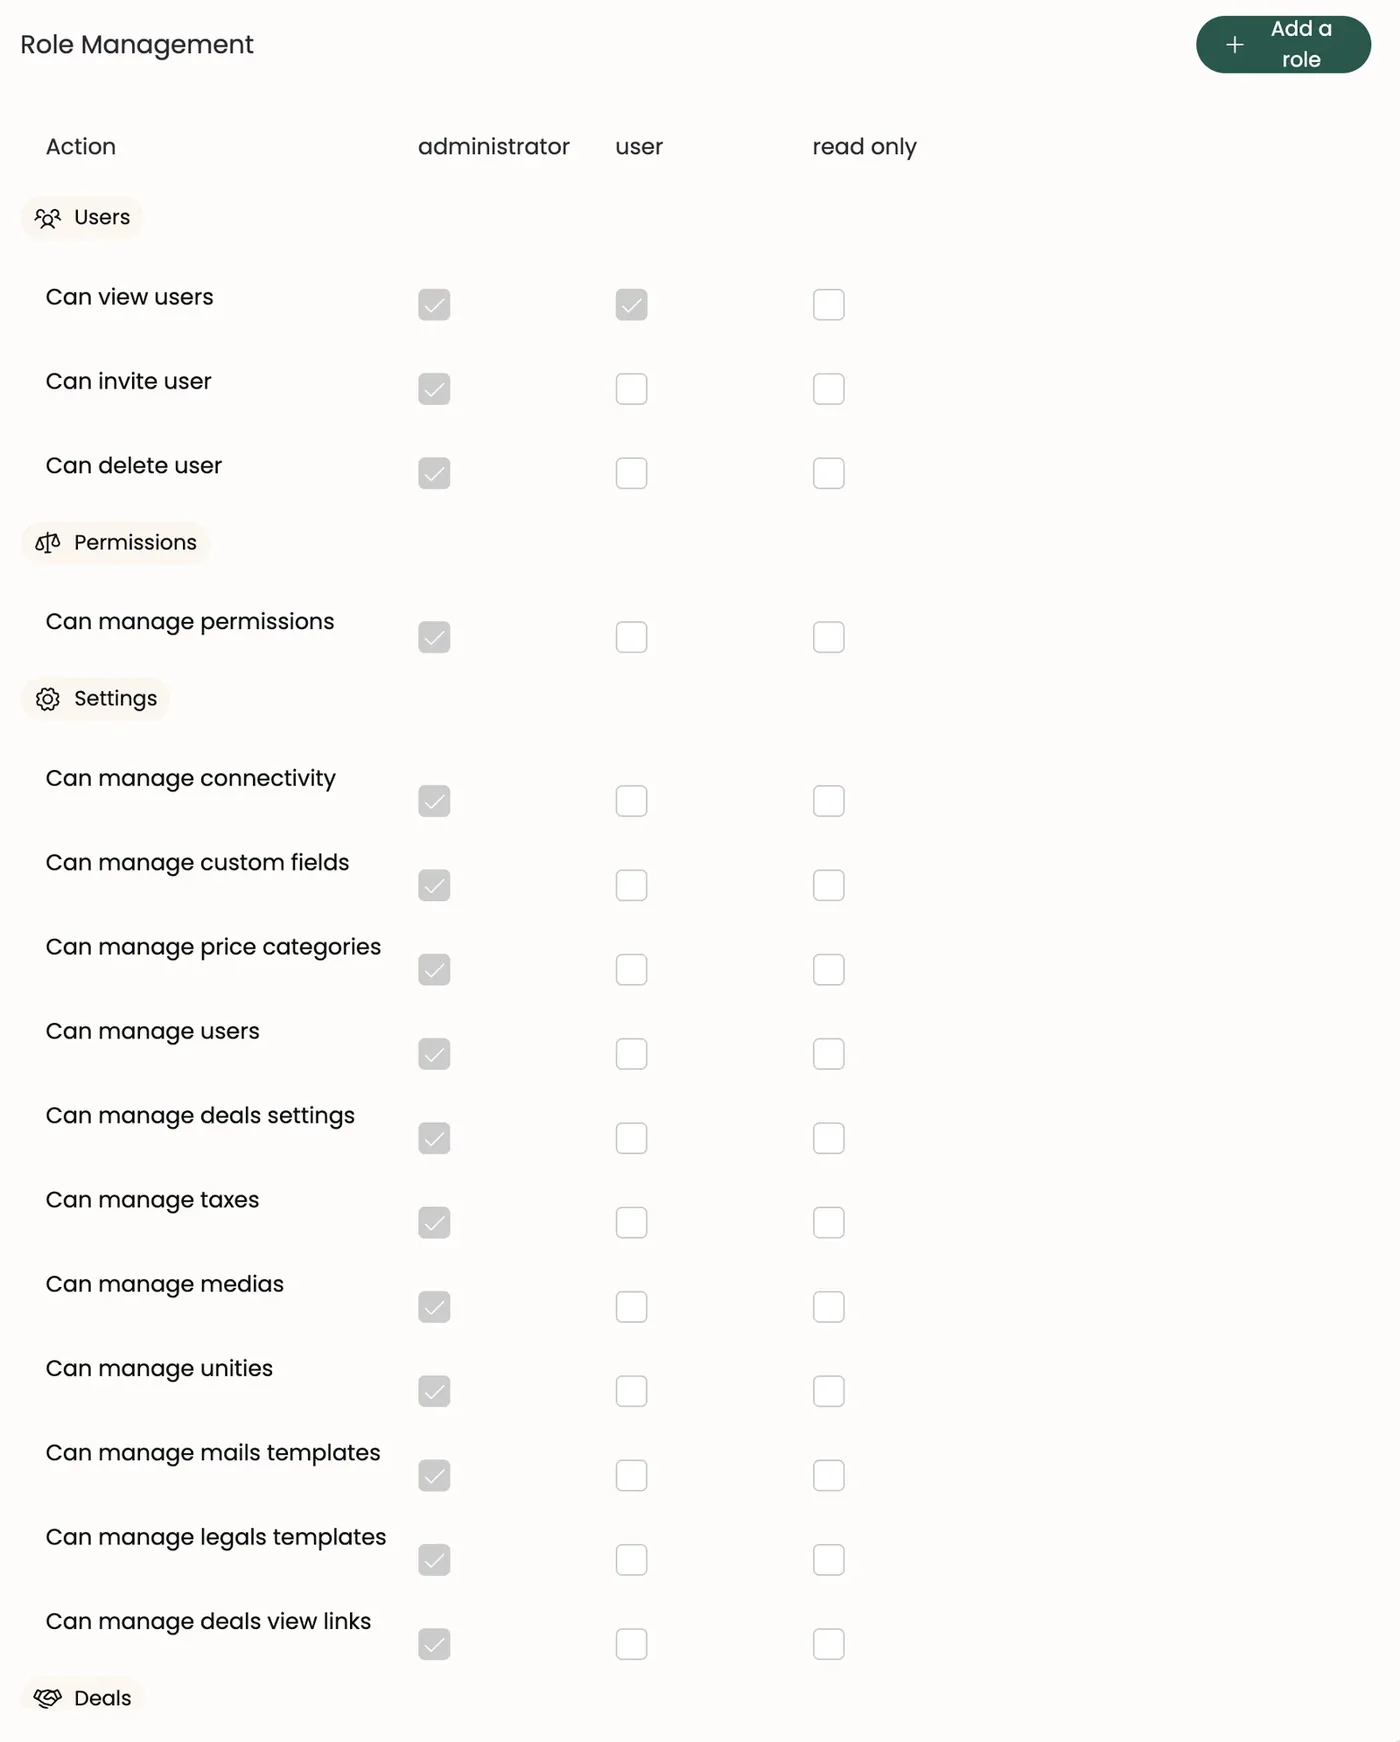
What each role is allowed to do: permissions in rows, roles in columns, one checkbox per combination. You can create your own roles; the three base roles (administrator, user, read only) can't be deleted.
Deals
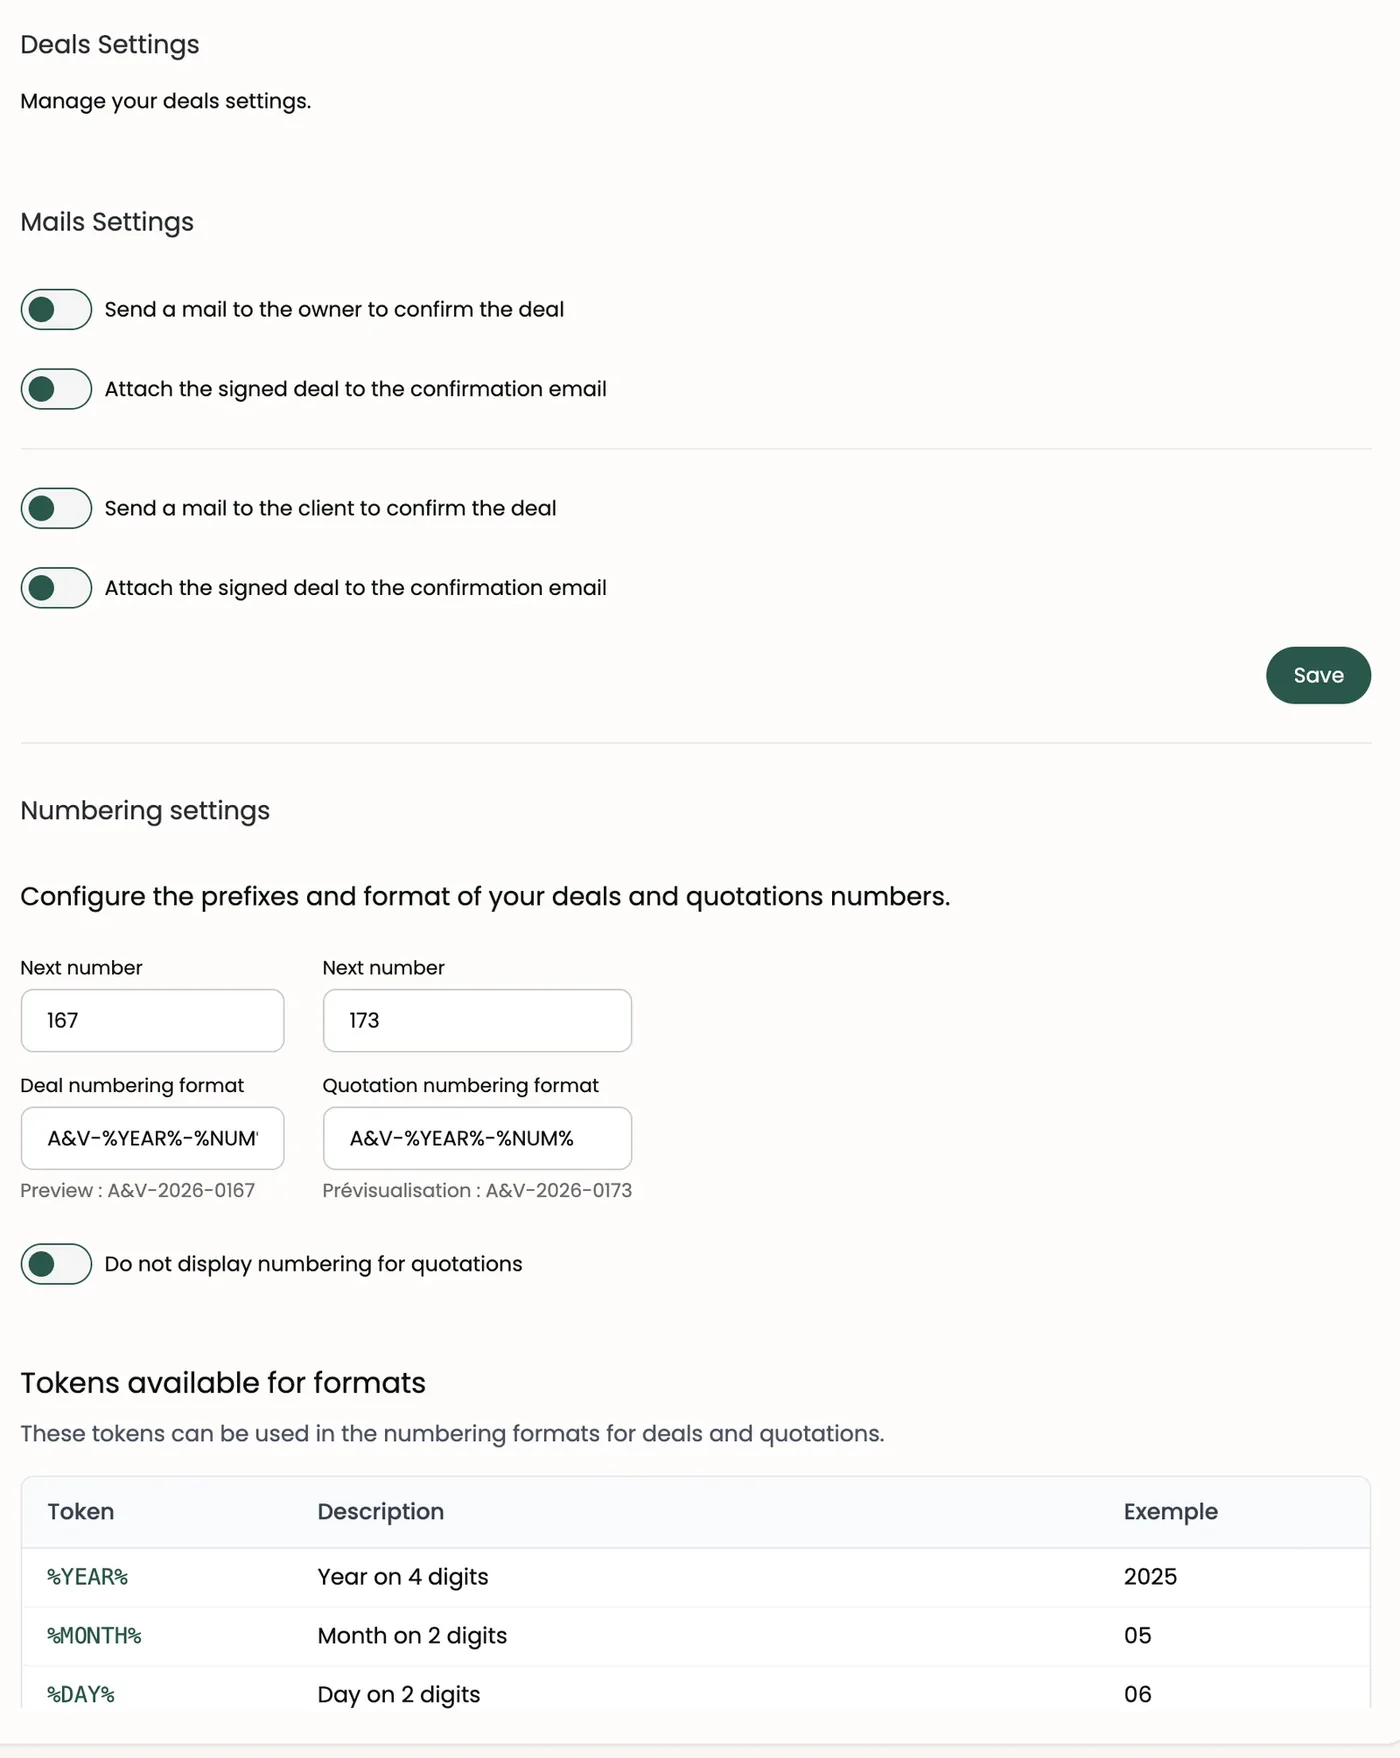
Three settings for all your deals:
- Mails Settings: send a confirmation email to the owner and/or the client on signature, with or without the signed PDF attached;
- Numbering settings: the format of deal and quote numbers (prefix, year, month, counter…), with a preview and the table of available tokens;
- Calendar View Settings: turn on the calendar view and choose the start and end fields (both are needed).
Quotation statuses
What it does Manage your quote statuses (for example add "Brochure sent"). The order you choose is the order used in the deal list, the filters and the editor.
How to use it
- New status: create a status, with its color.
- The ⠿ handle reorders by drag and drop.
- ⋮ menu: edit or delete — choosing which status the quotes using it switch to.
- Each status can carry an automatic action: Default (status of a new quote), On sending (applied when sent), On signing (applied on signature).
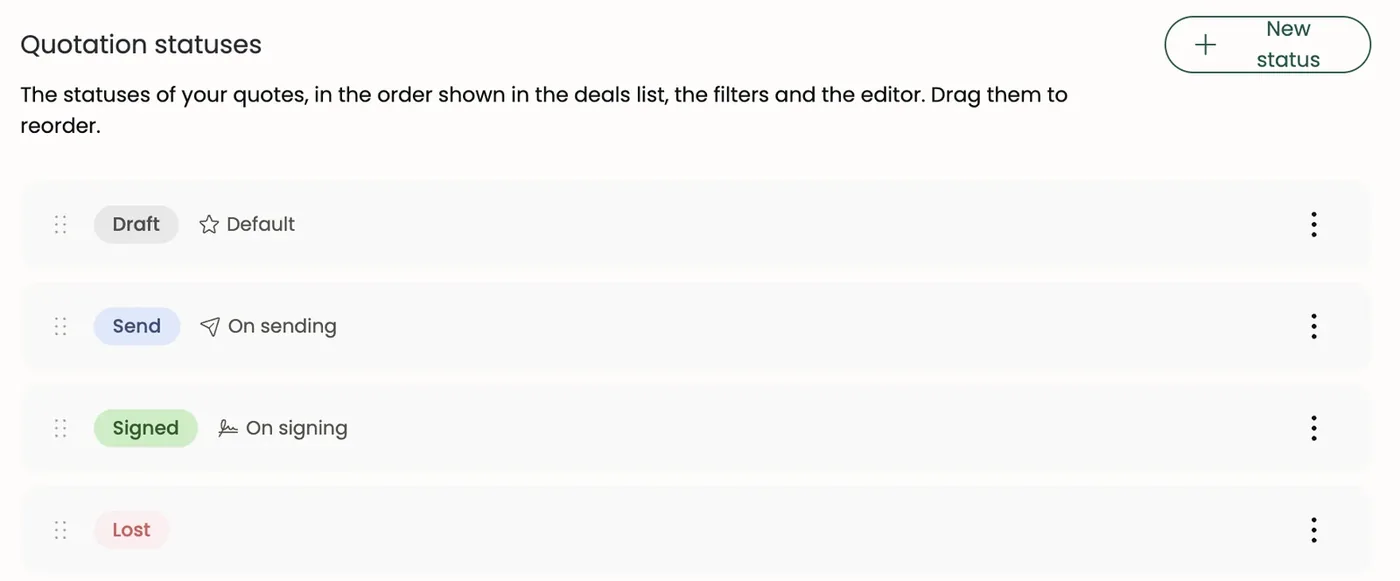
Good to know A status that carries an automatic action can't be deleted.
Custom Fields
What it does Add your own fields to quotes (Quotation), quote lines (Quotation line), contacts, companies or products.
How to use it Choose the tab, then Add a field: the type (text, number, date, date and time, choice list, multiple choice, image, rich text, formula…), the name and its translations, and whether it's required. Order by drag and drop.
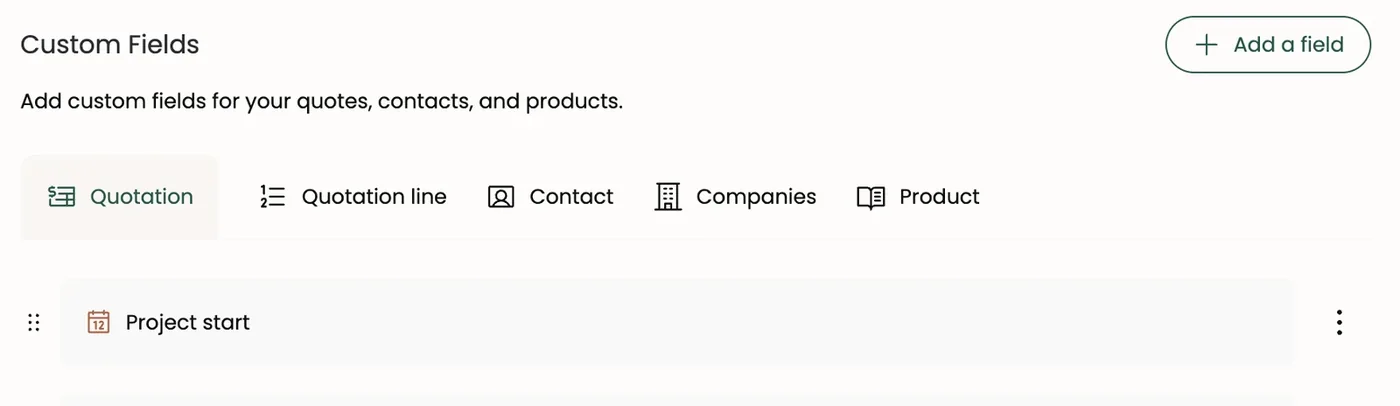
Good to know Fields show up everywhere: list columns and filters, forms, the Custom Fields block, pricing table columns, fields asked at signing, the calendar view. Formula fields calculate automatically, even when one formula uses another.
Price Categories
Several price lists (for example "Default" and "Public sector"). Each product has a price per category, and each deal applies a category.

Taxes
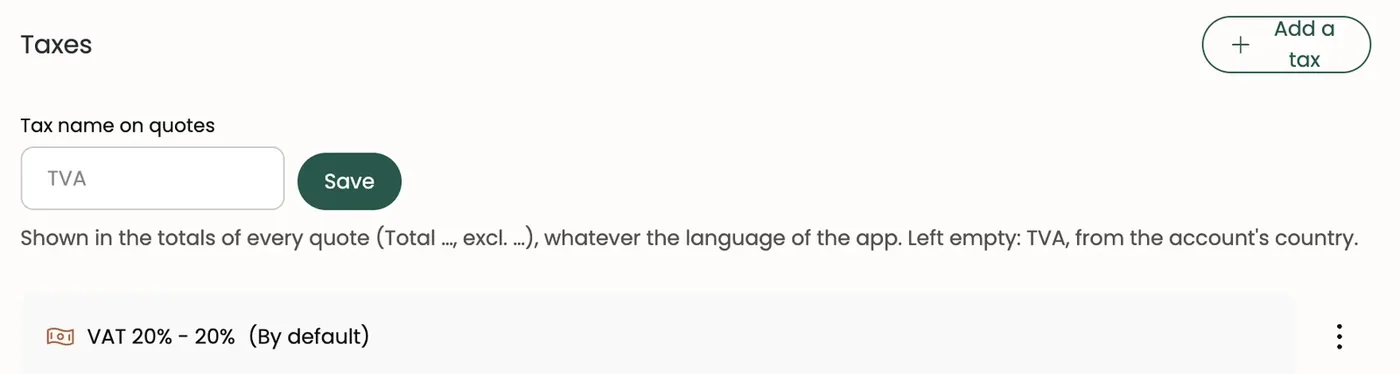
Your tax rates (name and percentage), including a default one that can't be deleted. The Tax name on quotes field chooses the word shown in quote totals ("VAT", "TVA", "GST"…); left empty, it's the word for your account's country.
Media Library
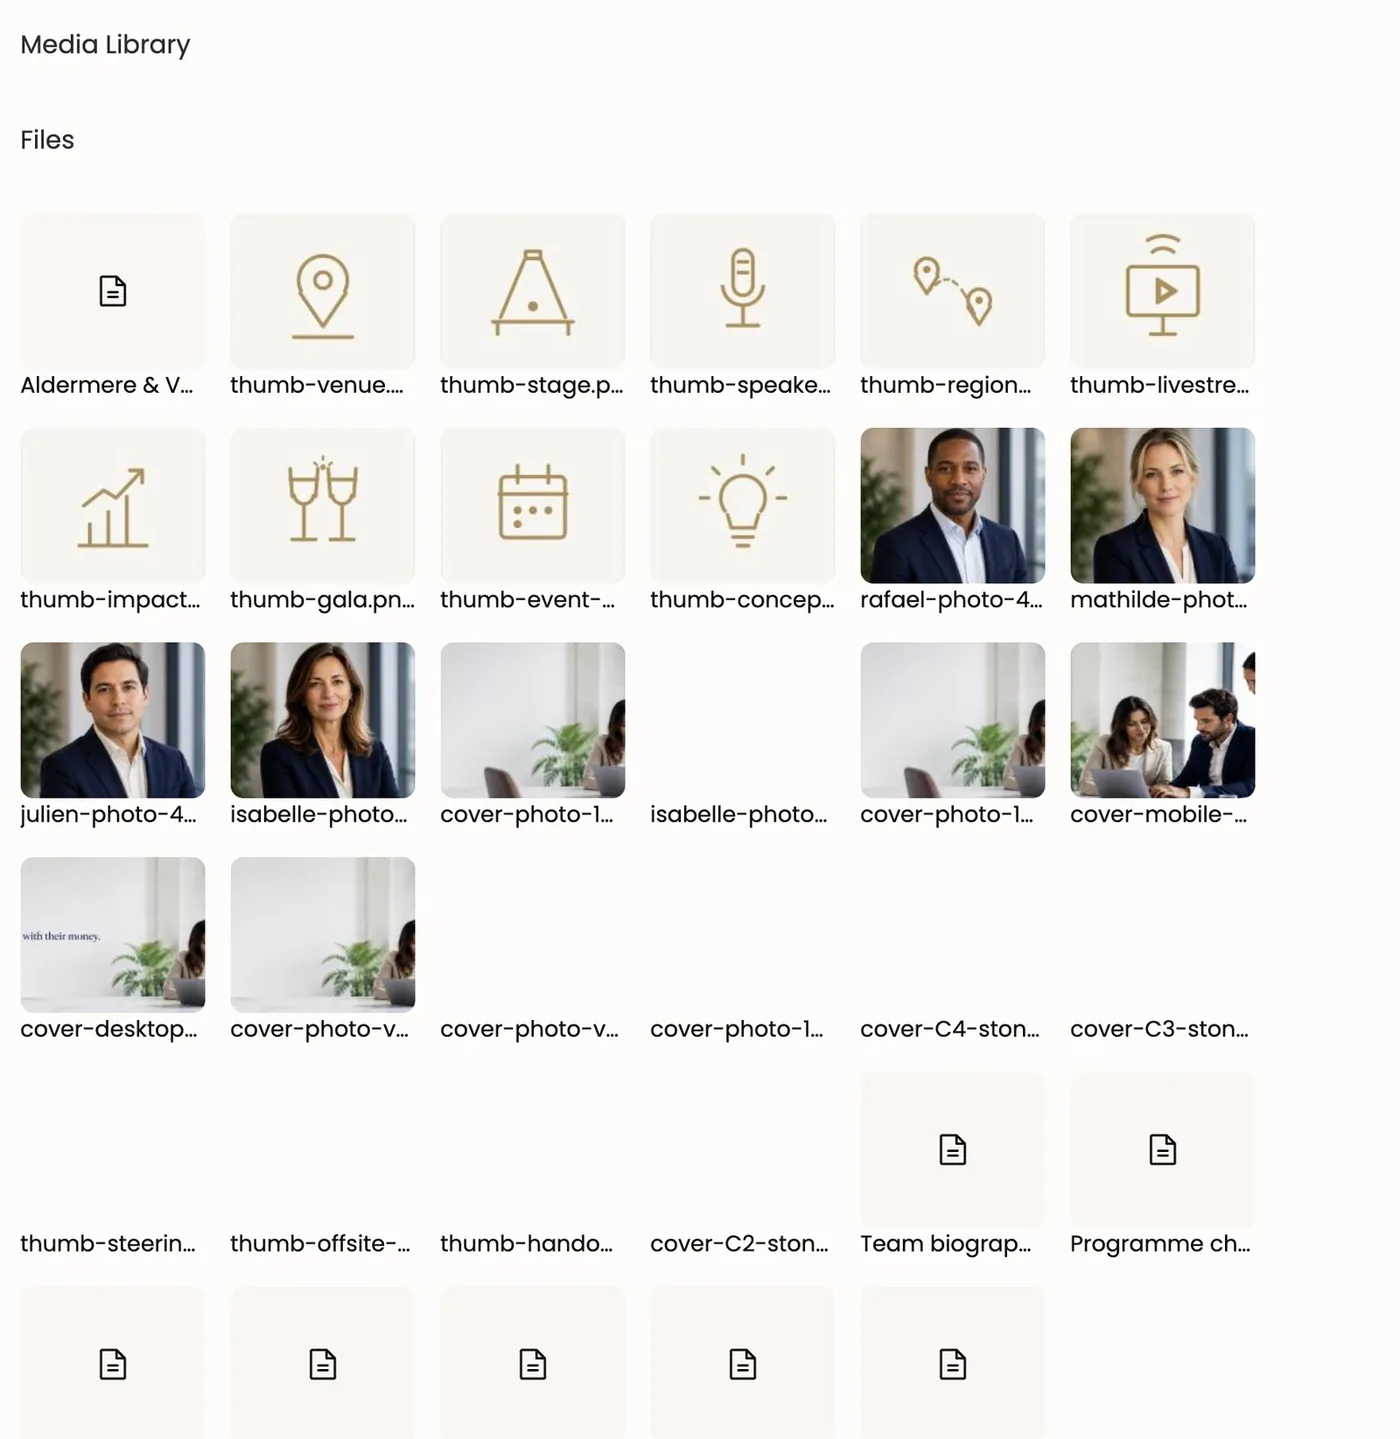
Images and files reusable in your proposals: photos, covers, PDFs… You can add files and delete several at once.
Tool Integrations
Connect Duodeal to your other tools:
- the API Token, the key that lets an external tool talk to Duodeal, with a link to the API documentation and a Refresh button to regenerate it;
- webhooks: notifications sent automatically to another tool when something happens in Duodeal (deal created, quote signed…).
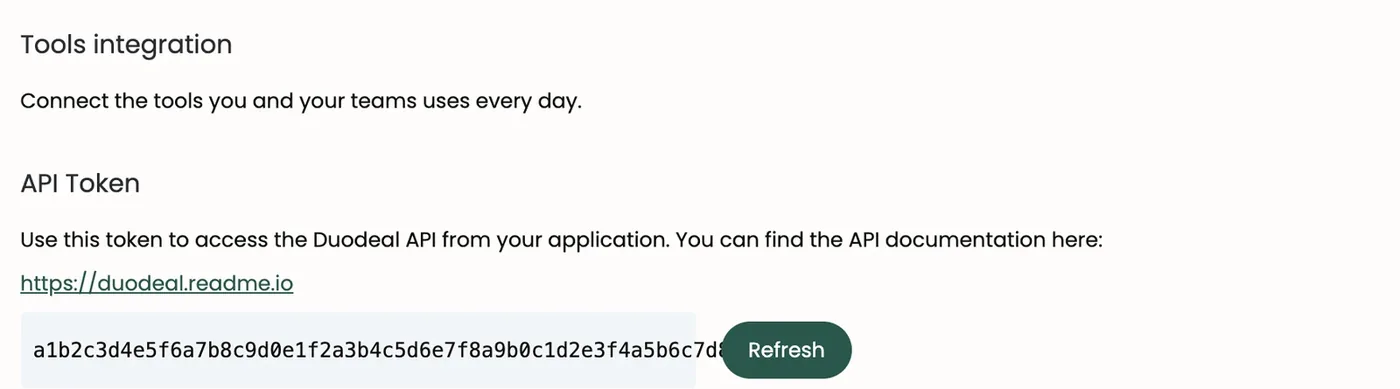
Good to know Regenerating the key invalidates the old one: connected tools must get the new one. Never share your key.
Emails configuration
How your emails to clients are sent, among four options: Send via Duodeal, Use my email application, Send with Gmail or Send with Outlook (one-click connection for the last two).
Views Links
The older public view templates ("Deal links"), which choose what to show or hide. They open the older version of the client page; for the current page, use share links (section 5).

Unities
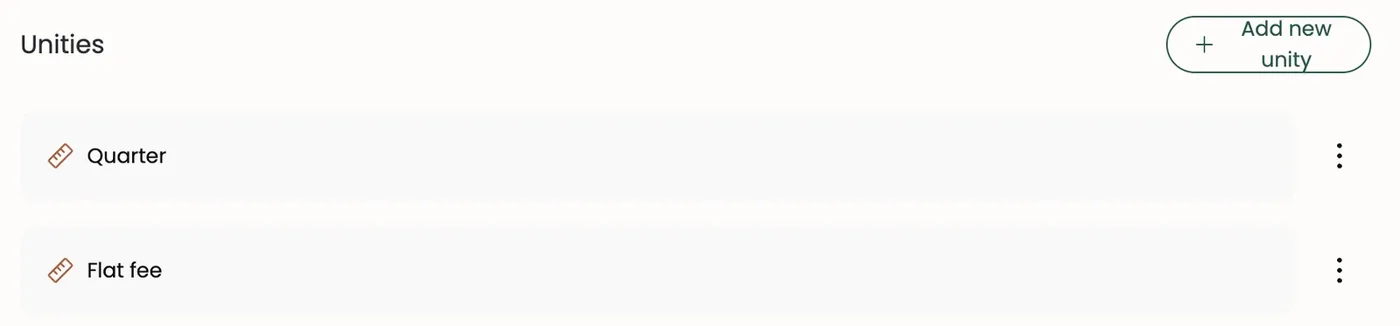
Your sales units (day, flat fee, quarter, unit…), with a default unit.
AI
What it does Teach the AI how your company works, through skills: procedures the AI only reads when the task matches (for example "How we build a consulting proposal"). They're used by Duodeal's AI assistant and by the AIs connected to your account (Claude via the Duodeal connector).
How to use it New skill, then:
- Name: the skill's name;
- When to use it: when to use it — this is all the AI reads before deciding to open it;
- Content: the procedure itself, in Markdown (steps, rules, products and prices to use, wording, what never to do).
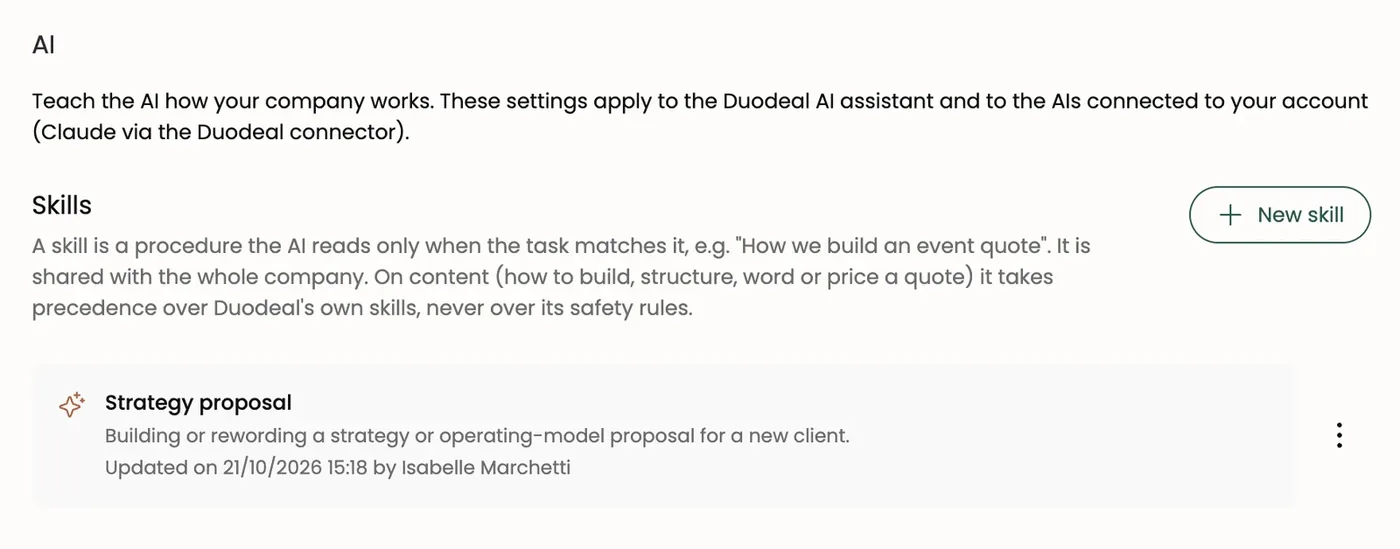
Good to know Skills are shared with the whole company: any user can create, edit or delete them.
Email Templates
Your standard emails for sending proposals, with variables replaced when sent (client name, deal link, salesperson name…). A template can be set as the default.

Legal mentions
Your reusable legal texts — Terms and Conditions of Sale or Legal notices — with a title, a type and the formatted text. They feed the Legal notices block of your proposals: write them once, find them in every quote.

Open questions
The following points are incomplete or unclear in the current product. They're flagged here rather than documented, pending clarification from the team.
-
Calendar view — end field: if only the start field is set in Settings → Deals, the calendar shows no deals. The setting should either require both fields or work with the start alone.
-
French text in the English interface: the calendar view ("Planning", "Semaine", "Aucun évènement à afficher"…), the filter connectors ("si", "et") and the recipients field of the "Send the deal" window ("Ajouter un email").
-
Analytics "Total deal score" banner: it doesn't appear until the score has been calculated, even when the deal list already shows a Hot Deal Score.
-
"No prices" link and card amounts: with Hide prices, amounts disappear from the table, but the proposal amount stays visible in the client page outline as long as Show the amount on quotation cards is on.
-
Contact type (individual / company): the distinction exists internally, but no setting lets you change it.
-
Empty deal name: nothing prevents creating a deal without a name.
-
"Sections" settings page: reachable only by direct address, missing from the menu; its purpose isn't established.
-
Client file uploads (HTML block): the announced limits (10 MB per file, 20 files per block, 50 MB per quote) couldn't be confirmed by a real test.
-
AI assistant — connection cut mid-answer: the announced recovery (the quote resyncs) couldn't be checked in real conditions.